DIABLO-16 Internal Functions
Note
The older format of the internal functions manual is included in Workshop4 installation and can be found under:
C:\Users\Public\Documents\4D Labs\4DUpdates\Manuals
You can also download this document below:
Introduction
The 4D Labs family of embedded graphics processors are powered by a highly optimised soft-core virtual engine, E.V.E. (Extensible Virtual Engine). EVE was designed and created by 4D Labs in the early 2000’s and should not be confused by FTDI’s solution of EVE, which was developed a decent decade or so later.
EVE is a proprietary, high performance virtual processor with an extensive byte-code instruction set optimised to execute compiled 4DGL programs. 4DGL (4D Graphics Language) was specifically developed from ground up for the EVE engine core. It is a high-level language which is easy to learn and simple to understand yet powerful enough to tackle many embedded graphics applications.
4DGL is a graphics-oriented language allowing rapid application development. An extensive library of graphics, text and file system functions and the ease of use of a language that combines the best elements and syntax structure of languages such as C, Basic, Pascal, etc. Programmers familiar with these languages will feel right at home with 4DGL. It includes many familiar instructions such as IF..ELSE..ENDIF, WHILE..WEND, REPEAT..UNTIL, GOSUB..ENDSUB, GOTO as well as a wealth of (chip-resident) internal functions that include SERIN, SEROUT, GFX_LINE, GFX_CIRCLE and many more.
This document covers the internal (chip-resident) functions available for the DIABLO-16 Processor. This document should be used in conjunction with the 4DGL Programmers Reference Manual.
Internal Functions Summary
DIABLO-16 Internal functions can be categorized based on usage as listed below:
- C Type Functions
- CRC Functions
- Display I/O Functions
- FAT16 File Functions
- Flash Memory Functions
- Floating Point Functions
- General Purpose Functions
- GPIO Functions
- Graphics Functions
- I2C Master Functions
- Image Control Functions
- Math Functions
- Media Functions
- Memory Allocation Functions
- Miscellaneous System Functions
- Serial (UART) Functions
- Sound Control Functions
- SPI Control Functions
- SPI Flash Functions
- String Class Functions
- System Memory Functions
- Text and String Functions
- Timer Functions
- Touch Screen Functions
- Widget Functions
C Type Functions
isdigit
Tests the character parameter and returns a 1 if the character is an ASCII digit else returns a 0. Valid range: "0123456789".
Syntax: isdigit(char);
| Arguments | Description |
|---|---|
| char | Specifies the ASCII character for the test. |
Return: 0 if character is not as ASCII digit, 1 if character is an ASCII digit.
Example
func main()
    var ch;
    var stat;
    gfx_Cls();
    txt_Set(FONT_ID, FONT2);
    print("Serial Input Test\n");
    print("Downloading prog to flash\n");
    print("Then use debbug terminal\n");

    to(COM0); print("serial input test:\n");

    // now just stay in a loop
    repeat                      // maybe replace

        ch := serin();
        if (ch != 1)
            print( [CHR] ch );  // if a key was received from PC,
                            // print its ascii value
            if (isdigit(ch)) print("Character is an ASCII digit");
            if (isxdigit(ch)) print("Character is ASCII Hexadecimal");
            if (isupper(ch)) print("Character is ASCII uppercase letter");
            if (islower(ch)) print("Character is ASCII uppercase letter");
            if (isalpha(ch)) print("Character is an ASCII uppercase or lowercase");
            if (isalnum(ch)) print("Character is an ASCII Alphanumeric");
            if (isprint(ch)) print("Character is a printable ASCII");
            if (isspace(ch)) print("Character is a space type character");
        endif
    forever                     // this as well

endfunc
isxdigit
Tests the character parameter and returns a 1 if the character is an ASCII hexadecimal digit else returns a 0. Valid range: "0123456789ABCDEF".
Syntax: isxdigit(char);
| Arguments | Description |
|---|---|
| char | Specifies the ASCII character for the test. |
Returns: 0 if character is not as ASCII hexadecimal digit, 1 if characted is an ASCII hexadecimal digit.
Example: Refer to isdigit Example
isupper
Tests the character parameter and returns a 1 if the character is an ASCII upper case letter else returns a 0. Valid range: "ABCDEF....WXYZ".
Syntax: isupper(char);
| Arguments | Description |
|---|---|
| char | Specifies the ASCII character for the test. |
Returns: 0 if character is not as ASCII upper case letter, 1 if characted is an ASCII upper case letter.
Example: Refer to isdigit Example
islower
Tests the character parameter and returns a 1 if the character is an ASCII lower case letter else returns a 0. Valid range: "abcd....wxyz".
Syntax: islower(char);
| Arguments | Description |
|---|---|
| char | Specifies the ASCII character for the test. |
Returns: 0 if character is not as ASCII lower case letter, 1 if characted is an ASCII lower case letter.
Example: Refer to isdigit Example
isalpha
Tests the character parameter and returns a 1 if the character is an ASCII lower or upper case letter else returns a 0. Valid range : "abcd....wxyz", “ABCD....WXYZ”
Syntax: isalpha(char);
| Arguments | Description |
|---|---|
| char | Specifies the ASCII character for the test. |
Returns: 0 if character is not as ASCII lower or upper case letter, 1 if characted is an ASCII lower or upper case letter.
Example: Refer to isdigit Example
isalnum
Tests the character parameter and returns a 1 if the character is an ASCII Alphanumeric else returns a 0. Valid range : "abcd....wxyz", “ABCD....WXYZ”, “0123456789”
Syntax: isalnum(char);
| Arguments | Description |
|---|---|
| char | Specifies the ASCII character for the test. |
Returns: 0 if character is not as ASCII Alphanumeric character, 1 if characted is an ASCII Alphanumeric character.
Example: Refer to isdigit Example
isprint
Tests the character parameter and returns a 1 if the character is a printable ASCII character else returns a 0. Valid range : 0x20... 0x7F
Syntax: isprint(char);
| Arguments | Description |
|---|---|
| char | Specifies the ASCII character for the test. |
Returns: 0 if character is not a printable ASCII character, 1 if characted is a printable ASCII character.
Example: Refer to isdigit Example
isspace
Tests the character parameter and returns a 1 if the character is any one of the space type character else returns a 0. Valid range : space, formfeed, newline, carriage return, tab, vertical tab.
Syntax: isspace(char);
| Arguments | Description |
|---|---|
| char | Specifies the ASCII character for the test. |
Returns: 0 if character is not a space type character, 1 if characted is a space type character.
Example: Refer to isdigit Example
toupper
Tests the character parameter and if the character is a lower cases letter, it returns the upper case equivalent else returns the passed char. Valid range: "abcd ... wxyz".
Syntax: toupper(char);
| Arguments | Description |
|---|---|
| char | Specifies the ASCII character for the test. |
Returns: The upper case equivalent else returns the passed char.
Example
func main()
    var ch, Upconvch, Loconvch, stat;
    gfx_Cls();
    txt_Set(FONT_ID, FONT2);
    print ("Serial Input Test\nDownload prog to flash\n");
    print ("Then use debug terminal\n");
    to(COM0); print("serial input test:\n");
    repeat  // now just stay in a loop
        ch := serin();
        if (ch != 1) // if a key was received from PC,
            print([CHR]ch); // print its ascii value
            if (isupper(ch))
                print("Uppercase ASCII found. Converting to lowercase");
                Loconvch := tolower(ch);
            endif
            if (islower(ch))
                print("Lowercase ASCII found. Converting to Uppercase");
                Upconvch := toupper(ch);
            endif
        endif
    forever
endfunc
tolower
Tests the character parameter and if the character is a lower case letter it returns the upper case equivalent else returns the passed char. Valid range: "ABCD ... WXYZ".
Syntax: toupper(char);
| Arguments | Description |
|---|---|
| char | Specifies the ASCII character for the test. |
Returns: The lower case equivalent if characters are upper case else returns the passed char.
Example
Refer to toupper Example
LObyte
Returns the lower byte (lower 8-bit) of a 16-bit variable.
Syntax: LObyte(var);
| Arguments | Description |
|---|---|
| var | User variable. |
Returns: The lower byte (lower 8-bit) of a 16-bit variable.
Example
HIbyte
Returns the upper byte (upper 8-bits) of a 16-bit variable.
Syntax: HIbyte(var);
| Arguments | Description |
|---|---|
| var | User variable. |
Returns: The upper byte (upper 8-bit) of a 16-bit variable.
Example
ByteSwap
Returns the swapped upper and lower bytes of a 16-bit variable.
Syntax: ByteSwap(var);
| Arguments | Description |
|---|---|
| var | User variable. |
Returns: Returns the endian swapped value of a 16-bit variable.
Example
NybleSwap
Returns the swapped lower bytes nybles, upper byte retained.
Syntax: NybleSwap(var);
| Arguments | Description |
|---|---|
| var | User variable. |
Returns: Returns the 16-bit variable with swapped lower nybles.
Example
CRC Functions
The CRC functions are mainly designed for serial communications, but are implemented in such a way that they can be used to other things as well. The com_TXblock and com_RXblock commands can be used to assist with reading and writing comm ports, generating and checking CRCs with the minimum of user data manipulation.
crc_16
Calculates the Checksum CRC using the ‘standard’ 16-bit CRC algorithm. For the standard test string "123456789", crc_16 will return 0xBB3D. Note if you calculate all of the incoming data INCLUDING the CRC, the result should be 0x00
Syntax: crc_16(buf, count);
| Argument | Description |
|---|---|
| buf | Source memory buffer. This is a string pointer. |
| count | Number of bytes to be used to generate the CRC. |
Returns: The generated 16-bit CRC.
Example
crc_CCITT
Calculates the Checksum CRC as a ‘standard’ CRCITT checksum. For the standard test string "123456789", crc_CCITT with seed = 0 (XMODEM protocol) will return = 0x31C3, for seed = 0xFFFF, the result will be 0x29B1 and for seed = 0x1D0F, the result is 0xE5CC.
Syntax: crc_CCITT(buf, count, seed);
| Argument | Description |
|---|---|
| buf | Source memory buffer. This is a string pointer. |
| count | Number of bytes to be used to generate the CRC. |
| seed | The seed for the CRC generation. |
Returns: The generated CCITT CRC.
Example
crc_CSUM_8
Calculates the Checksum CRC as an 8-bit number. This is equivalent to simple addition of all bytes and returning the negated sum an 8-bit value.
For the standard test string "123456789", crc_CSUM_8 will return 0x0023. Note if you calculate all of the incoming data INCLUDING the CRC, the result should be 0x00
Syntax: crc_CSUM_8(buf, count);
| Argument | Description |
|---|---|
| buf | Source memory buffer. This is a string pointer. |
| count | Number of bytes to be used to generate the CRC. |
Returns: The generated 8-bit checksum CRC.
Example
crc_MODBUS
Calculates the Checksum CRC as per the MODBUS standard.
For the standard test string "123456789", crc_MODBUS will return 0x4B37. Note if you calculate all of the incoming data INCLUDING the CRC, the result should be 0x00
Syntax: crc_MODBUS(buf, count);
| Argument | Description |
|---|---|
| buf | Source memory buffer. This is a string pointer. |
| count | Number of bytes to be used to generate the CRC. |
Returns: The generated MODBUS CRC.
Example
Display I/O Functions
These functions allow direct display access for fast blitting operations.
disp_SetReg
Sets the Display driver IC register.
Syntax: disp_SetReg(register, data);
| Arguments | Description |
|---|---|
| register | Refer to the display driver datasheet |
| data | Refer to the display driver datasheet |
Returns: None
disp_setGRAM
Prepares the GRAM area for user access. The lower 16bits of the pixel count in the selected area is returned. This is usually all that is needed unless GRAM area exceeds 256^2. A copy of the 32bit value can be found in GRAM_PIXEL_COUNT_LO and GRAM_PIXEL_COUNT_HI.
Syntax: disp_setGRAM(x1, y1, x2, y2);
| Arguments | Description |
|---|---|
| x1, y1 | Top left of the GRAM window. |
| x2, y2 | Bottom right of the GRAM window. |
Returns: The LO word of the 32-bit pixel count is returned.
Example
disp_WrGRAM
Data can be written to the GRAM consecutively using this function once the GRAM access window has been setup.
Syntax: disp_WrGRAM(colour);
| Arguments | Description |
|---|---|
| colour | Pixel color to be populated. |
Returns: None
Example
disp_WriteControl
Sends a 16-bit value to the display bus. Refer to individual data sheets for the display for more information. This function is used to extend the capabilities of the user code to gain access to the display hardware.
Syntax: disp_WriteControl(value);
| Arguments | Description |
|---|---|
| value | Specifies the 16-bit value to be written to the display control register. |
Returns: None
Example
disp_WriteWord
Sends a 16-bit value to the display bus. Refer to individual data sheets for the display for more information. This function is used to extend the capabilities of the user code to gain access to the the display hardware.
Syntax: disp_WriteWord(value);
| Arguments | Description |
|---|---|
| value | Specifies the value to be written to the display data register. |
Returns: None
Example
disp_ReadWord
Read a word from the display.
Syntax: disp_ReadWord();
Returns: 16-bit value in the register.
Example
disp_Disconnect
This function disconnects the display driver pins and/or reconfigures it to achieve its lowest possible power consumption. Use after disabling peripheral power to ensure the minimal power usage by the display.
Syntax: disp_Disconnect();
Returns: None
Note
disp_Init() should be used to reinitialise the display.
disp_Init
This function is used to initialise the display. This is useful in a number of situations, however mainly for the uLCD-xx-PTU modules which have the ability to disable the power supply to the display for low power sleep modes. This function is required to re-initialise the display once power to the display has been restored, so the display is usable once again. New in v0.7 PmmC
Syntax: disp_Init();
Returns: None
disp_BlipPixelsFromCOMn
This function writes the number of pixels defined by the last disp_setGRAM() call to the display from the specified com port. The function returns once all pixels have been written.
New in v1.1 PmmC
Syntax: disp_BlitPixelsFromCOM0(); or disp_BlitPixelsFromCOM1(); or disp_BlitPixelsFromCOM2(); or disp_BlitPixelsFromCOM3();
Return: None
FAT16 File Functions
file_Error
Returns the most recent error code or 0 if there were no errors.
File Error Codes
| Error Code | Value | Description |
|---|---|---|
| FE_OK | 0 | IDE function succesded |
| FE_IDE_ERROR | 1 | IDE command execution error |
| FE_NOT_PRESENT | 2 | CARD not present |
| FE_INVALID_MBR | 4 | MBR sector invalid signature |
| FE_PARTITION_TYPE | 3 | WRONG partition type, not FAT16 |
| FE_INVALID_BR | 5 | Boot Record invalid signature |
| FE_DISK_NOT_MNTD | 6 | Media not mounted |
| FE_FILE_NOT_FOUND | 7 | File not found in open for read |
| FE_INVALID_FILE | 8 | File not open |
| FE_FAT_EOF | 9 | Fat attempt to read beyond EOF |
| FE_EOF | 10 | Reached the end of file |
| FE_INVALID_CLUSTER | 11 | Invalid cluster value > maxcls |
| FE_DIR_FULL | 12 | All root dir entry are taken |
| FE_DISK_FULL | 13 | All clusters in the partition are taken |
| FE_FILE_OVERWRITE | 14 | A file with same name exist already |
| FE_CANNOT_INIT | 15 | Cannot init the CARD |
| FE_CANNOT_READ_MBR | 16 | Cannot read the MBR |
| FE_MALLOC_FAILED | 17 | Malloc could not allocate the FILE struct |
| FE_INVALID_MODE | 18 | Mode was not r.w. |
| FE_FIND_ERROR | 19 | Failure during FILE search |
| FE_INVALID_FNAME | 20 | Invalid Filename |
| FE_INVALID_MEDIA | 21 | bad media |
| FE_SECTOR_READ_FAIL | 22 | Sector Read fail |
| FE_SECTOR_WRITE_FAIL | 23 | Sector Write fail |
Syntax: file_Error();
Returns: Error Code
Example
file_Count
Returns number of files found that match the criteria. The wild card character '*'matches up with any combination of allowable characters and '?' matches up with any single allowable character. Filename must be 8.3 format. Long Filenames are not supported. TESTPR~1.4XE for example.
Syntax: file_Count(filename);
| Arguments | Description |
|---|---|
| filename | Name of the file(s) for the search (passed as a string). 8.3 Format |
Returns: Number of files that match the criteria.
Example
file_Dir
Streams a string of file names that agree with the search key. Returns number of files found that match the criteria. The wild card character '*' matches up with any combination of allowable characters and '?' matches up with any single allowable character. Filename must be 8.3 format. Long Filenames are not supported. TESTPR~1.4XE for example.
Syntax: file_Dir(filename);
| Arguments | Description |
|---|---|
| filename | Name of the file(s) for the search (passed as a string). 8.3 Format |
Returns: Number of files that match the criteria.
Example
file_FindFirst
Returns true if at least 1 file exists that satisfies the file argument. Wildcards are usually used so if file_FindFirst returns true, further tests can be made using file_FindNext(); to find all the files that match the wildcard class. Note that the stream behaviour is the same as file_Dir. Filename must be 8.3 format. Long Filenames are not supported. TESTPR~1.4XE for example.
Syntax: file_FindFirst(fname);
| Arguments | Description |
|---|---|
| fname | Name of the file(s) for the search (passed as a string). 8.3 Format |
Return: 1 If at least one file exists that satisfies the criteria. 0 If no file satisfies the criteria.
Example
file_FindNext
Returns true if more file exists that satisfies the file argument that was given for file_FindFirst. Wildcards must be used for file_FindFirst, else this function will always return zero as the only occurrence will have already been found. Note that the stream behaviour is the same as file_Dir.
Syntax: file_FindNext();
Returns: 1 if more files exist that satisfy the criteria set in the file_FindFirst(fname). 0 if no more files satisfy the criteria set in the file_FindFirst(fname)
Example
file_Exists
Tests for the existence of the file provided with the search key. Returns TRUE if found. fname must be 8.3 format, and therefore in capital letters. TESTPR~1.4XE for example.
Syntax: file_Exists(fname);
| Arguments | Description |
|---|---|
| fname | Name of the file(s) for the search (passed as a string). 8.3 Format |
Return: 1 if File found. 0 if File not found.
Example
file_Close
Returns TRUE if file closed, FALSE if not.
Syntax: file_Close();
| Arguments | Description |
|---|---|
| fname | the file handle that was created by file_Open("fname") which is now used as reference (handle) for "fname" for further file functions such as in this function to close the file. |
Returns: True (1) if file closed, False (0) otherwise.
Example
file_Open
Returns handle if file exists. The file "handle" that is created is now used as reference for "filename" for further file functions such as file_Close(handle), etc. For FILE_WRITE and FILE_APPEND modes ('w' and 'a') the file is created if it does not exist.
If the file is opened for append and it already exists, the file pointer is set to the end of the file ready for appending, else the file pointer will be set to the start of the newly created file.
If the file was opened successfully, the internal error number is set to 0 (i.e. no errors) and can be read with the file_Error() function.
For FILE_READ mode ('r') the file must exist else a null handle (0) is returned and the 'file not found' error number is set which can be read with the file_Error() function.
Syntax: file_Open(fname, mode);
| Arguments | Description |
|---|---|
| fname | Name of the file(s) for the search (passed as a string). 8.3 Format |
| mode | FILE_READ ('r'), FILE_WRITE ('w') or FILE_APPEND ('a') |
Returns: Handle if file exists. Sets internal file error number accordingly (0 if no errors).
Example
Note
- If a file is opened for write mode 'w', and the file already exists, the operation will fail. Unlike C and some other languages where the file will be erased ready for re-writing when opened for writing, 4DGL offers a simple level of protection that ensures that a file must be purposely erased before being re-written.
- Beginning with the v4.0 PmmC a file opened with FILE_APPEND may be randomly read and or written. Also any altered file will have the Archive bit set in the directory entry.
file_Read
Reads the number of bytes specified by size from the file referenced by handle into a destination memory buffer. Destination is always a word pointer, as you can only read into RAM which is word addressable. If destination is zero, data is read direct to GRAM window.
Syntax: file_Read(*destination, size, hanlde);
| Arguments | Description |
|---|---|
| destination | Destination memory buffer. Word Pointer. |
| size | Number of bytes to be read |
| handle | The handle that references the file to be read. |
Returns: Number of characters read.
Example
file_Seek
Places the file pointer at the required position in a file that has been opened in 'r' (read) or 'a' (append) mode. In append mode, file_Seek does not expand a filesize, instead, the file pointer (handle) is set to the end position of the file, e.g.:- assuming the file size is 10000 bytes, file_Seek(handle, 0, 0x1234); will set the file position to 0x00001234 (byte position 4660) for the file handle, so subsequent data may be read from that position onwards with file_GetC(...), file_GetW(...), file_GetS(...), or an image can be displayed with file_Image(...). Conversely, file_PutC(...), file_PutW(...) and file_PutS(...) can write to the file at the position. A FE_EOF (end of file error) will occur if you try to write or read past the end of the file.
Syntax: file_Seek(handle, HiWord, LoWord);
| Arguments | Description |
|---|---|
| handle | The handle that references the file |
| HiWord | Contains the upper 16bits of the memory pointer into the file |
| LoWord | Contains the lower 16bits of the memory pointer into the file |
Returns: TRUE if ok, usually ignored.
Example
file_Index
Places the file pointer at the position in a file that has been opened in 'r' (read) or 'a' (append) mode. In append mode, file_Index does not expand a filesize, instead, the file pointer (handle) is set to the end position of the file, e.g.:- assuming the record size is 100 bytes, file_Index(handle, 0, 100, 22); will set the file position to 2200 for the file handle, so subsequent data may be read from that position onwards with file_GetC(...), file_GetW(...), file_GetS(...), or an image can be displayed with file_Image(...). Conversely, file_PutC(...), file_PutW(...) and file_PutS(...) can write to the file at the position. A FE_EOF (end of file error) will occur if you try to write or read past the end of the file.
Syntax: file_Index(handle, Hisize, LoSize, recordnum);
| Arguments | Description |
|---|---|
| handle | The handle that references the file. |
| Hisize | Contains the upper 16bits of the size of the file records. |
| LoSize | Contains the lower 16bits of the size of the file records. |
| recordnum | The index of the required record. |
Returns: TRUE if ok, usually ignored.
Example:
file_Tell
Reads the 32-bit file pointer and stores it into 2 variables, HiWord and LoWord
Syntax: file_Tell(handle, &HiWord, &LoWord);
| Arguments | Description |
|---|---|
| handle | The handle that references the file. |
| HiWord | Contains the upper 16bits of the memory pointer into the file. |
| LoWord | Contains the lower 16bits of the memory pointer into the file |
Returns: TRUE if ok, usually ignored.
Example:
file_Write
Writes the number of bytes specified by "size" from the source buffer into the file referenced by "handle". The source buffer is a byte/string pointer, as it can be written from program memory which is always byte addressable.
Syntax: file_Write(*source, size, handle);
| Arguments | Description |
|---|---|
| source | Source memory buffer. Byte/String Pointer. |
| size | Number of bytes to be written. |
| handle | The handle that references the file to write. |
Returns: The number of bytes written.
Example
file_Size
Reads the 32-bit file size and stores it into 2 variables, HiWord and LoWord.
Syntax: file_Size(handle, &HiWord, &LoWord);
| Arguments | Description |
|---|---|
| handle | The handle that references the file. |
| HiWord | Contains the upper 16bits of the file size. |
| LoWord | Contains the lower 16bits of the file size. |
Returns: TRUE if ok, usually ignored.
Example
file_Image
Display an image from the file stream at screen location specified by x, y(top left corner). If there is more than 1 image in the file, it can be accessed with file_Seek(...).
Syntax: file_Image(x, y, handle);
| Arguments | Description |
|---|---|
| x | X-position of the image to be displayed |
| y | Y-position of the image to be displayed |
| handle | The handle that references the file containing the image(s) |
Returns: A copy of the file_Error() error code
Example
file_ScreenCapture
Save an image of the screen shot to file at the current file position.
The image can later be displayed with file_Image(...); The file may be opened in append mode to accumulate multiple images. Later, the images can be displayed with file_Seek(...).
All image headers must start on a sector boundary.
The image is saved from x, y (with respect to top left corner), and the capture area is determined by "width" and "height".
Syntax: file_ScreenCapture(x, y, width, height, handle);
| Arguments | Description |
|---|---|
| x | X-position of the image to be captured |
| y | Y-position of the image to be captured |
| width | Width of the area to be captured. |
| height | Height of the area to be captured. |
| handle | The handle that references the file to store the image(s) |
Returns: Zero (0) if function successful.
Example
file_Mount();
hFile := file_Open("test.img", 'a'); // open a file to save the image
file_ScreenCapture(20,20,100,100, hFile);// save an area
file_ScreenCapture(0,0,50,50, hFile);    // (save another area)
file_Close(hFile);                       // now close the file

// and to display the saved area(s)

hFile := file_Open("test.img", 'r');    // open the saved file
file_Image(20,180, hFile);              // display the image
file_Image(150,180, hFile);             // (display the next image)
file_Close(hFile);
file_Unmount();                         // finished with file system
Note
The image will be sector aligned.
file_PutC
This function writes the byte specified by "char" to the file, at the position indicated by the associated file-position pointer and advances the pointer appropriately (incremented by 1). The file must be previously opened with 'w' (write) or 'a' (append) modes.
Syntax: file_PutC(char, handle);
| Arguments | Description |
|---|---|
| char | Data byte about to be written. |
| handle | The handle that references the file to be written to. |
Returns: True if function succeeded
Example
file_GetC
This function reads a byte from the file, at the position indicated by the associated file-position pointer and advances the pointer appropriately (incremented by 1). The file must be previously opened with 'r' (read) mode.
Syntax: file_GetC(handle);
| Arguments | Description |
|---|---|
| handle | The handle that reference the file. |
Returns: The next char from the file.
Example
file_PutW
This function writes word sized (2 bytes) data specified by "word" to the file, at the position indicated by the associated file-position pointer and advances the pointer appropriately (incremented by 2). The file must be previously opened with 'w' (write) or 'a' (append) modes.
Syntax: file_PutW(word, handle);
| Arguments | Description |
|---|---|
| word | Date about to be written. |
| handle | The handle that reference the file to be written to. |
Returns: True if function succeeded.
Example
file_GetW
This function reads a word (2 bytes) from the file, at the position indicated by the associated file-position pointer and advances the pointer appropriately (incremented by 2). The file must be previously opened with 'r' (read) mode.
Syntax: file_GetW(handle);
| Arguments | Description |
|---|---|
| handle | The handle that reference to the file. |
Returns: The next word in the file.
Example
file_PutS
This function writes an ASCIIZ (null terminated) string from a buffer specified by "*source" to the file, at the position indicated by the associated file-position pointer and advances the pointer appropriately. The file must be previously opened with 'w' (write) or 'a' (append) modes.
Syntax: file_PutS(*source, handle);
| Arguments | Description |
|---|---|
| source | A pointer to the string to be written. Word Pointer. |
| handle | The handle that references the file to be written to. |
Returns: The number of the characters written (excluding the null terminator).
Example
file_GetS
This function reads a line of text to a buffer (specified by "*string") from a file at the current file position indicated by the associated file-position pointer and advances the pointer appropriately. The file must be previously opened with 'r' (read) mode.
file_GetS(...) will stop reading when any of the following conditions are true:
a. It has read n-1 bytes (one character is reserved for the null-terminator) b. It encounters a newline character (a line-feed in the compilers tested here) c. It reaches the end of file d. A read error occurs.
The file must be previously opened with 'r' (read) mode.
Syntax: file_GetS(*string, size, handle);
| Arguments | Description |
|---|---|
| string | Destination buffer, Word Pointer. |
| size | The maximum number of bytes to be read from the file. |
| handle | The handle that references the file. |
Returns: The number of characters read from file (excluding the null terminator)
Example
Note
Only reads up to "size-1" characters into "string".
file_Erase
This function erases a file on the disk.
Syntax: file_Erase(fname);
| Arguments | Description |
|---|---|
| fname | Name of the file to be erased. |
Returns: True (1) if successful, False (0) otherwise.
Example
file_Rewind
Resets the file pointer to the beginning of a file that has been opened in 'r' (read), 'w', or 'a' (append) mode.
Syntax: file_Rewind(handle);
| Arguments | Description |
|---|---|
| handle | The handle that references the file. |
Returns: True (1) if successful, False (0) otherwise.
Example
file_LoadFunction
Load a function or program from disk and return a function pointer to the allocation.
The function can then be invoked just like any other function would be called via a function pointer. Parameters may be passed to it in a conventional way. The function may be discarded at any time when no longer required, thus freeing its memory resources.
The loaded function can be discarded with mem_Free(..) Note that any pointer references passed to the child function may not include references to the parents DATA statements or any static string references. Any string or array information must be in the parents global or local memory space. The reason for this is that DATA statements and static strings are contained in the parents CODE segment, and cannot be accessed by the child process.
The callers stack is shared by the loaded function, however any global variables in the loaded function are private to that function.
Syntax: file_LoadFunction(fname.4XE);
| Arguments | Description |
|---|---|
| fname.4XE | Name of the 4DGL application program that is about to be loaded into RAM. |
Returns: A pointer to the memory allocation where the function has been loaded from file which can be then used as a function call.
Example
var titlestring[20];
var textstring[20];
to (titlestring); putstr("My Window Title");
to (textstring); putstr("My Special Message");
popupWindow := file_LoadFunction("popupWindow1.4fn");
if(!popupWindow) goto LoadFunctionFailed; // could not load the function

// then elsewhere in your program
res := popupWindow(MYMODE,titlestring,textstring);
if(res == QUIT_APPLICATION) goto exitApp;

// Later in your program, when popupWindow is no longer required
// for the application

res := mem_Free(popupWindow);
if(!res) goto FreeFunctionFailed; // should never happen if memory not
                                  // corrupted
var fncHandle;   // a var for a handle to sliders2.4dg
var slidervals;  // reference var to access global vars in sliders.4dg

fncHandle := file_LoadFunction("sliders2.4xe"); // load the function
slidervals := fncHandle & 0x7FFF; // note that memory allocations
// for transient programs are biased with 8000h which must be removed.
slidervals++;    // note that all globals start at '1'

slidervals[0] := 25; // set sliders to initial positions
slidervals[1] := 20;
slidervals[2] := 30;
slidervals[3] := 15;
slidervals[4] := 35;
slidervals[5] := 20;
slidervals[6] := 40;
slidervals[7] := 25;
slidervals[8] := 45;
slidervals[9] := 5;

r := fncHandle();     // activate the function

print("Return value = 0x", [HEX] r,"\n");

// print the  values, they may have changed
print("Slider 1  ", slidervals[0]," Slider 2  ", slidervals[1],"\n");
print("Slider 3  ", slidervals[2]," Slider 4  ", slidervals[3],"\n");
print("Slider 5  ", slidervals[4]," Slider 6  ", slidervals[5],"\n");
print("Slider 7  ", slidervals[6]," Slider 8  ", slidervals[7],"\n");
print("Slider 9  ", slidervals[8]," Slider 10 ", slidervals[9],"\n");

mem_Free(fncHandle); // done with sliders, release its memory
file_Run
Any memory allocations in the main FLASH program are released, however, the stack and globals are maintained.
If arglistptr is 0, no arguments are passed, else arglistptr points to an array, the first element being the number of additional elements in the array which contain the arguments.
func 'main' in the called program accepts the arguments, if any.
The arguments can only be passed by value, no pointers or references can be used as all memory is cleared before the file is loaded. Refer to file_Exec and file_LoadFunction for functions that can pass by reference.
The disk does not need to be mounted, file_Run automatically mounts the drive.
Syntax: file_Run(fname.4XE, arglistptr);
| Arguments | Description |
|---|---|
| fname.4XE | name of the 4DGL child program to be loaded into RAM and executed. |
| arglistptr | pointer to the list of arguments to pass to the new program. |
Returns: The value from main in the called program.
Example
#inherit "4DGL_16bitColours.fnc"
#inherit "FONT4.fnt"

#constant MAXBUTTONS 30 // for now, maximum number of buttons we want
                   // (also sets maximum number of files we can exec)

#STACK 500
//stack must be large enough to be shared with called program
#MODE RUNFLASH
// This is a 'top down' main program and must be run from FLASH

//-------------------------------------------------------------------// local global variables
//-------------------------------------------------------------------
// NB:- demo assigns all arrays to MAXBUTTONS.
// The arrays could be dynamically assigned to minimise memory usage.
// There is break even point between extra code and smallish arrays.
var keyval;       // 0 if no key pressed else 1-n
var filenames;    // pointer to byte array that holds the filenames

var buttontexts[MAXBUTTONS]; // pointers into the filenames array
//holds the filenames we use as button text

var vButtonState[MAXBUTTONS];
//button state flag( bit 0 = up:down state)
var vOldButtonState[MAXBUTTONS];
// OLD button state flags (bit 0 = up:down state)

// (we keep 2 copies so we can test for a state change and only redraw when a state change occurs)

var touchX1[MAXBUTTONS];           // touch regions for the buttons
var touchY1[MAXBUTTONS];
var touchX2[MAXBUTTONS];
var touchY2[MAXBUTTONS];

var btnTextColor;                       // button text colour
var btnBtnColor;                        // button background colour
var buttoncount;                   // actual number of buttons created (set by number of *.4XE files we find on drive)

var tempstr[20];                // general purpose string, 40 bytes

#DATA
 byte fred 1,2,3,4,5,6,7,8,9,10,11,12
#END

/*===================================================================
Redraw the button matrix. Only draw buttons that have changed state.
The top lef corner of the button matrix is set with the xorg and yorg parameters depending on the font and text string width, the button matrix dynamically resizes.
Parameters:-
maxwidth    = rhs from xorg (in pixels) to cause wrap at rhs
maxwidth    = maximum matrix width (in pixel units)
buttoncount = number of buttons to display
font        = FONT1 to FONT4
xorg:yorg   = top left corner of button array
NB:- The  touch detect matrix array is updated when any button changes state.
When you need to draw the matrix for the first instance of the matrix, you must
call with mode = 1 to instantiate the buttons.
call with mode = 0 for normal button action.
===================================================================*/

func redraw(var bcount, var font, var xorg, var yorg, var maxwidth, var mode )

    var xgap, ygap, n, x1, y1, x2, y2;

    xgap := 2;
    ygap := 2;
    x1 := xorg;
    y1 := yorg;

    // if first, set all the buttons to the up state
    if (mode)
        n := 0;
        repeat
            vButtonState[n]:=UP;
// set all the buttons to inverse state
            vOldButtonState[n]:=DOWN;
// so we guarantee they are all drawn in the 'up' state (not pressed)
        until(++n >= buttoncount);
    endif

// check all the button states, if a change occured, draw the new button state and update the touch detect matrix array
    n := 0;
    repeat
        // if the button state has changed
        if ( vButtonState[n] != vOldButtonState[n])
            vOldButtonState[n] := vButtonState[n];

            // if we already have all the co-ordinates, use them
            if (!mode)
                x1 := touchX1[n];
                y1 := touchY1[n];
                x2 := touchX2[n];
                y2 := touchY2[n];
            endif

            // draw the button
            gfx_Button( vButtonState[n], x1, y1, btnBtnColor, btnTextColor, font, 1, 1, buttontexts[n] );

           // update the touch screen regions only during first build
            if (mode)
                x2 := gfx_Get(RIGHT_POS);
                y2 := gfx_Get(BOTTOM_POS);

                touchX1[n] := x1;
                touchY1[n] := y1;
                touchX2[n] := x2;
                touchY2[n] := y2;

                // calculate next button position
                x1 := x2 + xgap;
                if (x1 >= xorg + maxwidth)
                    x1 := xorg;
                    y1 := y2 + ygap;
                endif
            endif

        endif
    until (++n >= buttoncount);
endfunc

//===================================================================
// do something with the key data
// In this example, we reconstitute the button name to a file name
// by appending ".4XE" and then call the file_Run command to
// run an application.
//===================================================================
func sendkey()
    var p;

    p := buttontexts[keyval-1];
    to(tempstr); str_Printf(&p, "%s.4XE");

    txt_Set(TEXT_OPACITY, OPAQUE);
    txt_Set(FONT_ID , FONT4);
    txt_MoveCursor(3, 0);

    print ("                 ");

    if(file_Exists(str_Ptr(tempstr)))
        touch_Set(TOUCH_DISABLE);         // disable the touch screen
        txt_Set(TEXT_COLOUR, ORANGE);
        print ("\rRUN: ", [STR] tempstr );// run the required program
        pause(500);
        gfx_Cls();
        file_Run(str_Ptr(tempstr),0);   // just run the prog, no args
     else
        txt_Set(TEXT_COLOUR, RED);
        print ("\rFAULT: ", [STR] tempstr );  // run required program
        pause(1000);
    endif

endfunc

//===================================================================
// convert the touch co-ordinates to a key value
// returns 0 if no key down else return index 1..n of button
//===================================================================
func readKeys(var x, var y)

    var n, x1, y1, x2, y2, r;

    n := 0;
    r := 0;

    while (n < buttoncount && !r)
        x1 := touchX1[n];
        y1 := touchY1[n];
        x2 := touchX2[n];
        y2 := touchY2[n];
        n++;
        if (x >= x1 && x < x2 && y >= y1 && y < y2) r := n;
    wend

    return r;
endfunc

//==================================================================
func main()

    var k, n, state, x, y;
    var p, s, w, f;
redo:
    w := 140;
    f := FONT4;
    btnTextColor := BLACK;
    btnBtnColor := LIGHTGREY;

    gfx_Cls();
    gfx_Set(BEVEL_WIDTH, 2);

    txt_Set(FONT_ID, FONT3);
    print("Simple test for file_Run(...);\n");
    print("Memory available = ",mem_Heap(),"\n");

    if(!file_Mount())
        putstr("Disk not mounted");
        while(!file_Mount());
    else
        putstr("Disk mounted\n");
    endif

    buttoncount := file_Count("*.4xe");
// count all the executable files on the drive
    print("4XE File count = ",buttoncount,"\n");

    n := buttoncount;       // k holds entry count
    if (!n)
        print("No 4XE executables\n");
// critical error, nothing to run!
        repeat forever
    endif

    filenames := mem_AllocZ(n*13);
// allocate a buffer for the filenames
    if(!filenames)
        print("Out of memory\n");
// critical error, could not allocate buffer
        repeat forever
    endif

    to(filenames); file_Dir("*.4xe");
// load the filenames array

    p := str_Ptr(filenames);    // point to the string

//assign array of string pointers and truncate filename extensions
    n := 0;
    while ( n < buttoncount )
        buttontexts[n++] := p;    // save pointer to the string
        p:=str_Find ( &p , "." ); // find end of required string
        str_PutByte(p++,'\0');    // change '.' to \0
        p := p + 4;               // skip over "4XE\n"
    wend

    touch_Set(TOUCH_ENABLE);      // enable the touch screen

    redraw(buttoncount, f, 10, 80, w, 1);
// draw buttons for the first time

    // now just stay in a loop
    repeat
        state := touch_Get(TOUCH_STATUS);  // get touchscreen status
        x := touch_Get(TOUCH_GETX);
        y := touch_Get(TOUCH_GETY);

       if(state == TOUCH_PRESSED)          // if there's a press
            if (keyval := readKeys(x, y))
                vButtonState[keyval-1] := DOWN;
// put button in DOWN state
                redraw(buttoncount, f, 10, 80, w, 0);
// draw any button down states
            endif
        endif

        if(state == TOUCH_RELEASED)
// if there's a release
            if (keyval)
                vButtonState[keyval-1] := UP;
// restore the buttons UP state
                redraw(buttoncount, f, 10, 80, w, 0);
// draw any button up states
                sendkey();
// do something with the key data
                keyval := 0;
// because prog(main prog) gave up all its allocations for file_Exec,
// we have lost our file mount info and the directory list so we must
// re-establish these to be able to continue. A better approach to
// ensure total stability for the main program is to reset the system
                // with SystemReset()
                //==================================
                // systemReset() // restart the main program
                // or
                goto redo;      // re-mount disk, reload filenames
                //==================================

            endif
        endif

    forever

    // mem_Free(filenames);
   // no need to release buffer, this prog is in flash and never exits.....
    // file_Unmount();                         // ditto

endfunc
//===================================================================
file_Exec
This function is similar to file_Run, however, the main program in FLASH retains all memory allocations (e.g. file buffers, memory allocated with mem_Alloc etc).
Returns like a function, current program calling program is kept active and control returns to it.
If arglistptr is 0, no arguments are passed, else arglist points to an array, the first element being the number of elements in the array.
func 'main' in the called program accepts the arguments.
This function is similar to file_LoadFunction(...), however, the function argument list is passed by pointer, and the memory consumed by the function is released as soon as the function completes.
Syntax: file_Exec(fname.4XE, arglistptr);
| Arguments | Description |
|---|---|
| fname | Filename of the 4DGL child program to be loaded into RAM and executed. |
| arglistptr | Pointer to the list of arguments to pass to the new program or 0 if no arguments. |
Returns: The value from main in the called program.
Example
var args[4], l[50] ;

func main()
    var i ;

    putstr("Mounting...\n");         // must mount uSD for file_Exec
    if (!(file_Mount()))
        while(!(file_Mount()))
            putstr("Drive not mounted...");
            pause(200);
            gfx_Cls();
            pause(200);
        wend
    endif

    for (i := 0; i < sizeof(l); i++)  // init array that will be passed
        l[i] := i ;
    next
    args[0] := 2 ;              // init arg count
    args[1] := 1234 ;           // init arg 1, this cannot be changed
    args[2] := l ;              // init arg 2 to address of l

    print("main Program\n" ) ;
    i := file_Exec("uSDProg.4fn", args) ;
    print("Back in main program\n" ) ;
    print("uSD Program returned ", i, "\n") ; // number from return statement

    for (i := 0; i < sizeof(l); i++)     // find what changed in array
        if (l[i] != i) print("l[", i, "] was changed to ", l[i], "\n" ) ;
    next
    print("Done") ;

    repeat
    forever

endfunc
func main(var j, var *l)    // parameters appear in the normal way
                            // The * shows that l will be indexed. It
                            // simply stops the compiler issuing a 'notice'
    txt_FGcolour(WHITE);
    print("In file_Exec's Program\n") ;
    print("Parms=", j, " ", l, "(ptr to l)\n") ;   // can't change these
    print("Incrementing l[5] to ", ++l[5], "\n") ; // can change these
    print("Returning 188\n") ;                     // can return a value
    txt_FGcolour(LIME);
    return 188;
endfunc
file_LoadImageControl
Reads a control file to create an image list.
The following are the modes of operation
| Mode | Description |
|---|---|
| 0 | It is assumed that there is a graphics file with the file extension "fname2.gci". In this case, the images have been stored in a FAT16 file concurrently, and the offsets that are derived from the "fname1.dat" file are saved in the image control so that the image control can open the file (.gci) and use file_Seek(...) to get to the position of the image which can then automatically be displayed using file_Image(...). Mode 0 builds the image control quickly as it only scans the .dat file for the file offsets and saves them in the relevant entries in the image control. The penalty is that images take longer to find when displayed due to file_Seek(...) overheads. |
| 1 | It is assumed that there is a graphics file with the file extension "fname2.gci". In this case, the images have been stored in a FAT16 file concurrently, and the offset of the images are saved in the image control so that image file (*.gci) can be mapped to directly. The absolute cluster/sector is mapped so file seek does not need to be called internally. This means that there is no seek time penalty, however, the image list takes a lot longer to build, as all the seeking is done at control build time. |
| 2 | In this case, the images have been stored in a in a RAW partition of the uSD card, and the absolute address of the images are saved in the DAT file. This is the fastest operation of the image control as there is no seeking or other disk activity taking place. |
| 3 | This mode is for Flash based 'file system' GCI (GCIF) with integrated DAT and other file types. "fname1" and "fname2" are then the Flash high and low words of the GCIF start location. |
When an image control is loaded, an array is built in RAM. It consists of a 6 word header with the following entries as defined by the constants:
| Information | Index |
|---|---|
| IMG_COUNT | 0 |
| IMG_ENTRYLEN | 1 |
| IMG_MODE | 2 |
| IMG_GCI_FILENAME | 3 |
| IMG_DAT_FILENAME | 4 |
| IMG_GCIFILE_HANDLE | 5 |
No images are stored in FLASH or RAM, the image control holds the index values for the absolute storage positions on the uSD card for RAW mode, or the cluster/sector position for formatted FAT16 mode.
When an image control is no longer required, the memory can be released with mem_Free();
Syntax: file_LoadImageControl(fname1, fname2, mode);
| Argument | Description |
|---|---|
| fname1 | The control list filename "*.dat". |
| fname2 | The image filename "*.gci". |
| mode | Determines the mode of operation |
Return: Pointer (handle) to the memory allocation to the image control list that has been created, null (0) if function fails
Example
#inherit "4DGL_16bitColours.fnc"

#constant OK   1
#constant FAIL 0

    var p;                          // buffer pointer
    var img;                        // handle for the image list
    var n, exit, r;

//-------------------------------------------------------------------
// return true if screen touched, also sets ok flag
func CheckTouchExit()
    return (exit := (touch_Get(TOUCH_STATUS) == TOUCH_PRESSED));   // if there's a press, exit
endfunc
//-------------------------------------------------------------------

func main()

    gfx_Cls();
    txt_Set(FONT_ID, FONT2);
    txt_Set(TEXT_OPACITY, OPAQUE);

    touch_Set(TOUCH_ENABLE);               // enable the touch screen

    print("heap=", mem_Heap(), " bytes\n");  // show the heap size

    r := OK; // return value
    exit := 0;

    if (!file_Mount())
        print("File error ", file_Error());
        while(!CheckTouchExit());
// just hang if we didnt get the image list
        r := FAIL;
        goto quit;
    endif

    print ("WAIT...building image list\n");

  // slow build, fast execution, higher memory requirement
    img := file_LoadImageControl("GFX2DEMO.dat", "GFX2DEMO.gci", 1);
  // build image control, returning a pointer to structure allocation

    if (img)
        print("image control=",[HEX] img,"\n");
// show the address of the image control allocation
    else
        putstr("Failed to build image control....\n");
        while(CheckTouchExit() == 0);
// just hang if we didnt get the image list
        r := FAIL;
        goto quit;
    endif

    print ("Loaded ", img[IMG_COUNT], " images\n");
    print ("\nTouch and hold to exit...\n");
    pause(2000);

    pause(3000);
    gfx_Cls();

    repeat
        n := 0;

        while(n < img[IMG_COUNT] && !exit) // go through all images
            CheckTouchExit();        // if there's a press, exit
            img_SetPosition( img, n, (ABS(RAND() % 240)), (ABS(RAND() % 320)));  // spread out the images
            n++;
        wend

        img_Show(img, ALL);    // update the entire control in 1 hit

    until(exit);

quit:

    mem_Free(img);      // release the image control
    file_Unmount();     // (program must release all resources)
    return r;

endfunc
//===================================================================
file_Mount
Starts up the FAT16 disk file services and allocates a small 32 byte control block for subsequent use. When you open a file using file_Open(...), a further 512 + 44 = 556 bytes are attached to the FAT16 file control block. When you close a file using file_Close(...), the 556 byte allocation is released leaving the 32 byte file control block. The file_Mount() function must be called before any other FAT16 file related functions can be used. The control block and all FAT16 file resources are completely released with file_Unmount().
Syntax: file_Mount();
Return: True (1) if successful, False (0) otherwise
Example
if( !file_Mount() )
   while(!(file_Mount()))
      putstr("Disk not mounted");
      pause(200);
      gfx_Cls();
      pause(200);
   wend
endif
file_Unmount
Release any buffers for FAT16 and unmount the Disk File System. This function is to be called to close the FAT16 file system.
Syntax: file_Unmount();
Return: None
Example
file_PlayWAV
Open the wav file, decode the header to set the appropriate wave player parameters and set off the playing of the file as a background process. See Sound Control Functions for additional play control functions.
This function may return the following values if unsuccessful:
| Value | Error Description |
|---|---|
| -7 | Insufficient memory available for WAV buffer and file |
| -6 | cant play this rate |
| -5 | no data chunk found in first rsector |
| -4 | no format data |
| -3 | no wave chunk signature |
| -2 | bad wave file format |
| -1 | file not found |
Syntax: file_PlayWAV(fname);
| Argument | Description |
|---|---|
| fname | Filename of the wav file to be opened and played |
Return: Number of blocks to play (1 to 32767), or error code otherwise.
Example
print("\nding.wav\n");
for (n := 0; n < 45; n++)
    pitch := NOTES[n];
    print([UDEC] pitch,"\r");
    snd_Pitch(pitch);
    file_PlayWAV("ding.wav");
    while(snd_Playing());
    //pause(500);
next
file_Rename
This function renames a file on the disk.
Syntax: file_Rename(oldname, newname);
| Argument | Description |
|---|---|
| oldname | Name of the file to be renamed |
| newname | Name of the file to be used as the new name |
Returns: 1 if successful, 0 otherwise.
Example
Note
If the function fails, the appropriate error number is set in file_Error() if an invalid filename is specified, otherwise the cause will be a missing old-name or a pre-existing newname.
file_SetDate
This function sets the modified date and time on an open file handle. The file must be closed at some future time for the date and time to be flushed to disk.
Syntax: file_SetDate(handle, year, month, day, hour, minute, second) ;
| Arguments | Description |
|---|---|
| handle | The handle that reference the file. |
| year | The year the file was updated 1980-2099. |
| month | The month the file was updated 1 - 12. |
| day | The day the file was updated 1 - 31. |
| hour | The hour the file was updated 0 - 23. |
| minute | The minute the file was uupdated 0 - 59. |
| second | The second the file was updated 0 - 59. |
Returns: 1 if successful, 0 otherwise (Handle not valid, or Date/Time not valid).
Example
file_CheckUpdate
Checks and/or updates the program running in Flash using the specified file on uSD.
The following options determine the mode of operation:
| Option | Value | Description |
|---|---|---|
| CHECKUPDATE_QUERY | 1 | Checks the specified file and compares its DateTime to the program running in Flash |
| CHECKUPDATE_UPDATENEWER | 2 | Updates the program in Flash if the program on uSD is newer |
| CHECKUPDATE_UPDATEALWAYS | 3 | Always updates the program in Flash |
If update occurs and the program is running from Flash, the display is reset after update. Otherwise, if a query or an error occurs, the following is returned:
| Option | Value | Description |
|---|---|---|
| CHECKUPDATE_NEWFILE | 1 | The specified file is newer than the file running in Flash |
| CHECKUPDATE_OLDFILE | 2 | The specified file is equal to or older than the file running in Flash |
| CHECKUPDATE_UPDATEDONE | 3 | An update was performed, and the program is running from RAM |
| CHECKUPDATE_NOFILE | 4 | The specified file does not exist |
| CHECKUPDATE_INVALIDFILE | 5 | The specified file is not valid '4xe' or '4fn' |
Syntax: file_CheckUpdate(fname, options);
| Argument | Description |
|---|---|
| fname | Filename of the 4DGL program on the uSD card |
| options | Determines whether to update always (3), update if newer (2) or simply query (1) |
Return: Result of the operation
Example
if (!(file_Mount()))
    while(!(file_Mount()))
        putstr("Drive not mounted...");
        pause(200);
        gfx_Cls();
        pause(200);
    wend
endif

if (file_CheckUpdate("Program.4xe", CHECKUPDATE_QUERY) == CHECKUPDATE_NEWFILE)
    putstr("Program will now update") ;
    file_CheckUpdate("Program.4xe", CHECKUPDATE_UPDATENEWER) ;
endif
Flash Memory Functions
flash_Bank
Identifies which flash bank the code is running from.
Syntax: flash_Bank();
Returns: The FLASH bank that code is currently running from, 0-5.
0: Flashbank_0
1: Flashbank_1
2: Flashbank_2
3: Flashbank_3
4: Flashbank_4
5: Flashbank_5
Example:
flash_Blit1
Blit an image to a GRAM window from FLASH storage. Image is stored in a linear fashion to suit the GRAM mechanism, palette is 2 x 16bit colours
Syntax: flash_Blit1(bank, offset, count, pallete2colour);
| Arguments | Description |
|---|---|
| bank | Flash bank to load the image from. 0 or FLASHBANK_0 1 or FLASHBANK_1 2 or FLASHBANK_2 3 or FLASHBANK_3 4 or FLASHBANK_4 5 or FLASHBANK_5 |
| offset | Offset in to the Flash bank where image is stored. |
| count | Total number of pixel in the image. |
| pallete2colour | An array of 2 elements being the colors for the two possible colour values. |
Returns: Actual count (normally same as count, will be lower if bank bounds exceeded)
Example
var actual_count;
var pixels := 2000;
// pallete should be defined as an array of 2 elements
// of 16bit color values
actual_count := flash_Blit1(FLASHBANK_2, 10, pixels, pallete);
flash_Blit2
Blit an image to a GRAM window from FLASH storage. Image is stored in a linear fashion to suit the GRAM mechanism, palette is 4 x 16bit colours.
Syntax: flash_Blit2(bank, offset, count, pallete4colour);
| Arguments | Description |
|---|---|
| bank | Flash bank to load the image from. 0 or FLASHBANK_0 1 or FLASHBANK_1 2 or FLASHBANK_2 3 or FLASHBANK_3 4 or FLASHBANK_4 5 or FLASHBANK_5 |
| offset | Offset in to the Flash bank where image is stored. |
| count | Total number of pixel in the image. |
| pallete4colour | An array of 4 elements being the colors for the four possible colour values. |
Returns: Actual count (normally same as count, will be lower if bank bounds exceeded)
Examples
var actual_count;
var pixels := 2000;
// pallete should be defined as an array of 4 elements
// of 16bit color values
actual_count := flash_Blit2(FLASHBANK_2, 10, pixels, pallete);
flash_Blit4
Blit an image to a GRAM window from FLASH storage. Image is stored in a linear fashion to suit the GRAM mechanism, palette is 16 x 16bit colours.
Syntax: flash_Blit4(bank, offset, count, pallete16colour);
| Arguments | Description |
|---|---|
| bank | Flash bank to load the image from. 0 or FLASHBANK_0 1 or FLASHBANK_1 2 or FLASHBANK_2 3 or FLASHBANK_3 4 or FLASHBANK_4 5 or FLASHBANK_5 |
| offset | Offset in to the Flash bank where image is stored. |
| count | Total number of pixel in the image. |
| pallete16colour | An array of 16 elements being the colors for the sixteen possible colour values. |
Returns: Actual count (normally same as count, will be lower if bank bounds exceeded)
Examples
var actual_count;
var pixels := 2000;
// pallete should be defined as an array of 16 elements
// of 16bit color values
actual_count := flash_Blit4(FLASHBANK_2, 10, pixels, pallete);
flash_Blit8
Blit an image to a GRAM window from FLASH storage. Image is stored 8-bits per pixel (332 format) in a linear fashion to suit the GRAM mechanism.
Syntax: flash_Blit8(bank, offset, count);
| Arguments | Description |
|---|---|
| bank | Flash bank to load the image from. 0 or FLASHBANK_0 1 or FLASHBANK_1 2 or FLASHBANK_2 3 or FLASHBANK_3 4 or FLASHBANK_4 5 or FLASHBANK_5 |
| offset | Offset in to the Flash bank where image is stored. |
| count | Total number of pixel in the image. |
Returns: Actual count (normally same as count, will be lower if bank bounds exceeded)
Examples
flash_Blit16
Blit an image to a GRAM window from FLASH storage. Image is stored 16bits per pixel (565) in a linear fashion to suit the GRAM mechanism.
Syntax: flash_Blit16(bank, offset, count);
| Arguments | Description |
|---|---|
| bank | Flash bank to load the image from. 0 or FLASHBANK_0 1 or FLASHBANK_1 2 or FLASHBANK_2 3 or FLASHBANK_3 4 or FLASHBANK_4 5 or FLASHBANK_5 -1 or ALL to select all the banks. |
| offset | Offset in to the Flash bank where image is stored. |
| count | Total number of pixel in the image. |
Returns: Actual count (normally same as count, will be lower if bank bounds exceeded)
Examples
flash_Copy
Copies bytes from any flash locations to a user buffer. If the bank is read protected, 0 bytes will be read.
Syntax: flash_Copy(bank, ptr, dest, count);
| Arguments | Description |
|---|---|
| bank | Flash bank to copy the data from. 0 or FLASHBANK_0 1 or FLASHBANK_1 2 or FLASHBANK_2 3 or FLASHBANK_3 4 or FLASHBANK_4 5 or FLASHBANK_5 -1 or ALL to select all the banks. |
| ptr | Pointer to a location in the selected flash bank. |
| dest | Pointer to the destination. The destination pointer is word aligned. |
| count | Count of bytes to be transferred. |
Returns: The count of the bytes transfered.
Example
flash_EraseBank
This function should be used with extreme caution. The selected bank will be completely erased regardless of FLASH_WRITE_PROTECT status if the confirmation value is set to hex 0xDEAD. If confirmation is any other value, a protected bank will not be erased, and function will return with 0 If the destination bank is the same as the execution bank, the processor will reset upon completion of erase. If the "bank" argument is set to ALL (-1) and confirmation is set to 0xDEAD, FLASHBANK_0 through FLASHBANK_5 are cleared.
Note
- Use with caution, this is a good way to 'clean up' the entire flash when starting new projects.
- Reset processor if program is erasing itself, or the ALL bank option is selected.
Syntax: flash_EraseBank(bank, confirmation);
| Arguments | Description |
|---|---|
| bank | Flash bank to be erased. 0 or FLASHBANK_0 1 or FLASHBANK_1 2 or FLASHBANK_2 3 or FLASHBANK_3 4 or FLASHBANK_4 5 or FLASHBANK_5 -1 or ALL to select all the banks. |
| confirmation | 0xDEAD: The command will erase regardless or FLASH_WRITE_PROTECT status. For any other value, a protected bank will not be erased. |
Returns: True if the function succeeded.
Example
flash_Exec
This function calls the main function in another bank. The main program in FLASH retains all memory allocations (e.g. file buffers, memory allocated with mem_Alloc etc.)
The called bank returns like a function, program in current bank is kept active and control returns to it. All memory allocated in the called bank should be freed before returning, or it will be lost.
If arglistptr is 0, no arguments are passed, else arglist points to an array, the first element being the number of elements in the array.
func 'main' in the called bank accepts the arguments.
Syntax: flash_Exec(flashbank, arglistptr);
| Arguments | Description |
|---|---|
| flashbank | Name of the bank to be executed. |
| arglistptr | Pointer to the list of arguments to pass to the selected bank or 0 if no arguments. |
Returns: The value from main in the called bank.
Example
flash_GetByte
Reads a single byte from any flash location. If the bank is read protected, only the first 2 bytes can be read.
0x55, 0xAA are the header signature bytes of a valid program.
Syntax: flash_GetByte(bank, ptr);
| Arguments | Description |
|---|---|
| bank | Flash bank to get the byte from. 0 or FLASHBANK_0 1 or FLASHBANK_1 2 or FLASHBANK_2 3 or FLASHBANK_3 4 or FLASHBANK_4 5 or FLASHBANK_5 |
| ptr | Pointer to a location in the selected flash bank. |
Returns: The byte value from the location.
Example
flash_GetWord
Reads a single word from any flash location. If the bank is read protected, only the first word can be read.
0x55AA is the header signature word of a valid program.
Snytax: flash_GetWord(bank, ptr);
| Arguments | Description |
|---|---|
| bank | Flash bank to get the word from. 0 or FLASHBANK_0 1 or FLASHBANK_1 2 or FLASHBANK_2 3 or FLASHBANK_3 4 or FLASHBANK_4 5 or FLASHBANK_5 |
| ptr | Pointer to a location in the selected flash bank. |
Returns: The word value from the location.
Example
flash_LoadFile
Copies a file from uSD to the required flashbank. The destination bank cannot be the execution bank, or a bank that is write protected.
Sytax: flash_LoadFile (bank, filename);
| Arguments | Description |
|---|---|
| bank | Flash bank to load the file from. 0 or FLASHBANK_0 1 or FLASHBANK_1 2 or FLASHBANK_2 3 or FLASHBANK_3 4 or FLASHBANK_4 5 or FLASHBANK_5 |
| filename | Name of the file to be copied (passed as a string). |
Returns: True if the function succeeded
Example
if (flash_LoadFile(FLASHBANK_2, "FILE.TXT"))
    print("File loaded to bank.");
else
    print("Failed");
endif
flash_putstr
Prints an ASCIIZ string from the Flash bank. Works the same as putstr, however, the source of the ASCIIZ string is in FLASH storage. Output may be redirected with the to(..) function. Bit15 of ptr is assumed 0.
Syntax: flash_putstr(bank, ptr);
| Arguments | Description |
|---|---|
| bank | Flash bank to load the String from. 0 or FLASHBANK_0 1 or FLASHBANK_1 2 or FLASHBANK_2 3 or FLASHBANK_3 4 or FLASHBANK_4 5 or FLASHBANK_5 |
| ptr | Pointer to a NULL terminated string in the selected flash bank. |
Returns: True if function succeeds, usually ignored. 0 if bank is read protected.
Example
flash_Run
Restarts the processor, running code from the required flash bank. Bank may be a variable, or one of the pre-defined constants.
Syntax: flash_Run(bank);
| Arguments | Description |
|---|---|
| bank | Flash bank to load the program from. 0 or FLASHBANK_0 1 or FLASHBANK_1 2 or FLASHBANK_2 3 or FLASHBANK_3 4 or FLASHBANK_4 5 or FLASHBANK_5 |
Returns: This function should not return as it restarts the processor and jumps to the required bank.
If it does return, - 1 indicates incorrect/invalid bank number. - 2 indicates no valid program in the selected bank.
Example
var status;
status := flash_Run (FLASHBANK_2, 10)
if (status == -1 || status == -2);
    print("Failed");
endif
flash_WriteBlock
Copies a 2kbyte buffer to the required flashbank in block 0-15. The destination bank cannot be an execution bank, or a program bank that is write-protected.
Syntax: flash_WriteBlock(sourceptr, bank, page);
| Arguments | Description |
|---|---|
| sourceptr | Source buffer to load the 2K bytes of data from. |
| bank | Flash bank to write the block to. 0 or FLASHBANK_0 1 or FLASHBANK_1 2 or FLASHBANK_2 3 or FLASHBANK_3 4 or FLASHBANK_4 5 or FLASHBANK_5 |
| page | Page number 0-15. Each page is 2K. The address of each block is 0, 2048, 4096 etc, determined by the page number 0-15. |
Returns: True if the function succeeded.
Example
var buffer[100] := "4D Labs Semiconductors";
var status;
if (status := flash_WriteBlock(buffer, FLASHBANK_2, 1))
    print("Successfully written to bank");
endif
flash_FunctionCall
Calls the Flashbank passing index "index" as the first parameter.
Other parameters "State", "&FunctionRam", "&FunctionDef", "&FunctionDef" are passed. The second two parameters are passed "as is", since the third parameter is normally in flash and one banks flash is not accessible from another
"FunctionArgCount" constants are copied into a RAM array and passed to the Function. "FunctionStringMap" is a bit array of the indexes containing single and multiple strings offset by 8. e.g. 0x0100 means parameter 8 is a single string, 0x0002 means paramter 9 is an array of strings with parameter 8 containing the count.
Syntax: flash_FunctionCall(bank, idx, state, FncRam, FncDef, FncArgCnt, FncStrMap);
| Arguments | Description |
|---|---|
| bank | Flash bank to write the block to. 0 or FLASHBANK_0 1 or FLASHBANK_1 2 or FLASHBANK_2 3 or FLASHBANK_3 4 or FLASHBANK_4 5 or FLASHBANK_5 |
| index | Index of the entry in the handle |
| state | Value passed to update function state |
| &FunctionRam | Pointer to the function RAM allocation |
| &FunctionDef | Pointer to the function definitions stored in Flash |
| FunctionArgCount | Function argument count |
| FunctionArgStringMap | String address array |
Returns: 0 if successful.
Example
flash_LoadSPIflash
Copies a file from uSD to the required flashbank. The destination bank cannot be the execution bank, or a bank that is write protected.
Syntax: flash_LoadSPIflash (bank, hndl, idx);
| Arguments | Description |
|---|---|
| bank | Flash bank to load the file from. 0 or FLASHBANK_0 1 or FLASHBANK_1 2 or FLASHBANK_2 3 or FLASHBANK_3 4 or FLASHBANK_4 5 or FLASHBANK_5 |
| hndl | The handle that references the file. |
| index | Index of the entry in the handle. |
Returns: True if the function succeeded
Example
result := flash_LoadSPIflash (FLASHBANK_2, "TETRIS10.EXE"); // load the file from disk into FLASHBANK_2
Floating Point Functions
flt_ADD
Performs floating point addition (A+B) and returns the value in the result register.
Syntax: flt_ADD(&result, &floatA, &floatB);
| Arguments | Description |
|---|---|
| &result | Points to float result register. |
| &floatA | Points to the float value A. |
| &floatB | Points to the float value B. |
Arguments may be a pointer to a float variable or a numeric text string. A string argument is converted at run-time by calling flt_Val for a string argument.
Returns: A pointer to the float result register or zero if error occurs. Carry and overflow are not affected.
Example
var floatA[2], floatB[2], result[2];
gfx_ScreenMode(LANDSCAPE) ;         //landscape orientation
flt_VAL(floatA, "3.3");             // Convert a string ("3.3") to a floatA
flt_ITOF(floatB, 4);                //Convert integer "4" to float

flt_ADD(result, floatA, floatB);
gfx_MoveTo(0,0);
print("add: ");
flt_PRINT(result,"%.6f");
print("\n");
Note
A float variable is a 2 word array, e.g. var myfloat[2].
flt_SUB
Performs floating point Subtraction (A-B) and returns the value in the result register.
Syntax: flt_SUB(&result, &floatA, &floatB);
| Arguments | Description |
|---|---|
| &result | Points to float result register. |
| &floatA | Points to the float value A. |
| &floatB | Points to the float value B. |
Arguments may be a pointer to a float variable or a numeric text string. A string argument is converted at run-time by calling flt_Val for a string argument.
Returns: A pointer to the float result register or zero if error occurs. Carry and overflow are not affected.
Example
var floatA[2], floatB[2], result[2];
gfx_ScreenMode(LANDSCAPE) ;         //landscape orientation
flt_VAL(floatA, "3.3");             // Convert a string ("3.3") to a floatA
flt_ITOF(floatB, 4);                //Convert integer "4" to float

flt_SUB(result, floatA, floatB);
print("subtract: ");
flt_PRINT(result,"%.6f");
print("\n");
Note
A float variable is a 2 word array, e.g. var myfloat[2].
flt_MUL
Performs floating point Multiplication (A * B) and returns the value in the result register.
Syntax: flt_MUL(&result, &floatA, &floatB);
| Arguments | Description |
|---|---|
| &result | Points to float result register. |
| &floatA | Points to the float value A. |
| &floatB | Points to the float value B. |
Returns: A pointer to the float result register or zero if error occurs. Carry and overflow are not affected.
Example
var Voltage[20];                        // string to store computed voltage
                                        // values
func main()
    var Vsteps;                         // variable to store conversion
                                        // results
    gfx_ScreenMode(LANDSCAPE) ;         // landscape orientation
    pin_Set( PIN_AN, PA0);              // set pin PA0 to be used as an
                                        // analogue input, standard mode
    repeat
        Vsteps := pin_Read(PA0) ;       // 12 bit analogue 0 to 4095
        gfx_MoveTo(0, 0) ;              // move o rigin to point 0, 108,
                                        //printing will start from this point
        print("steps: ", [DEC4Z]Vsteps);// print the number of steps
        getVoltage(Vsteps);             // compute the equivalent voltage
                                        //value of Vsteps
                                        // result is converted to a string
                                        //and stored in global variable Voltage
        gfx_MoveTo(0, 15) ;
        print("voltage: ");
        putstr(Voltage);                // print the computed equivalent
                                        //voltage onscree n
    forever
endfunc

func getVoltage(var reading)
    var nsteps[2];
    var Vref[2];
    var Nsteps[2];
    var Factor[2];
    var Result[2];
    flt_VAL(Vref, "3.3");               //Convert a string ("3.3") to a float
                                        // (Vref)
    flt_ITOF(Nsteps, 4095);             //Convert an integer (4095) to a float
                                        //(Nstep)
    flt_DIV(Factor, Vref, Nsteps);      //Float divistion, Factor = Vref/Nsteps
    flt_ITOF(nsteps, reading);          //Convert the integer 'reading' to a
                                        //float 'nsteps'
    flt_MUL(Result, nsteps, Fa ctor);   //Float multiplication,
                                        //Result = nsteps * Factor
    to(Voltage); flt_PRINT(Result, "%.6f");//print formatted Result
                                        //to the global variable Voltage
endfunc
Note
A float variable is a 2 word array, e.g. var myfloat[2].
flt_DIV
Performs floating point Division (A/B) and returns the value in the result register.
Syntax: flt_DIV(&result, &floatA, &floatB);
| Arguments | Description |
|---|---|
| &result | Points to float result register. |
| &floatA | Points to the float value A. |
| &floatB | Points to the float value B. |
Returns: A pointer to the float result register or zero if error occurs. Carry and overflow are not affected.
Example
see the example in flt_MUL()
Note
A float variable is a 2 word array, e.g. var myfloat[2].
flt_POW
Raises A to power B and returns the result value in the result register.
Syntax: flt_POW(&result, &floatA, &floatB);
| Arguments | Description |
|---|---|
| &result | Points to float result register. |
| &floatA | Points to the float value to raise. |
| &floatB | Points to the float value for power. |
Returns: A pointer to the float result register or zero if error occurs. Carry and overflow are not affected.
Example
var floatA[2], floatB[2], result[2];
gfx_ScreenMode(LANDSCAPE) ; //landscape orientation

flt_ITOF(floatA, 2); // Convert integer "2" to float
flt_ITOF(floatB, 8); // Convert integer "4" to float

flt_POW(result, floatA, floatB);
print("power: ");
flt_PRINT(result,"%.6f");
print("\n");
Note
A float variable is a 2 word array, e.g. var myfloat[2].
flt_ABS
Calculates absolute value of the floating point value.
Syntax: flt_ABS(&result, &floatval);
| Arguments | Description |
|---|---|
| &result | Points to float result register. |
| &floatval | Points to the float value to get the Absolute of. |
Return: A pointer to the float result register or zero if error occurs. Carry and overflow are not affected.
Example
var floatA[2], result[2];
gfx_ScreenMode(LANDSCAPE); // landscape orientation

flt_ITOF(floatA, 124); //Convert integer " 124" to float
flt_ABS(result, floatA);

print("absolute value: ");
flt_PRINT(result,"%.2f");
print("\n");
Note
A float variable is a 2 word array, e.g. var myfloat[2].
flt_CEIL
Rounds value up to the integer value. Removes fractional part, rounding up correctly.
Syntax: flt_CEIL(&result, &floatval);
| Arguments | Description |
|---|---|
| &result | Points to float result register. |
| &floatval | Points to the float value to integerize up. |
Returns: A pointer to the float result register or zero if error occurs. Carry and overflow are not affected.
Example
var floatA[2], result[2];
gfx_ScreenMode(LANDSCAPE) ; //landscape orientation

flt_VAL(floatA,"99.678"); //Convertstring "99.678" to float
flt_CEIL(result, floatA);

print(" result : ");
flt_PRINT(result,"%.5f");
print("\n");
Note
A float variable is a 2 word array, e.g. var myfloat[2].
flt_FLOOR
Rounds value down to the integer value. Removes fractional part, rounding down correctly.
Syntax: flt_FLOOR(&result, &floatval);
| Arguments | Description |
|---|---|
| &result | Points to float result register. |
| &floatval | Points to the float value to integerize down. |
Returns: A pointer to the float result register or zero if error occurs. Carry and overflow are not affected.
Example
var floatA[2], result[2];
gfx_ScreenMode(LANDSCAPE) ; //landscape orientation

flt_VAL(floatA,"99.678"); //Convert string "99.678" to float
flt_FLOOR(result, floatA);

print("result: ");
flt_PRINT(result,"%.5f");
print("\n");
Note
A float variable is a 2 word array, e.g. var myfloat[2].
flt_SIN
Calculates the SINE of float value in radians and returns the value in the result register.
Syntax: flt_SIN(&result, &floatval);
| Arguments | Description |
|---|---|
| &result | Points to float result register. |
| &floatval | Points to the float value angle (in radians) to get the SINE of. |
Returns: A pointer to the float result register or zero if error occurs. Carry and overflow are not affected.
Example
var floatA[2], result[2];
gfx_ScreenMode(LANDSCAPE) ; //landscape orientation

flt_VAL(floatA,"1.5708"); //Convert string "1.5708" to float
flt_SIN(result, floatA);

print("result: ");
flt_PRINT(result,"%.5f");
print("\n");
Note
A float variable is a 2 word array, e.g. var myfloat[2].
flt_COS
Calculates the COSINE of float value in radians and returns the value in the result register.
Syntax: flt_COS(&result, &floatval);
| Arguments | Description |
|---|---|
| &result | Points to float result register. |
| &floatval | Points to the float value angle (in radians) to get the COSINE of. |
Returns: A pointer to the float result register or zero if error occurs. Carry and overflow are not affected.
Example
var floatA[2], result[2];
gfx_ScreenMode(LANDSCAPE) ; //landscape orientation

flt_VAL(floatA,"3.1416"); //Convert string "3.1416" to float
flt_COS(result, floatA);

print("result: ");
flt_PRINT(result,"%.5f");
print("\n");
Note
A float variable is a 2 word array, e.g. var myfloat[2]
flt_TAN
Calculates the TANGENT of float value in radians and returns the value in the result register.
Syntax: flt_TAN(&result, &floatval);
| Arguments | Description |
|---|---|
| &result | Points to float result register. |
| &floatval | Points to the float value angle (in radians) to get the TANGENT of. |
Example
var floatA[2], result[2];
gfx_ScreenMode(LANDSCAPE) ; //landscape orientation

flt_VAL(floatA,"3.1416"); //Convert string "3.1416" to float
flt_TAN(result, floatA);

print("result: ");
flt_PRINT(result,"%.5f");
print("\n");
Note
A float variable is a 2 word array, e.g. var myfloat[2].
flt_ASIN
Calculates the ARCSINE of float value and returns the angle in radians in the result register.
Syntax: flt_ASIN(&result, &floatval);
| Arguments | Description |
|---|---|
| &result | Points to float result register. Result is in radians. |
| &floatval | Points to the float value to get the ARCSINE of. |
Returns: A pointer to the float result register or zero if error occurs. Carry and overflow are not affected.
Example
var floatA[2], result[2];
gfx_ScreenMode(LANDSCAPE) ; //landscape orientation

flt_VAL(floatA,"0.1234"); //Convert string "0.1234" to float
flt_ASIN(result, floatA);

print("result: ");
flt_PRINT(result,"%.5f");
print("\n");
Note
A float variable is a 2 word array, e.g. var myfloat[2].
flt_ACOS
Calculates the ARCCOS of float value and returns the angle in radians in the result register.
Syntax: flt_ACOS(&result, &floatval);
| Arguments | Description |
|---|---|
| &result | Points to float result register. Result is in radians. |
| &floatval | Points to the float value to get the ARCCOS of. |
Returns: A pointer to the float result register or zero if error occurs. Carry and overflow are not affected.
Example
var floatA[2], result[2];
gfx_ScreenMode(LANDSCAPE) ; //landscape orientation

flt_VAL(floatA,"0.1234"); //Convert string "0.1234" to float
flt_ACOS(result, floatA);

print("result: ");
flt_PRINT(result,"%.5f");
print("\n");
Note
A float variable is a 2 word array, e.g. var myfloat[2].
flt_ATAN
Calculates the ARCTAN of float value and returns the angle in radians in the result register.
Syntax: flt_ATAN(&result, &floatval);
| Arguments | Description |
|---|---|
| &result | Points to float result register. Result is in radians. |
| &floatval | Points to the float value to get the ARCTAN of. |
Returns: A pointer to the float result register or zero if error occurs. Carry and overflow are not affected.
Example
var floatA[2], result[2];
gfx_ScreenMode(LANDSCAPE) ;     //landscape orientation

flt_VAL(floatA,"0.1234");       //Convert string "0.1234" to float
flt_ATAN(result, floatA);
print("result: ");
flt_PRINT(result,"%.5f");
print("\n");
Note
A float variable is a 2 word array, e.g. var myfloat[2].
flt_EXP
Calculates the Exponent of float value and returns the value in the result register.
Syntax: flt_EXP(&result, &floatval);
| Arguments | Description |
|---|---|
| &result | Points to float result register. |
| &floatval | Points to the float value to get the Exponent of. |
Returns: A pointer to the float result register or zero if error occurs. Carry and overflow are not affected.
Example
var floatA[2], result[2];
gfx_ScreenMode(LANDSCAPE) ;     //landscape orientation

flt_ITOF(floatA, 5);            //convert integer 5 to float
flt_EXP(result, floatA);        //result = e^5
print("result: ");
flt_PRINT(result,"%.4f");
print("\n");
Note
A float variable is a 2 word array, e.g. var myfloat[2].
flt_LOG
Calculates the Natural Log of float value and returns the value in the result register.
Syntax: flt_LOG(&result, &floatval);
| Arguments | Description |
|---|---|
| &result | Points to float result register. |
| &floatval | Points to the float value to get the natural Log of. |
Returns: A pointer to the float result register or zero if error occurs. Carry and overflow are not affected.
Example
var floatA[2], result[2];
gfx_ScreenMode(LANDSCAPE) ; //landscape orientation

flt_VAL(floatA,"2.718282"); //Convert string "2.718282" to float
flt_LOG(result, floatA);
print("result: ");
flt_PRINT(result,"%.5f");
print("\n");
Note
A float variable is a 2 word array, e.g. var myfloat[2].
flt_SQR
Calculates the square root of float value and returns the value in the result register.
Syntax: flt_SQR(&result, &floatval);
| Arguments | Description |
|---|---|
| &result | Points to float result register. |
| &floatval | Points to the float value to get the square root of. |
Returns: A pointer to the float result register or zero if error occurs. Carry and overflow are not affected.
Example
var floatA[2], result[2];
gfx_ScreenMode(LANDSCAPE) ;         //landscape orientation

flt_VAL(floatA,"16.0");             //Convert string "16.0" to float
flt_SQR (result, floatA);
print("result: ");
flt_PRINT(result,"%.5f");
print("\n");
Note
A float variable is a 2 word array, e.g. var myfloat[2].
flt_LT
Compare A to B and returns true if A < B.
Syntax: flt_LT(&floatA, &floatB);
| Arguments | Description |
|---|---|
| &floatA | Points to the float value A. |
| &floarB | Points to the float value B. |
Returns: True if A < B, false otherwise.
Example
var floatA[2], floatB[2], result[2];
gfx_ScreenMode(LANDSCAPE) ;         //landscape orientation
flt_VAL(floatA,"16.0");             //Convert string "16.0" to float
flt_VAL(floatB,"17.5");             //Convert string "17.5" to float

if(flt_LT(floatA, floatB))
    print("floatA is less than floatB\n");
endif
Note
A float variable is a 2 word array, e.g. var myfloat[2].
flt_EQ
Compare A to B and returns true if equal.
Syntax: flt_EQ(&floatA, &floatB);
| Arguments | Description |
|---|---|
| &floatA | Points to the float value A. |
| &floarB | Points to the float value B. |
Returns: True if A == B, false otherwise.
Example
var floatA[2], floatB[2], result[2];
gfx_ScreenMode(LANDSCAPE) ;             //landscape orientation
flt_VAL(floatA,"16.0");                 //Convert string "16.0" to float
flt_VAL(floatB,"16.0");                 //Convert string "16.0" to float

if(flt_EQ(floatA, floatB))
    print("floatA is equal to floatB\n");
else
    print("floatA is not equal to floatB\n");
endif
Note
A float variable is a 2 word array, e.g. var myfloat[2].
flt_NE
Compare A to B and returns true if A != B.
Syntax: flt_NE(&floatA, &floatB);
| Arguments | Description |
|---|---|
| &floatA | Points to the float value A. |
| &floarB | Points to the float value B. |
Returns: True if A != B, false otherwise.
Example
var
floatA[2], floatB[2], result[2];
gfx_ScreenMode(LANDSCAPE) ;                 //landscape orientation
flt_VAL(floatA,"16.0");                     //Convert string "16.0" to float
flt_VAL(floatB,"100.0");                    //Convert string "100.0" to float

if(flt_NE(floatA, floatB))
    print("floatA is not equal to floatB\n");
else
    print("floatA is equal to floatB\n");
endif
Note
A float variable is a 2 word array, e.g. var myfloat[2].
flt_GT
Compare A to B and returns true if A > B.
Syntax: flt_GT(&floatA, &floatB);
| Arguments | Description |
|---|---|
| &floatA | Points to the float value A. |
| &floarB | Points to the float value B. |
Returns: True if A > B, false otherwise.
Example
var floatA[2], floatB[2], result[2];
gfx_ScreenMode(LANDSCAPE) ;                 //landscape orientation

flt_VAL(floatA,"16.0");                     //Convert string "16.0" to float
flt_VAL(floatB,"100.0");                    //Convert string "100.0" to float

if(flt_GT(floatB, floatA))
    print("floatB is greater than floatA\n");
endif
Note
A float variable is a 2 word array, e.g. var myfloat[2].
flt_GE
Compare A to B and returns true if A >= B.
Syntax: flt_GE(&floatA, &floatB);
| Arguments | Description |
|---|---|
| &floatA | Points to the float value A. |
| &floarB | Points to the float value B. |
Returns: True if A >=B, false otherwise.
Example
var floatA[2], floatB[2], result[2];
gfx_ScreenMode(LANDSCAPE) ;                         //landscape orientation

flt_VAL(floatA,"16.0");                             //Convert string "16.0" to float
flt_VAL(floatB,"100.0");                            //Convert string "100.0" to float
if(flt_GE(floatB, floatA))
    print("floatB is greater than or equal to floatA\n");
endif
Note
A float variable is a 2 word array, e.g. var myfloat[2].
flt_LE
Compare A to B and returns true if A <= B.
Syntax: flt_LE(&floatA, &floatB);
| Arguments | Description |
|---|---|
| &floatA | Points to the float value A. |
| &floarB | Points to the float value B. |
Returns: True if A <= B, false otherwise.
Example
var floatA[2], floatB[2], result[2];
gfx_ScreenMode(LANDSCAPE) ;                         //landscape orientation

flt_VAL(floatA,"160.0");                            //Convert string "160.0" to float
flt_VAL(floatB,"100.0");                            //Convert string "100.0" to float
if(flt_LE(floatB, floatA))
    print("floatB is less than or equal to floatA\n");
endif
Note
A float variable is a 2 word array, e.g. var myfloat[2].
flt_SGN
Examines sign of the float value and returns 0 if sign is positive or value equals zero. Returns 16bit integer -1 if float sign is negative.
Syntax: flt_SGN(&floatval);
| Arguments | Description |
|---|---|
| &floatval | Points to the float value to examine the sign of. |
Returns: 16bit integer -1 if float sign is negative, or zero if positive.
Example
var floatA[2];
gfx_ScreenMode(LANDSCAPE) ;              //landscape orientation

flt_VAL(floatA,"-100.0");               //Convert string " 100.0" to float
if(flt_SGN(floatA) ==-1)
    print("floatA is a negative value\n");
endif
Note
A float variable is a 2 word array, e.g. var myfloat[2].
flt_FTOI
Converts a floating point number to a 16bit integer. The floating point number is rounded up or down accordingly.
Syntax: flt_FTOI(&floatval);
| Arguments | Description |
|---|---|
| &floatval | Points to the float value to be converted to integer. |
Returns: The integer value of the float.
Example
var floatA[2], result;
gfx_ScreenMode(LANDSCAPE) ; //landscape orientation
flt_VAL(floatA," 123.4567"); //Convert string " 123.4567" to float

result := flt_FTOI(floatA);
print("result: ", result,"\n");
Note
A float variable is a 2 word array, e.g. var myfloat[2].
flt_ITOF
Converts a 16bit signed integer value to a signed floating point number.
Syntax: flt_ITOF(&fresult, var16);
| Arguments | Description |
|---|---|
| &fresult | Points to float result variable. |
| var16 | a 16bit signed integer variable. |
Returns: The pointer to the float result, normally ignored.
Example
var floatA[2];
gfx_ScreenMode(LANDSCAPE) ;     //landscape orientation
flt_ITOF(floatA, 100);          //convert integer 100 to float

print("float value: ");
flt_PRINT(floatA,"%.6f");       //prints "100.000000"
print("\n");
Note
A float variable is a 2 word array, e.g. var myfloat[2].
flt_UITOF
Converts a 16bit unsigned integer value to a positive floating point number.
Syntax: flt_UITOF(&fresult, uvar16);
| Arguments | Description |
|---|---|
| &fresult | Points to float result variable. |
| uvar16 | A 16bit unsigned integer variable. |
Returns: The pointer to the float result.
Example
var floatA[2];
gfx_ScreenMode(LANDSCAPE) ;     //landscape orientation
flt_UITOF(floatA, 50000);       //convert integer 50000 to float

print("float value: ");
flt_PRINT(floatA,"%.2f");       //prints "50000.00"
print("\n");
Note
A float variable is a 2 word array, e.g. var myfloat[2].
flt_LTOF
Converts a 32bit signed integer value to a signed floating point number.
Syntax: flt_LTOF(&fresult, var32);
| Arguments | Description |
|---|---|
| &fresult | Points to float result variable. |
| var32 | A 32bit (long) signed variable. |
Returns: The pointer to the float result.
Example
var floatA[2], long Int[2];
gfx_ScreenMode(LANDSCAPE) ;         //landscape orientation
umul_1616( longInt, 500, 2000);    //multiply 500 by 2,000, store
                                    //result (1,000,000) in longInt
flt_LTOF(floatA, longInt);          //convert 1,000,000 to a float value
print("float value: ");
flt_PRINT(floatA,"%.2f");           //prints "1000000.00"
print("\n");
Note
A float variable is a 2 word array, e.g. var myfloat[2].
flt_ULTOF
Converts a 32bit unsigned integer value to a positive floating point number.
Syntax: flt_ULTOF(&fresult, uvar32);
| Arguments | Description |
|---|---|
| &fresult | Points to float result variable. |
| uvar32 | A 32bit (long) unsigned variable. |
Returns: The pointer to the float result.
Example
var floatA[2], longInt[2], ptr;
gfx_ScreenMode(LANDSCAPE) ;             //landscape orientation
umul_1616(longInt, 50000, 50000);       //multiply 50,000 by 50,000
                                        //store result (2,500,000,000) in longInt
ptr := str_Ptr(longInt);                //create a string pointer for longInt
print("unsigned 32bit value: ");
str_Printf(&ptr,"%lu");                 //print the value of longInt
print("\n");

flt_ULTOF(floatA, longInt);             //convert longInt to a float value
print("float value: ");
flt_PRINT(floatA,"%.2f");               //prints "2500000000.00"
print("\n");
Note
A float variable is a 2 word array, e.g. var myfloat[2].
flt_VAL
Converts the number string to a valid float value. Carry and overflow are not affected.
Syntax: flt_VAL(&fresult, numstring);
| Arguments | Description |
|---|---|
| &fresult | Points to float result variable. |
| numstring | A string constant or string variable that holds valid floating point number.The string argument can be a string constant, a pointer to a string variable, or a pointer to a data statement.The string may be a float, or a hex or binary integer value (no decimal point allowed). For hex or binary, the number is preceeded with 0x or 0b. |
Returns: The pointer to the float result.
Example
See the example in section flt_ADD.
Note
A float variable is a 2 word array, e.g. var myfloat[2].
flt_PRINT
Prints a floating point value in a set string format.
The string argument can be a string constant, a pointer to a string variable, or a pointer to a data statement. If it is zero or an empty string, the number is automatically formatted for the best presentation. The format string is similar to the C language, but only a single '%' may be used to print a single variable.
To format the output, refer to the following syntax:

| flag | Meaning |
|---|---|
| - | Left justify. |
| + | Always display Sign. |
| space | Display space if there is no sign. |
| 0 | Pad with leading zeros. |
width specifies the number of characters used in total to display the value. Notice that the width includes the decimal point, and a - sign if there is one.
precision indicates the number of characters used after the decimal point.
| specifier | Meaning |
|---|---|
| f | Float |
| e or E | Float exponential Format. |
Syntax: flt_PRINT(&fvalue, formatstring);
| Arguments | Description |
|---|---|
| &fresult | Points to float result variable. |
| formatString | zero, null string, of valid format string. |
Returns: ‘0’ if successful.
Example
var floatA[2];
gfx_ScreenMode(LANDSCAPE) ;         //landscape orientation
flt_ITOF(floatA, 5000);             //convert integer 5000 to float

print("float value: ");
print("\n");

//specify format
print("         %f: ");
flt_PRINT(floatA,"%f");             //prints "5000.000000"
                                    //default precision is six 0's after the decimal point
print("\n");

print("         %e: ");
flt_PRINT(floatA,"%e");             //prints "5.000000e+03" (float exponential format)
                                    //default precision is six 0's after the decimal point
print("\n");

//specify precision
print("         %.2f: ");
flt_PRINT(floatA,"%.2f");           //prints "5000.00"
print("\n");

print("         %.1e: ");
flt_PRINT(floatA,"%.1e");           //prints "5.0e+03" (float exponential format)
print("\n");

//specify width and precision
print("         %10.2f: ");
flt_PRINT(floatA,"%10.2f");         //prints " 5000.00",
                                    //a total of 10 characters (including the decimal point)
                                    //left padded with 3 space characters
print("\n");

print("     %10.2e: ");
flt_PRINT(floatA,"%10.2e");         //prints " 5.00e+03",
                                    //a total of 10 characters (including the decimal point)
                                    //left padded with 2 space characters
print("\n");

//specify flag, width, and precision
print(" %010.2f: ");
flt_PRINT(floatA,"%010.2f");        //prints "0005000.00",
                                    //a total of 10 characters (including the decimal point)
                                    //left padded with 3 0's
print("\n");

print(" %010.2e: ");
flt_PRINT(floatA,"%010.2e");        //prints "005.00e+03",
                                    //a total of 10 characters (including the decimal point)
                                    //left padded with 2 0's
print("\n");


print(" %+10.2f: ");
flt_PRINT(floatA,"%+10.2f");        //prints " +5000.00",
                                    //a total of 10 characters (including the decimal point)
                                    //sign is always displayed
                                    //left padded with 2 space characters
print("\n");

print("%+010.2f: ");
flt_PRINT(floatA,"%+010.2f");       //prints "+005000.00",
                                    //a total of 10 characters (including the decimal point)
                                    //left padded with 2 0's
print("\n");
Note
A float variable is a 2 word array, e.g. var myfloat[2].
flt_PRINTxy
Prints a floating point value in a set string format at the specified position.
The string argument can be a string constant, a pointer to a string variable, or a pointer to a data statement. If it is zero or an empty string, the number is automatically formatted for the best presentation. The format string is similar to the C language, but only a single '%' may be used to print a single variable.
For more information on the syntax of the format string, refer to section flt_PRINT (&fvalue, formatstring).
Syntax: flt_PRINTxy(x, y, &fvalue, formatstring);
| Arguments | Description |
|---|---|
| x | The x position to start printing the number in. |
| y | The y position to start printing the number in. |
| &fresult | Points to float result variable. |
| formatstring | zero, null string, of valid format string |
Returns: ‘0’ if successfull.
Example
var floatA[2];
gfx_ScreenMode(LANDSCAPE) ;         //landscape orientation
flt_ITOF(floatA, 5000);             //convert integer 5000 to float

print("float value: ");
print("\n");

//specify format
gfx_MoveTo(36, 16);                 //move cursor to 36,16
txt_FGcolour(YELLOW);               //set text foreground color to yellow
print("%f: ");
txt_FGcolour(LIME);                 //set text foreground color to lime
flt_PRINTxy(68,16,floatA,"%f");     //prints "5000.000000" at 68,16
print("\n");

gfx_MoveTo(36, 32);                 //move cursor to 36,32
txt_FGcolour(YELLOW);               //set text foreground color to yellow
print("%e: ");
txt_FGcolour(LIME);                 //set text foreground color to lime
flt_PRINTxy(68,32,floatA,"%e");     //prints "5.000000e+03" at 68,32
print("\n");

//specify precision
gfx_MoveTo(20, 52);                 //move cursor to 20,52
txt_FGcolour(YELLOW);               //set text foreground color to yellow
print("%.2f: ");
txt_FGcolour(LIME);//set text foreground color to lime
flt_PRINTxy(68, 52, floatA,"%.2f");//prints "5000.00" at 68,52
print("\n");

gfx_MoveTo(20, 72);                 //move cursor to 20,72
txt_FGcolour(YELLOW);               //set text foreground color to yellow
print("%.1e: ");
txt_FGcolour(LIME);                 //set text foreground color to lime
flt_PRINTxy(68, 72, floatA,"%.1e"); //prints "5.0e+03" at 68,72
print( n");
Note
A float variable is a 2 word array, e.g. var myfloat[2].
General Purpose Functions
pause
Stop execution of the user program for a predetermined amount of time.
Syntax: pause(time);
| Arguments | Description |
|---|---|
| time | A value specifying the delay time in milliseconds. |
Returns: None
Example
lookup8
Search a list of 8-bit constant values for a match with a search value key. If found, the index of the matching constant is returned in result, else result is set to zero. Thus, if the value is found first in the list, result is set to one. If second in the list, result is set to two etc. If not found, result is returned with zero.
Syntax: lookup8(key, byteConstList);
| Arguments | Description |
|---|---|
| key | A byte value to search for in a fixed list of constants. The key argument can be a variable, array element, expression or constant. |
| byteConstList | A comma separated list of constants and strings to be matched against key. |
Returns: The index of the matching constant, otherwise zero.
Example
func main()
    var key, r;

    key := 'a';
    r := lookup8(key, 0x4D, "abcd", 2, 'Z', 5);
    print(" nSearch value 'a' nfound as index ", r)

    key := 5;
    r := lookup8(key, 0x4D, "abcd", 2, 'Z', 5);
    print("\nSearch value 5 nfound at index ", r)
    putstr("\nScanning..\n");

    key := -12000;          // we will count from 12000 to +12000, only
                            // the hex ascii values will give a match value

    while(key <= 12000)
        r := lookup8(key, "0123456789ABCDEF" ); // hex lookup
        if(r) print([HEX1] r 1);    // only print if we got a match in
                                    // the table
        key++;
    wend

    repeat forever
endfunc
Note
The list of constants cannot be re-directed. The lookup8(...) functions offer a versatile way for returning an index for a given value. This can be very useful for data entry filtering and parameter input checking and where ever you need to check the validity of certain inputs. The entire search list field can be replaced with a single name if you use the $ operator in constant, e.g. :
#constant HEXVALUES $"0123456789ABCDEF"
lookup16
Search a list of 16-bit constant values for a match with a search value key. If found, the index of the matching constant is returned in result, else result is set to zero. Thus, if the value is found first in the list, result is set to one. If second in the list, result is set to two etc. If not found, result is returned with zero.
| Arguments | Description |
|---|---|
| key | A byte value to search for in a fixed list of constants. The key argument can be a variable, array element, expression or constant. |
| wordConstList | A comma separated list of constants to be matched against key. |
Returns: The index of the matching constant, otherwise zero
Example
func main()
    var key, r;

    key := 5000;
    r := lookup16(key, 5,10,20,50,100,200,500,1000,2000,5000,10000);
    //r := lookup16(key,

    if(r)
        print("\nSearch value 5000 nfound at index ", r);
    else
        putstr("\nValue not found");
    endif
        print("\nOk"); // all done
    repeat forever
endfunc
Note
The lookup16(...) functions offer a versatile way for returning an index for a given value. This is very useful for parameter input checking and where ever you need to check the validity of certain values. The entire search list field can be replaced with a single name by using the $ operator in constant, e.g.:
#constant LEGALVALS $5,10,20,50,100,200,500,1000,2000,5000,10000
GPIO Functions
pin_Set
There are pre-defined constants for mode and pin:
| 4D Pin Name (Predefined) | PA0 | PA1 | PA2 | PA3 | PA4 | PA5 | PA6 | PA7 | PA8 | PA9 | PA10 | PA11 | PA12 | PA13 | PA14 | PA15 |
|---|---|---|---|---|---|---|---|---|---|---|---|---|---|---|---|---|
| DIABLO-16 Pin Number | pin61 | pin62 | pin63 | pin64 | pin46 | pin49 | pin50 | pin51 | pin52 | pin53 | pin43 | pin44 | pin31 | pin32 | pin37 | pin36 |
| H1 pin Number | pin 1 | pin 3 | pin 5 | pin 7 | pin 29 | pin 27 | pin 25 | pin 23 | pin 21 | pin 19 | pin 8 | pin 6 | pin 28 | pin 30 | pin 24 | pin 26 |
| 4D Mode (Predefined) | mode | PA0 | PA1 | PA2 | PA3 | PA4 | PA5 | PA6 | PA7 | PA8 | PA9 | PA10 | PA11 | PA12 | PA13 | PA14 | PA15 |
|---|---|---|---|---|---|---|---|---|---|---|---|---|---|---|---|---|---|
| PIN_INP | 0 | Yes | Yes | Yes | Yes | Yes | Yes | Yes | Yes | Yes | Yes | Yes | Yes | Yes | Yes | Yes | Yes |
| PIN_INP_HI | 1 | Yes | Yes | Yes | Yes | Yes | Yes | Yes | Yes | Yes | Yes | Yes | Yes | Yes | Yes | Yes | Yes |
| PIN_INP_LO | 2 | Yes | Yes | Yes | Yes | Yes | Yes | Yes | Yes | Yes | Yes | Yes | Yes | Yes | Yes | Yes | Yes |
| PIN_OUT | 3 | Yes | Yes | Yes | Yes | Yes | Yes | Yes | Yes | Yes | Yes | Yes | Yes | Yes | Yes | Yes | Yes |
| PIN_OUT_OD | 4 | No | No | No | No | Yes | Yes | Yes | Yes | Yes | Yes | Yes | Yes | Yes | Yes | Yes | Yes |
| PIN_AN | 5 | Yes | Yes | Yes | Yes | No | No | No | No | No | No | No | No | No | No | No | No |
| PIN_ANAVG | 6 | Yes | Yes | Yes | Yes | No | No | No | No | No | No | No | No | No | No | No | No |
Syntax: pin_Set(mode, pin);
| Arguments | Description |
|---|---|
| mode | A value (usually a constant) specifying the pin operation. |
| pin | A value (usually a constant) specifying the pin number. |
Returns: None
Example
pin_Set(PIN _INP , PA0 );       // set PA0 to be an in tput
pin_Set(PIN_AN , PA1 );         // set PA 1 to be an Analog input
pin_Set(PIN _INP_HI, PA4 );     // set PA4 to be an in tput with int. pullup
pin_Set(PIN_INP_LO, PA5);       // set PA5 to be an in tput with int. pulldown
pin_Set(PIN _OUT, PA10 );       // set PA10 to be used as an ou tput
pin_Set(PIN_OUT_OD, PA 14);     // set PA 1 4 to be an Open Drain Output
pin_Set(PIN _ANAVG, PA0 );      // set PA0 to be an Averaging Analog Input
Note
If using PIN_AN or PIN_ANAVG via the pin_Read() function, then if Touch is enabled this function should be called no more than once per millisecond, otherwise touch behaviour could be erratic.
pin_HI
Set any pin to the HI state, pin is automatically made an output. Pullup, Pulldown, and change notification will be disabled for the selected pin.
| 4D Pin Name (Predefined) | DIABLO-16 Pin Number | Availability |
|---|---|---|
| PA0 | 61 | Yes |
| PA1 | 62 | Yes |
| PA2 | 63 | Yes |
| PA3 | 64 | Yes |
| PA4 | 46 | Yes |
| PA5 | 49 | Yes |
| PA6 | 50 | Yes |
| PA7 | 51 | Yes |
| PA8 | 55 | Yes |
| PA9 | 53 | Yes |
| PA10 | 43 | Yes |
| PA11 | 44 | Yes |
| PA12 | 31 | Yes (See Note) |
| PA13 | 32 | Yes (See Note) |
| PA14 | 37 | Yes |
| PA15 | 36 | Yes |
Syntax: pin_HI(pin);
| Arguments | Description |
|---|---|
| pin | A value (usually a constant) specifying the pin number or a predefined pin name. |
Returns: a Logic 1 (0x0001) if the pin number is legal.
Example
Note
Some 4D Systems display modules utilise this pin for additional peripherals such as Resistive or Capacitive Touch. To ensure that the pin is available for use, refer to the appropriate product’s datasheet.
pin_LO
Set any pin to the LOW state, pin is automatically made an output. Pullup, Pulldown, and change notification will be disabled for the selected pin.
| 4D Pin Name (Predefined) | DIABLO-16 Pin Number | Availability |
|---|---|---|
| PA0 | 61 | Yes |
| PA1 | 62 | Yes |
| PA2 | 63 | Yes |
| PA3 | 64 | Yes |
| PA4 | 46 | Yes |
| PA5 | 49 | Yes |
| PA6 | 50 | Yes |
| PA7 | 51 | Yes |
| PA8 | 55 | Yes |
| PA9 | 53 | Yes |
| PA10 | 43 | Yes |
| PA11 | 44 | Yes |
| PA12 | 31 | Yes (See Note) |
| PA13 | 32 | Yes (See Note) |
| PA14 | 37 | Yes |
| PA15 | 36 | Yes |
Syntax: pin_LO(pin);
| Arguments | Description |
|---|---|
| pin | A value (usually a constant) specifying the pin number or a predefined pin name. |
Returns: A Logic 1 (0x0001) if the pin number is legal.
Example
Note
Some 4D Systems display modules utilise this pin for additional peripherals such as Resistive or Capacitive Touch. To ensure that the pin is available for use, refer to the appropriate product’s datasheet.
pin_Val
Outputs a logic state on a pin depending on the value of bit 0 of a variable. The pin is automatically made an output. Pullup, Pulldown, and change notification will be disabled for the selected pins.
| 4D Pin Name (Predefined) | DIABLO-16 Pin Number | Availability |
|---|---|---|
| PA0 | 61 | Yes |
| PA1 | 62 | Yes |
| PA2 | 63 | Yes |
| PA3 | 64 | Yes |
| PA4 | 46 | Yes |
| PA5 | 49 | Yes |
| PA6 | 50 | Yes |
| PA7 | 51 | Yes |
| PA8 | 55 | Yes |
| PA9 | 53 | Yes |
| PA10 | 43 | Yes |
| PA11 | 44 | Yes |
| PA12 | 31 | Yes (See Note) |
| PA13 | 32 | Yes (See Note) |
| PA14 | 37 | Yes |
| PA15 | 36 | Yes |
Syntax: pin_Val(pin, value);
| Arguments | Description |
|---|---|
| pin | A value (usually a constant) specifying the pin number or a predefined pin name. |
| value | Bit 0 of value. |
Returns: A Logic 1 (0x0001) if the pin number is legal.
Example
Note
Some 4D Systems display modules utilise this pin for additional peripherals such as Resistive or Capacitive Touch. To ensure that the pin is available for use, refer to the appropriate product’s datasheet.
pin_Read
Read a pin in various ways. If the pin is set to an input, read the state of the input pin. If set to an output, read the state of the output latch. If set to analogue, read the 12 bit analogue value.
| 4D Pin Name (Predefined) | DIABLO-16 Pin Number | Availability |
|---|---|---|
| PA0 | 61 | Yes |
| PA1 | 62 | Yes |
| PA2 | 63 | Yes |
| PA3 | 64 | Yes |
| PA4 | 46 | Yes |
| PA5 | 49 | Yes |
| PA6 | 50 | Yes |
| PA7 | 51 | Yes |
| PA8 | 55 | Yes |
| PA9 | 53 | Yes |
| PA10 | 43 | Yes |
| PA11 | 44 | Yes |
| PA12 | 31 | Yes (See Note) |
| PA13 | 32 | Yes (See Note) |
| PA14 | 37 | Yes |
| PA15 | 36 | Yes |
When using PIN_AN or PIN_ANAVG via the pin_Set command, then please note: If Touch is enabled this function should be called no more than once per millisecond, otherwise touch behaviour could be erratic.
PIN_AN > 15,000 reads/second
PIN_ANAVG ~3,000 reads/second
Syntax: pin_Read(pin);
| Arguments | Description |
|---|---|
| pin | A value (usually a constant) specifying the pin number or a predefined pin name. |
Returns: State of the pin a Logic 0 (0x0001) or 1 (0x0001) if the pin is set to digital input. State of the output latch, a Logic 0 (0x0001) or 1 (0x0001) if the pin is set to digital output. 12 bit analogue value if the pin is set to an analogue pin.
Example
pin_Set(PIN _AN , PA1 );        // set PA 1 to be used as an Analog input
ANval := pin_Read(PA1);         // Read the 12bit analog input
Note
Some 4D Systems display modules utilise this pin for additional peripherals such as Resistive or Capacitive Touch. To ensure that the pin is available for use, refer to the appropriate product’s datasheet.
bus_Read
Read the 16-bit port regardless of pin configurations. If a pin is configured as input or analogue, the pin is read directly as if it were a digital input. If a pin is configured as an output, the pin is also read directly, giving the output latch state.
| 4D Pin Name (Predefined) | DIABLO-16 Pin Number | Availability |
|---|---|---|
| PA0 | 61 | Yes |
| PA1 | 62 | Yes |
| PA2 | 63 | Yes |
| PA3 | 64 | Yes |
| PA4 | 46 | Yes |
| PA5 | 49 | Yes |
| PA6 | 50 | Yes |
| PA7 | 51 | Yes |
| PA8 | 55 | Yes |
| PA9 | 53 | Yes |
| PA10 | 43 | Yes |
| PA11 | 44 | Yes |
| PA12 | 31 | Yes (See Note) |
| PA13 | 32 | Yes (See Note) |
| PA14 | 37 | Yes |
| PA15 | 36 | Yes |
Syntax: bus_Read();
Returns: The 16-bit value of the bus.
Example
Note
Some 4D Systems display modules utilise this pin for additional peripherals such as Resistive or Capacitive Touch. To ensure that the pin is available for use, refer to the appropriate product’s datasheet.
bus_Read8
Returns the state of the bus as an 8bit value in to the lower byte of the assigned variable.
The BUS_RD pin set to LO, then, after a settling delay of approx 50nsec, the BUS is read into the lower 8-bits of the assigned variable (the upper 8-bits being set to 0) the BUS_RD pin is then set back to a HI level.

Syntax: bus_Read8();
Returns: The state of the 8-bit bus as an 8bit value.
Example
The lower byte of var1 will get loaded with the state of the bus.
Note
The BUS_RD pin must be preset to the desired output state must the bus pins to ensure BUS write integrity.
BUS_RD is PA3
The 8-bit BUS pins 0 to 7 are PA4 to PA11.
bus_Write8
The lower 8-bits of arg1 are placed on the BUS, then, after a settling delay of approx 50nsec, the BUS_WR pin is strobed LO for approx 50nsec then set back HI. The upper 8-bits of arg1 are ignored.

Syntax: bus_Write8(value);
| Arguments | Description |
|---|---|
| Value | The lower 8-bits of value are sent to the 8-bit bus. |
Returns: None
Example
Note
The BUS_WR pin pin must be preset to the desired output state as must the bus pins to ensure BUS write integrity.
BUS_WR is PA2
The 8-bit BUS pins 0 to 7 are PA4 to PA11
bus_SetPins
Any '1' bits in "value" sets the corresponding port pin to an output and forces its state to a '1'. The state of its previous open drain configuration is not altered. Any ‘0’ bits in "value" will not affect the pin. pullup, pulldown, and change notification will be disabled for the selected pins.
| 4D Pin Name (Predefined) | DIABLO-16 Pin Number | Availability |
|---|---|---|
| PA0 | 61 | Yes |
| PA1 | 62 | Yes |
| PA2 | 63 | Yes |
| PA3 | 64 | Yes |
| PA4 | 46 | Yes |
| PA5 | 49 | Yes |
| PA6 | 50 | Yes |
| PA7 | 51 | Yes |
| PA8 | 55 | Yes |
| PA9 | 53 | Yes |
| PA10 | 43 | Yes |
| PA11 | 44 | Yes |
| PA12 | 31 | Yes (See Note) |
| PA13 | 32 | Yes (See Note) |
| PA14 | 37 | Yes |
| PA15 | 36 | Yes |
Syntax: bus_SetPins(value);
| Arguments | Description |
|---|---|
| Value | A value (usually a constant) specifying the pin number. Bit 0 corresponds to PA0 through to bit9 which corresponds to PA9. |
Returns: None
Example
var arg1;
arg1 := 0b0011010;          // set desired mask
bus_SetPins(arg1);          // set PA 1, PA3 and PA4 to output, making them HI
Note
Some 4D Systems display modules utilise this pin for additional peripherals such as Resistive or Capacitive Touch. To ensure that the pin is available for use, refer to the appropriate product’s datasheet.
bus_ClearPins
Any '1' bits in "value" sets the corresponding port pin to an output and forces its state to a '0'. The state of its previous open drain configuration is not altered. Any ‘0’ bits in "value" will not affect the pin. pullup, pulldown, and change notification will be disable for the selected pins.
| 4D Pin Name (Predefined) | DIABLO-16 Pin Number | Availability |
|---|---|---|
| PA0 | 61 | Yes |
| PA1 | 62 | Yes |
| PA2 | 63 | Yes |
| PA3 | 64 | Yes |
| PA4 | 46 | Yes |
| PA5 | 49 | Yes |
| PA6 | 50 | Yes |
| PA7 | 51 | Yes |
| PA8 | 55 | Yes |
| PA9 | 53 | Yes |
| PA10 | 43 | Yes |
| PA11 | 44 | Yes |
| PA12 | 31 | Yes (See Note) |
| PA13 | 32 | Yes (See Note) |
| PA14 | 37 | Yes |
| PA15 | 36 | Yes |
Syntax: bus_ClearPins(value);
| Arguments | Description |
|---|---|
| Value | A value (usually a constant) specifying the pin number. Bit 0 corresponds to PA0 through to bit9 which corresponds to PA9. |
Returns: None
Example
var arg1;
arg1 := M_PA1 | M_PA3 | M_PA4 ;     // set desired mask (same as
bus_ClearPins(arg1);                // set PA 1, PA3 and PA4 to output, making them LO
Note
Some 4D Systems display modules utilise this pin for additional peripherals such as Resistive or Capacitive Touch. To ensure that the pin is available for use, refer to the appropriate product’s datasheet.
bus_SetChangeInterrupt
Any '1' bits in "portmask" marks that pin to generate an interrupt on change. A level change on that pin will cause "function" to be executed. If "function" is zero, the display may be put into sleep mode, and any change will cause a wakeup reset. Wakeup will always re-start code running in FLASHBANK_0 Bit 0 corresponds to PA0 through to bit15 which corresponds to PA15
Once armed, "function" will only be executed once, it is necessary to re-arm for any further events.
| 4D Pin Name (Predefined) | DIABLO-16 Pin Number | Availability |
|---|---|---|
| PA0 | 61 | Yes |
| PA1 | 62 | Yes |
| PA2 | 63 | Yes |
| PA3 | 64 | Yes |
| PA4 | 46 | Yes |
| PA5 | 49 | Yes |
| PA6 | 50 | Yes |
| PA7 | 51 | Yes |
| PA8 | 55 | Yes |
| PA9 | 53 | Yes |
| PA10 | 43 | Yes |
| PA11 | 44 | Yes |
| PA12 | 31 | Yes (See Note) |
| PA13 | 32 | Yes (See Note) |
| PA14 | 37 | Yes |
| PA15 | 36 | Yes |
Syntax: bus_SetChangeInterrupt(function, portmask);
| Arguments | Description |
|---|---|
| function | Event Function to be queued when an interrupt occurs. |
| portmask | "portmask" marks that pin to generate an interrupt on change. A value (usually a constant) specifying the pin number or a predefined pin name. |
Returns: The current state of the pins that are selected in "portmask". This can be saved and later used in "function" to see which pin(s) actually changed.
Example
bus_SetChangeInterrupt(scanKeypad, M_PA4 | M_PA5 | M_PA6 | M_PA7); // set PA4 to PA7 to interrupt on change
Note
Some 4D Systems display modules utilise this pin for additional peripherals such as Resistive or Capacitive Touch. To ensure that the pin is available for use, refer to the appropriate product’s datasheet.
Qencoder1
Connect a quadrature encoder to a pair of pins, using the predefined 4D Pin Names in the table below, and the PHApin and PHBpin arguments in this function.
It is necessary to configure the pins first, depending on your requirements, e.g.
pin_Set(PIN_INP_HI, PA4); // PA4 as input, with pullup to Vcc
or maybe
pin_Set(PIN_INP, PA4); // PA4 as input, no pullup or pulldown
The position counter and delta can be read or written to at any time with peekW and pokeW using the following constants:
QEN1_COUNTER_LOQEN1_COUNTER_HIQEN1_DELTA(QEN1_DELTA is reset to 0 once it has been read.)
| 4D Pin Name (Predefined) | DIABLO-16 Pin Number | Availability |
|---|---|---|
| PA0 | 61 | Yes |
| PA1 | 62 | Yes |
| PA2 | 63 | Yes |
| PA3 | 64 | Yes |
| PA4 | 46 | Yes |
| PA5 | 49 | Yes |
| PA6 | 50 | Yes |
| PA7 | 51 | Yes |
| PA8 | 55 | Yes |
| PA9 | 53 | Yes |
| PA10 | 43 | Yes |
| PA11 | 44 | Yes |
| PA12 | 31 | Yes (See Note) |
| PA13 | 32 | Yes (See Note) |
| PA14 | 37 | No |
| PA15 | 36 | No |
Syntax: Qencoder1(PHApin, PHBpin, mode);
| Arguments | Description |
|---|---|
| PHApin | Phase A input pin, 4D Pin Name reference – see table above. |
| PHBpin | Phase B input pin, 4D Pin Name reference – see table above. |
| mode | Not currently used, set to 0 only. |
Returns: None
Example
var qen1Delta;
pin_Set(PIN_INP_HI, PA4);               // Set PA4 to be Input with Pullup
pin_Set(PIN_INP_HI, PA5);               // Set PA5 to be Input with Pullup
Qencoder1(PA4, PA5, 0);                 // connect PA4 and PA5 pins to quadrature encoder module #1
qen1Delta := peekW(QEN1_DELTA);
Note
Some 4D Systems display modules utilise this pin for additional peripherals such as Resistive or Capacitive Touch. To ensure that the pin is available for use, refer to the appropriate product’s datasheet.
Qencoder1Reset
Resets the Counters and Delta values for Encoder #1.
QEN1_COUNTER_LOis reset to zero.QEN1_COUNTER_HIis reset to zero.QEN1_DELTAis reset to zero.
Syntax: Qencoder1Reset();
Returns: None
Example
Qencoder2
Connect a quadrature encoder to a pair of pins, using the predefined 4D Pin Names in the table below, and the PHApin and PHBpin arguments in this function.
It is necessary to configure the pins first, depending on your requirements, e.g.
pin_Set(PIN_INP_HI, PA 8 // PA 8 as input, with pullup to Vcc
or maybe
pin_Set(PIN_INP, PA 9 // PA 9 as input, no pullup or pulldown
The position counter and delta can be read or written to at any time with peekW and pokeW using the following constants:
QEN2_COUNTER_LOQEN2_COUNTER_HIQEN2_DELTA(QEN2_DELTA is reset to 0 once it has been read)
| 4D Pin Name (Predefined) | DIABLO-16 Pin Number | Availability |
|---|---|---|
| PA0 | 61 | Yes |
| PA1 | 62 | Yes |
| PA2 | 63 | Yes |
| PA3 | 64 | Yes |
| PA4 | 46 | Yes |
| PA5 | 49 | Yes |
| PA6 | 50 | Yes |
| PA7 | 51 | Yes |
| PA8 | 55 | Yes |
| PA9 | 53 | Yes |
| PA10 | 43 | Yes |
| PA11 | 44 | Yes |
| PA12 | 31 | Yes (See Note) |
| PA13 | 32 | Yes (See Note) |
| PA14 | 37 | No |
| PA15 | 36 | No |
Syntax: Qencoder2(PHApin, PHBpin, mode);
| Arguments | Description |
|---|---|
| PHApin | Phase A input pin, 4D Pin Name reference – see table below. |
| PHBpin | Phase B input pin, 4D Pin Name reference – see table below. |
| mode | Not currently used, set to 0 only. |
Returns: None
Example
var qen2Delta;
pin_Set(PIN_INP, PA8);          // Set PA8 to be Input pin_Set(PIN_INP, PA9); // Set PA9 to be Input
Qencoder2(PA8, PA9, 0);         // connect PA8 and PA9 pins to quadrature encoder module #2
pokeW(QEN2_COUNTER_HI) := 12;   // some ‘preset value’
Note
Some 4D Systems display modules utilise this pin for additional peripherals such as Resistive or Capacitive Touch. To ensure that the pin is available for use, refer to the appropriate product’s datasheet.
Qencoder2Reset
Resets the Counters and Delta values for Encoder #2.
QEN2_COUNTER_LOis reset to zero.QEN2_COUNTER_HIis reset to zero.QEN2_DELTAis reset to zero.
Syntax: Qencoder2Reset();
Returns: None
Example
pwm_Init
This PWM function enables a PWM output on the desired pin, based on the availability set out by the table below. Set the pin using the predefined 4D Pin Name into the pin argument, and select its mode and value, which are determined by:
| PWM Mode | Description |
|---|---|
| PWM_OFF | Turn off the PWM (pin is left as Output) |
| PWM_PLAIN | Plain PWM which value is a number between 0 and 1000. This corresponds to a 0.0 to 100.0% duty cycle. Raw Frequency is ~70kHz. A value of 1 is not valid. |
| PWM_SERVO | Servo PWM has a value which is between 100 and 200. This corresponds to 1.00 to 2.00ms. Please note values from 0 to 600 are valid (0-6ms) but should be used with caution. Repitition Rate is ~50Hz or 20ms. |
| PWN_BINARY | Binary PWM which value is a number between 0 and 1024. This corresponds to a 0.0 to 100.0% duty cycle. Raw Frequency is ~68kHz. A value of 1 is not valid. |
| PWM_625HZ | Plain PWM which corresponds to 62.5Hz, which takes a value from 0 to 160. |
| PWM_200HZ | Plain PWM which value is a number between 0 and 1000. This corresponds to a 0.0 to 100.0% duty cycle. Raw Frequency is as specified. |
| PWM_500HZ | Plain PWM which value is a number between 0 and 1000. This corresponds to a 0.0 to 100.0% duty cycle. Raw Frequency is as specified. |
| PWM_1KHZ | Plain PWM which value is a number between 0 and 1000. This corresponds to a 0.0 to 100.0% duty cycle. Raw Frequency is as specified. |
| PWM_5KHZ | Plain PWM which value is a number between 0 and 1000. This corresponds to a 0.0 to 100.0% duty cycle. Raw Frequency is as specified. |
| PWM_10KHZ | Plain PWM which value is a number between 0 and 1000. This corresponds to a 0.0 to 100.0% duty cycle. Raw Frequency is as specified. |
| PWM_15KHZ | Plain PWM which value is a number between 0 and 1000. This corresponds to a 0.0 to 100.0% duty cycle. Raw Frequency is as specified. |
| PWM_20KHZ | Plain PWM which value is a number between 0 and 1000. This corresponds to a 0.0 to 100.0% duty cycle. Raw Frequency is as specified. |
| PWM_25KHZ | Plain PWM which value is a number between 0 and 1000. This corresponds to a 0.0 to 100.0% duty cycle. Raw Frequency is as specified. |
| PWM_30KHZ | Plain PWM which value is a number between 0 and 1000. This corresponds to a 0.0 to 100.0% duty cycle. Raw Frequency is as specified. |
| PWM_35KHZ | Plain PWM which value is a number between 0 and 1000. This corresponds to a 0.0 to 100.0% duty cycle. Raw Frequency is as specified. |
The pwm_Init is non-blocking and the pwm continues until turned off.
| 4D Pin Name (Predefined) | DIABLO-16 Pin Number | Availability |
|---|---|---|
| PA0 | 61 | No |
| PA1 | 62 | No |
| PA2 | 63 | No |
| PA3 | 64 | No |
| PA4 | 46 | Yes |
| PA5 | 49 | Yes |
| PA6 | 50 | Yes |
| PA7 | 51 | Yes |
| PA8 | 55 | Yes |
| PA9 | 53 | Yes |
| PA10 | 43 | No |
| PA11 | 44 | No |
| PA12 | 31 | No |
| PA13 | 32 | No |
| PA14 | 37 | No |
| PA15 | 36 | No |
Syntax: pwm_Init(pin, mode, value);
| Arguments | Description |
|---|---|
| pin | 4D Pin Name to enable the PWM on. |
| mode | Modes for the PWM, see description below. |
| value | Value determines Duty Cycle/Time Base depending on Mode, see below. |
Returns: TRUE if the pin number is legal, usually ignored.
Example
pwm_Init(PA4, PWM_PLAIN, 676); //Sets Plain PWM of 67.7% on PA4

pwm_Init(PA5, PWM_625HZ, 80); //Sets 62.5Hz PWM with 50% duty cycle

pwm_Init(PA6, PWM_500HZ, 500); //Sets 500Hz PWM with 50% duty cycle
pin_Pulseout
This function will invert the state of an output for "value" milliseconds.
pin_Pulseout is a non-Blocking function, that is, code execution may continue while a pulse is occurring, and pulses can occur on multiple pins simultaneously.
pin_PulseoutB is a Blocking function, where program execution is suspended during pulse.
If not already an output, pin is automatically made a push/pull output, and the last state of its output latch will determine pulse polarity.
Its open drain state is not altered if the pin was already an output.
If pulseout is called while pulseout is still active, the pulse timer will simply be updated with the new "value" and the pulse will continue with the extended value.
| 4D Pin Name (Predefined) | DIABLO-16 Pin Number | Availability |
|---|---|---|
| PA0 | 61 | Yes |
| PA1 | 62 | Yes |
| PA2 | 63 | Yes |
| PA3 | 64 | Yes |
| PA4 | 46 | Yes |
| PA5 | 49 | Yes |
| PA6 | 50 | Yes |
| PA7 | 51 | Yes |
| PA8 | 55 | Yes |
| PA9 | 53 | Yes |
| PA10 | 43 | No |
| PA11 | 44 | No |
| PA12 | 31 | No |
| PA13 | 32 | No |
| PA14 | 37 | No |
| PA15 | 36 | No |
Syntax: pin_Pulseout(pin, value); or pin_PulseoutB(pin, value);
| Arguments | Description |
|---|---|
| pin | 4D predefined Pin Name to enable Pulseout on. |
| value | Length of pulse in milliseconds. |
Returns: TRUE if the pin number is legal (usually ignored).
Example
pin_Pulseout(PA3, 105);     // create a Hi Pulse of 105ms on PA3
…
pin_set(PIN_OUT, PA1);      // set PA1 as an Output
pin_HI(PA1);                // set PA1 to output HI
pin_Pulseout(PA1, 50);      // create a Lo pulse of 50ms on PA1
pin_Counter
Connect a counter to a pin to count transistions, and optionally call an event function when the 16bit counter wraps from 0xFFFF to zero.
The counter can be read or written to at any time with peekW and pokeW, therefore, the count may be set to 0xFFF0 for example, so that user function "OVFfuction" will be called after 16 pulses.
If "OVFfunction" is set to zero, only the counter will increment, and simply wrap back to zero from 0xFFFF. If "OVFfunction" points to a user function, wnen the event fires, pin_Counter will be disabled, and will need to be re-armed (ie '1shot' operation)
| 4D Pin Name (Predefined) | DIABLO-16 Pin Number | Availability |
|---|---|---|
| PA0 | 61 | No |
| PA1 | 62 | No |
| PA2 | 63 | No |
| PA3 | 64 | No |
| PA4 | 46 | Yes |
| PA5 | 49 | Yes |
| PA6 | 50 | Yes |
| PA7 | 51 | Yes |
| PA8 | 55 | Yes |
| PA9 | 53 | Yes |
| PA10 | 43 | No |
| PA11 | 44 | No |
| PA12 | 31 | No |
| PA13 | 32 | No |
| PA14 | 37 | No |
| PA15 | 36 | No |
The pin may be configured as an input or output, the function behaves the same.
All six pin counters may be active simultaneously, and the maximum frequency of pin transitions should not exceed a few Khz in mode 1 and 2 and are usually used for simple process control counting.
| Pin Counter MODE | Description |
|---|---|
| COUNT_OFF (0) | Disconnect the counter from the pin, "OVFfunction" is therefore ignored, and counting is inhibited. |
| COUNT_RISE (1) | increment counter on every rising edge. |
| COUNT_FALL (2) | increment on every falling edge. |
| COUNT_EDGE (3) | increment on every rising and falling edge. |
Syntax: pin_Counter(pin, mode, OVFfunction);
| Arguments | Description |
|---|---|
| pin | 4D predefined Pin Name to enable pin counter on, see table below. |
| mode | Counter mode, see table below. |
| OVFfunction | Event function to be queued on overflow of counter. |
Returns: None
Example
func main()
    pin_Set(PIN_INP, PA4);                      // external start event
    repeat                                      // main loop
        if(pin_Read(PA4))
            pin_Counter(PA2, COUNT_RISE, userFunc);
        endif
        // user code here
    forever
endfunc

func userFunc()
    print("Hello World");
endfunc
ana_HS
Collects "samples" samples at "rate" frequency for 0 to 4 analogue pins and calls "userFunction" when done.
"rate" is samples represented as 1/100 samples per second, up to 250,000 reads/second across 1-4 channels. For example if you wish to sample at 5000 samples per second, you would set rate to be 50 as 5000 * 1/100 = 50.
Any unused IOx pins should have their buffer addresses (i.e. IO4buf) set to 0
For performance reasons samples are taken in chunks of 32, thus if you request 33 samples there will be a delay of 31 samples before "userFunction" is called
Syntax: ana_HS(rate, samples, IO1buf, IO2buf, IO3buf, IO4buf, userFunction);
| Arguments | Description |
|---|---|
| rate | Number of samples per second, see rate commend below. |
| samples | Number of samples to collect per analog channel. |
| IO1buf | Buffer Address for first Analog Channel. |
| OI2buf | Buffer Address for second Analog Channel. |
| IO3buf | Buffer Address for third Analog Channel. |
| IO4buf | Buffer Address for forth Analog Channel. |
| userFunction | Function to call once all samples have been collected. |
Returns: None
Example
var x[100];         // Buffer for IO1buf
var b[100];         // Buffer for IO2buf
var c[100];         // Buffer for IO3buf

// 1000 samples a second, 10000 samples to be collected from 3 channels
ana_HS(1000, 10, a, b, c, 0, myFunc);

func myFunc()
    //do something once samples collected
endfunc
Note
If Touch is enabled this function should be called no more than once per millisecond, otherwise touch behaviour could be erratic.
pin_PulseoutCount
This function will invert the state of an output at a "freq" freuency "count" times. This is a non-Blocking function, that is, code execution may continue while a pulse is occuring, and pulses can occur on multiple pins simultaneously. A function can be specified that will be called when all the pulses have been output. A maximum of 3 pulseoutCount activities can be active at any one point.
If not already an output, pin is automatically made a push/pull output, and the last state of its output latch will determine pulse polarity.
Its open drain state is not altered if the pin was already an output.
If pulseoutCount is called while pulseoutCount is active, the pulse counter will simply have the new count value added to it.
| 4D Pin Name (Predefined) | DIABLO-16 Pin Number | Availability |
|---|---|---|
| PA0 | 61 | No |
| PA1 | 62 | No |
| PA2 | 63 | No |
| PA3 | 64 | No |
| PA4 | 46 | Yes |
| PA5 | 49 | Yes |
| PA6 | 50 | Yes |
| PA7 | 51 | Yes |
| PA8 | 55 | Yes |
| PA9 | 53 | Yes |
| PA10 | 43 | No |
| PA11 | 44 | No |
| PA12 | 31 | No |
| PA13 | 32 | No |
| PA14 | 37 | No |
| PA15 | 36 | No |
Syntax: pin_PulseoutCount(pin, frequency, count, function);
| Arguments | Description |
|---|---|
| pin | 4D predefined Pin Name to enable PulseoutCount on. |
| frequency | The frequency to pulse the pin at (minimum 10Hz). |
| count | The number of times to pulse the specified pin. |
| function | Address of a function to be called at completion. |
Returns: TRUE if the pin number is legal and the frequency is at least 10Hz and the maximum number of 3 simultaneous pulseoutCount pins is not exceeded.
Example
func pulseCompleted()
    // do something
endfunc

func main()

    pin_set(PIN_OUT, PA4);
    // ... user setup

    // start an alternating pulse w/ 5000 inversions at 100Hz
    pin_PulseoutCount(PA4, 100, 5000, pulseCompleted);
    // runs pulseCompleted when done
    // change pulseCompleted to 0 if not required

    repeat
        // ... user loop
    forever
endfunc
OW_Reset
Resets a ONEWIRE device and returns the status.
| 4D Pin Name (Predefined) | DIABLO-16 Pin Number | Availability |
|---|---|---|
| PA0 | 61 | Yes |
| PA1 | 62 | Yes |
| PA2 | 63 | Yes |
| PA3 | 64 | Yes |
| PA4 | 46 | Yes |
| PA5 | 49 | Yes |
| PA6 | 50 | Yes |
| PA7 | 51 | Yes |
| PA8 | 55 | Yes |
| PA9 | 53 | Yes |
| PA10 | 43 | Yes |
| PA11 | 44 | Yes |
| PA12 | 31 | Yes (See Note) |
| PA13 | 32 | Yes (See Note) |
| PA14 | 37 | Yes |
| PA15 | 36 | Yes |
Syntax: OW_Reset(pin);
| Arguments | Description |
|---|---|
| pin | 4D predefined Pin Name, see table above. |
Returns: Reset, and returns the status of the ONEWIRE device, 0 = ACK, 1 = No Activity.
Example
print ("result=", OW_Reset(PA0));
// This example will print a 0 if the device initialised successfully.
Note
Some 4D Systems display modules utilise this pin for additional peripherals such as Resistive or Capacitive Touch. To ensure that the pin is available for use, refer to the appropriate product’s datasheet.
OW_Read
Reads the 8-bit value from a 1-Wire devices register. (refer to Dallas 1wired documentation for further information)
| 4D Pin Name (Predefined) | DIABLO-16 Pin Number | Availability |
|---|---|---|
| PA0 | 61 | Yes |
| PA1 | 62 | Yes |
| PA2 | 63 | Yes |
| PA3 | 64 | Yes |
| PA4 | 46 | Yes |
| PA5 | 49 | Yes |
| PA6 | 50 | Yes |
| PA7 | 51 | Yes |
| PA8 | 55 | Yes |
| PA9 | 53 | Yes |
| PA10 | 43 | Yes |
| PA11 | 44 | Yes |
| PA12 | 31 | Yes (See Note) |
| PA13 | 32 | Yes (See Note) |
| PA14 | 37 | No |
| PA15 | 36 | No |
Syntax: OW_Read(pin);
| Arguments | Description |
|---|---|
| pin | 4D predefined Pin Name, see table above. |
Returns: A word holding the lower 8-bits contain data bits received from the 1-Wire device.
Example
// read temperature from DS1821 device
var temp_buf;
OW_Reset(PA0);                  // reset the device
OW_Write(PA0, 0xAA);            // send the read command
temp_buf := OW_Read(PA0);     // read the device register
Note
Some 4D Systems display modules utilise this pin for additional peripherals such as Resistive or Capacitive Touch. To ensure that the pin is available for use, refer to the appropriate product’s datasheet.
OW_Read9
Reads the 9 or more bit value from a 1-Wire devices register. (refer to Dallas 1wired documentation for further information)
| 4D Pin Name (Predefined) | DIABLO-16 Pin Number | Availability |
|---|---|---|
| PA0 | 61 | Yes |
| PA1 | 62 | Yes |
| PA2 | 63 | Yes |
| PA3 | 64 | Yes |
| PA4 | 46 | Yes |
| PA5 | 49 | Yes |
| PA6 | 50 | Yes |
| PA7 | 51 | Yes |
| PA8 | 55 | Yes |
| PA9 | 53 | Yes |
| PA10 | 43 | Yes |
| PA11 | 44 | Yes |
| PA12 | 31 | Yes (See Note) |
| PA13 | 32 | Yes (See Note) |
| PA14 | 37 | No |
| PA15 | 36 | No |
Syntax: OW_Read9(pin);
| Arguments | Description |
|---|---|
| pin | 4D predefined Pin Name, see table above. |
Returns: A word holding 9 or more data bits received from the 1-Wire device.
Example
// read temperature from DS1821 device
var temp_buf;
OW_Reset(PA0);              // reset the device
OW_Write(PA0, 0xAA);        // send the read command
temp_buf := OW_Read9(PA0)   // read the device register
Note
Some 4D Systems display modules utilise this pin for additional peripherals such as Resistive or Capacitive Touch. To ensure that the pin is available for use, refer to the appropriate product’s datasheet.
OW_Write
Writes the 8-bit data to 1-Wire devices register. (refer to Dallas 1wired documentation for further information)
| 4D Pin Name (Predefined) | DIABLO-16 Pin Number | Availability |
|---|---|---|
| PA0 | 61 | Yes |
| PA1 | 62 | Yes |
| PA2 | 63 | Yes |
| PA3 | 64 | Yes |
| PA4 | 46 | Yes |
| PA5 | 49 | Yes |
| PA6 | 50 | Yes |
| PA7 | 51 | Yes |
| PA8 | 55 | Yes |
| PA9 | 53 | Yes |
| PA10 | 43 | Yes |
| PA11 | 44 | Yes |
| PA12 | 31 | Yes (See Note) |
| PA13 | 32 | Yes (See Note) |
| PA14 | 37 | No |
| PA15 | 36 | No |
Syntax: OW_Write(pin, data);
| Arguments | Description |
|---|---|
| pin | 4D predefined Pin Name, see table above. |
| data | The lower 8-bits of data are sent to the 1-Wire device. |
Returns: None
Example
//===================================================================
// For this demo to work, a Dallas DS18B20 must be connected to
// PA0 AND POWERED FROM 3.3 to 5V.
// DS18B20 pin1 = Gnd / pin2 = data in/out / pin 3 = + 3.3 v
// Refer to the Dallas DS18B20 for further information
//===================================================================

func main()
    var temp_buf ;
    pause(1000);
    txt_MoveCursor(0,0);
    if(OW _Reset(PA0))                      // initialise and test
        print("No device detected");
        while(1);
    endif

    repeat
        txt_MoveCursor(0, 0);
        print ("result=", OW_Reset(PA0));
        OW_Write(PA0, 0xcc);                // sk ip ROM
        OW_Write(PA0, 0x44);                // start conversion
        OW_Reset(PA0);                      // reset
        OW_Write(PA0, 0xcc);                // skip ROM
        OW_Write(PA0, 0xBE);                // get temperature
        temp_buf := OW_Read(PA0);
        temp_buf += (OW_Read(PA0) << 8);
        txt_MoveCursor(1, 0);
        print ("temp_buf=0x", [HEX4] temp_buf);
    forever
endfunc
Note
Some 4D Systems display modules utilise this pin for additional peripherals such as Resistive or Capacitive Touch. To ensure that the pin is available for use, refer to the appropriate product’s datasheet.
NP_Write
Writes a string of pixels to the NeoPixel array connected to the specified I/O Pin.
Due to the critical timing requirements of the NeoPixel, any interrupts should be stopped, or otherwise circumvented before this command is issued. Internally, the system Timer is disabled during this command.
Comms Interrupts should also be disabled by the user, otherwise errors may occur. A suitable workaround is to repeat the NP_Write until com_Count does not change during its execution.
Comms TX Buffers, if used, should be held.
Audio should be stopped or paused.
| 4D Pin Name (Predefined) | DIABLO-16 Pin Number | Availability |
|---|---|---|
| PA0 | 61 | Yes |
| PA1 | 62 | Yes |
| PA2 | 63 | Yes |
| PA3 | 64 | Yes |
| PA4 | 46 | Yes |
| PA5 | 49 | Yes |
| PA6 | 50 | Yes |
| PA7 | 51 | Yes |
| PA8 | 55 | Yes |
| PA9 | 53 | Yes |
| PA10 | 43 | Yes |
| PA11 | 44 | Yes |
| PA12 | 31 | Yes (See Note) |
| PA13 | 32 | Yes (See Note) |
| PA14 | 37 | Yes |
| PA15 | 36 | Yes |
Syntax: NP_Write(pin, data, size, Options, RepeatFirst, Repeat, RepeatLast);
| Arguments | Description |
|---|---|
| pin | 4D predefined Pin Name, see table above. |
| data | The address of the data to be sent. |
| size | The size of the data to be sent, in Pixels. |
| Options | The format of the data pixels, NP_565, NP_RGB or NP_XRGB. |
| RepeatFirst | Number of times to repeat the first colour (0 means first colour is not considered 'special'). |
| Repeat | Number of times to repeat the colours between first and last. |
| RepeatLast | Number of times to repeat the last colour (0 means last colour is not considered 'special') |
Returns: TRUE if the pin number is legal (usually ignored).
Example
var data[4] := [RED, LIME, BLUE, WHITE] ; // send Red, Lime Blue, and white to the NeoPixel strip twice
NP_Write(PA0, data, 4, 0, 2, 0);
// send 2 x Red, Lime, Blue and 2 x White to the NeoPixel strip
NP_Write(PA0, data, 4, 2 , 1 , 2 );
Note
Some 4D Systems display modules utilise this pin for additional peripherals such as Resistive or Capacitive Touch. To ensure that the pin is available for use, refer to the appropriate product’s datasheet.
Graphics Functions
gfx_Cls
Clear the screen using the current background colour. gfx_Cls() command brings some of the settings back to default; such as,
- Transparency turned OFF
- Outline colour set to BLACK
- Opacity set to OPAQUE
- Pen set to OUTLINE
- Line patterns set to OFF
- Right text margin set to full width
- Text magnifications set to 1
- All origins set to 0:0
The alternative to maintain settings and clear screen is to draw a filled rectangle with the required background colour.
Syntax: gfx_Cls();
Returns: None
Example
gfx_ChangeColour
Changes all oldColour pixels to newColour within the clipping area.
Syntax: gfx_ChangeColour(oldColour, newColour);
| Arguments | Description |
|---|---|
| oldColour | Specifies the sample colour to be changed within the clipping window. |
| newColour | Specifies the new colour to change all occurrences of old colour within the clipping window. |
Returns: None
Example
func main()
    txt_Width(3);
    txt_Height(5);
    gfx_MoveTo(8,20);
    print("TEST");              // print the string
    gfx_SetClipRegion();        // force clipping area to extents of text
                                // just printed
    gfx_ChangeColour(BLACK, RED);   // test change of background colour

    repeat forever
endfunc

// This example prints a test string, forces the clipping area to the extent of the text that was printed then changes the background colour.
gfx_Circle
Draws a circle with centre point x1, y1 with radius r using the specified colour.
Syntax: gfx_Circle(x, y, rad, colour);
| Arguments | Description |
|---|---|
| x,y | Specifies the centre of the circle. |
| rad | Specifies the radius of the circle. |
| colour | Specifies the colour of the circle. |
Returns: None
Example
// assuming PEN_SIZE is OUTLINE
gfx_Circle(50,50,30, RED);

// This example draws a BLUE circle outline centred at x=50, y=50 with a radius of 30 pixel units.
Note
The default PEN_SIZE is set to OUTLINE, however, if PEN_SIZE is set to SOLID, the circle will be drawn filled, if PEN_SIZE is set to OUTLINE, the circle will be drawn as an outline. If the circle is drawn as SOLID, the outline colour can be specified with gfx_OutlineColour(...). If OUTLINE_COLOUR is set to 0, no outline is drawn.
gfx_CircleFilled
Draws a SOLID circle with centre point x1, y1 with radius using the specified colour.
The outline colour can be specified with gfx_OutlineColour(...). If OUTLINE_COLOUR is set to 0, no outline is drawn.
Syntax: gfx_CircleFilled(x, y, rad, colour);
| Arguments | Description |
|---|---|
| x,y | Specifies the centre of the circle. |
| rad | Specifies the radius of the circle. |
| colour | Specifies the fill colour of the circle. |
Returns: None
Example
if(state == TOUCH_RELEASED)             // if there's a release;
    gfx_CircleFilled(x, y, 10, RED);    // we'll draw a solid red circle
                                        // of radius=10 on touch release
endif
Note
The PEN_SIZE is ignored, the circle is always drawn SOLID.
gfx_Line
Draws a line from x1, y1 to x2, y2 using the specified colour. The line is drawn using the current object colour. The current origin is not altered. The line may be tessellated with the gfx_LinePattern(...) function.
Syntax: gfx_Line(x1, y1, x2, y2, colour);
| Arguments | Description |
|---|---|
| x1, y1 | Specifies the starting coordinates of the line. |
| x2, y2 | Specifies the ending coordinates of the line. |
| colour | Specifies the colour of the line. |
Returns: None
Example
gfx_Line(100, 100, 10, 10, RED);

// This example draws a RED line from x1=10, y1=10 to x2=100, y2=100
gfx_Hline
Draws a fast horizontal line from x1 to x2 at vertical co-ordinate y using colour.
Syntax: gfx_Hline(y, x1, x2, colour);
| Arguments | Description |
|---|---|
| y | Specifies the vertical position of the horizontal line. |
| x1, x2 | Specifies the horizontal end points of the line. |
| colour | Specifies the colour of the horizontal line. |
Returns: None
Example
gfx_Hline(50, 10, 80, RED);

// This example draws a fast RED horizontal line at y=50, from x1=10 to x2=80
gfx_Vline
Draws a fast vertical line from y1 to y2 at horizontal co-ordinate x using colour.
Syntax: gfx_Vline(x, y1, y2, colour);
| Arguments | Description |
|---|---|
| x | Specifies the horizontal position of the vertical line. |
| y1, y2 | Specifies the vertical end points of the line. |
| colour | Specifies the colour of the vertical line. |
Returns: None
Example
gfx_Vline(20, 30, 70, RED);

// This example draws a fast RED vertical line at x=20, from y1=30 to y2=70
gfx_Rectangle
Draws a rectangle from x1, y1 to x2, y2 using the specified colour. The line may be tessellated with the gfx_LinePattern(...) function.
Syntax: gfx_Rectangle(x1, y1, x2, y2, colour);
| Arguments | Description |
|---|---|
| x1, y1 | Specifies the top left corner of the rectangle. |
| x2, y2 | Specifies the bottom right corner of the rectangle. |
| colour | Specifies the colour of the rectangle. |
Returns: None
Example
gfx_Rectangle(10, 10, 30, 30, GREEN);

// This example draws a GREEN rectangle from x1=10, y1=10 to x2=30, y2=30
Note
The default PEN_SIZE is set to OUTLINE, however, if PEN_SIZE is set to SOLID, the rectangle will be drawn filled, if PEN_SIZE is set to OUTLINE, the rectangle will be drawn as an outline. If the rectangle is drawn as SOLID, the outline colour can be specified with gfx_OutlineColour(...). If OUTLINE_COLOUR is set to 0, no outline is drawn. The outline may be tessellated with the gfx_LinePattern(...) function.
gfx_RectangleFilled
Draws a SOLID rectangle from x1, y1 to x2, y2 using the specified colour. The line may be tessellated with the gfx_LinePattern(...) function.
The outline colour can be specified with gfx_OutlineColour(...). If OUTLINE_COLOUR is set to 0, no outline is drawn. The outline may be tessellated with the gfx_LinePattern(...) function.
Syntax: gfx_RectangleFilled(x1, y1, x2, y2, colour);
| Arguments | Description |
|---|---|
| x1, y1 | Specifies the top left corner of the rectangle. |
| x2, y2 | Specifies the bottom right corner of the rectangle. |
| colour | Specifies the fill colour of the rectangle. |
Returns: None
Example
gfx_RectangleFilled(30,30,80,80, RED);

// This example draws a filled RED rectangle from x1=30,y1=30 to x2=80,y2=80
Note
The PEN_SIZE is ignored, the rectangle is always drawn SOLID.
gfx_RoundRect
Draw a filled rectangle at the given co-ordinates with optional rounded corners.
If x1 = x2 or y1 = y2 no straight line part is drawn.

The actual width of the round-corners rectangle is computed by: 2*rad + x2 – x1.
The actual height of the round-corners rectangle is computed by: 2*rad + y2 – y1.
Rendering can be obtained with gfx_FillPattern(PATTRN); or gfx_FillPattern(OFF); for no fill pattern determined by ‘radius’.
Syntax: gfx_RoundRect(x1, y1, x2, y2, rad, colour);
| Arguments | Description |
|---|---|
| x1, y1 | Specifies the top left corner of the inner rectangle. |
| x2, y2 | Specifies the bottom right corner of the inner rectangle. |
| rad | Specifies the corner radius.This is the distance in pixels extending from the corners of the inner rectangle. |
| colour | Specifies the colour of the rectangle. |
Returns: None
Example
gfx_Polyline
Plots lines between points specified by a pair of arrays using the specified colour. The lines may be tessellated with the gfx_LinePattern(...) function. gfx_Polyline can be used to create complex raster graphics by loading the arrays from serial input or from MEDIA with very little code requirement.
This function is very similar to the Polygon function.
Syntax: gfx_Polyline(n, vx, vy, colour);
| Arguments | Description |
|---|---|
| n | Specifies the number of elements in the x and y arrays specifying the vertices for the polyline. |
| vx | Specifies the addresses of the storage of the array of elements for the x coordinates of the vertices. |
| vy | Specifies the addresses of the storage of the array of elements for the y coordinates of the vertices. |
| colour | Specifies the colour for the lines. |
Returns: None
Example
#inherit "4DGL_16bitColours.fnc"

var vx[20], vy[20];

func main()
    vx[0] := 36; vy[0] := 110;
    vx[1] := 36; vy[1] := 80;
    vx[2] := 50; vy[2] := 80;
    vx[3] := 50; vy[3] := 110;

    vx[4] := 76; vy[4] := 104;
    vx[5] := 85; vy[5] := 80;
    vx[6] := 94; vy[6] := 104;

    vx[7] := 76; vy[7] := 70;
    vx[8] := 85; vy[8] := 76;
    vx[9] := 94; vy[9] := 70;

    vx[10] := 110; vy[10] := 66;
    vx[11] := 110; vy[11] := 80;
    vx[12] := 100; vy[12] := 90;
    vx[13] := 120; vy[13] := 90;
    vx[14] := 110; vy[14] := 80;

    vx[15] := 101; vy[15] := 70;
    vx[16] := 110; vy[16] := 76;
    vx[17] := 119; vy[17] := 70;

    // house
    gfx_Rectangle(6,50,66,110,RED);         // frame
    gfx_Triangle(6,50,36,9,66,50,YELLOW);   // roof
    gfx_Polyline(4, vx, vy, CYAN);          // door

    // man
    gfx_Circle(85, 56, 10, BLUE);           // head
    gfx_Line(85, 66, 85, 80, BLUE);         // body
    gfx_Polyline(3, vx+4, vy+4, CYAN);      // legs
    gfx_Polyline(3, vx+7, vy+7, BLUE);      // arms

    // woman
    gfx_Circle(110, 56, 10, PINK);          // head
    gfx_Polyline(5, vx+10, vy+10, BROWN);   // dress
    gfx_Line(104, 104, 106, 90, PINK);      // left arm
    gfx_Line(112, 90, 116, 104, PINK);      // right arm
    gfx_Polyline(3, vx+15, vy+15, SALMON);  // dress

     repeat forever
endfunc

// This example draws a simple scene
gfx_Polygon
Plots lines between points specified by a pair of arrays using the specified colour. The last point is drawn back to the first point, completing the polygon. The lines may be tessellated with the gfx_LinePattern(...) function. gfx_Polygon can be used to create complex raster graphics by loading the arrays from serial input or from MEDIA with very little code requirement.
Syntax: gfx_Polygon(n, vx, vy, colour);
| Arguments | Description |
|---|---|
| n | Specifies the number of elements in the x and y arrays specifying the vertices for the polygon. |
| vx | Specifies the addresses of the storage of the array of elements for the x coordinates of the vertices. |
| vy | Specifies the addresses of the storage of the array of elements for the y coordinates of the vertices. |
| colour | Specifies the colour for the polygon. |
Returns: None
Example
var vx[7], vy[7];

func main()
    vx[0] := 10; vy[0] := 10;
    vx[1] := 35; vy[1] := 5;
    vx[2] := 80; vy[2] := 10;
    vx[3] := 60; vy[3] := 25;
    vx[4] := 80; vy[4] := 40;
    vx[5] := 35; vy[5] := 50;
    vx[6] := 10; vy[6] := 40;
    gfx_Polygon(7, vx, vy, RED);
    repeat forever
endfunc

// This example draws a simple polygon
gfx_Triangle
Draws a triangle outline between vertices x1,y1 , x2,y2 and x3,y3 using the specified colour. The line may be tessellated with the gfx_LinePattern(...) function. Vertices must be specified in an anti-clockwise fashion.
Syntax: gfx_Triangle(x1, y1, x2, y2, x3, y3, colour);
| Arguments | Description |
|---|---|
| x1, y1 | Specifies the first vertices of the triangle. |
| x2, y2 | Specifies the second vertices of the triangle. |
| x3, y3 | Specifies the third vertices of the triangle. |
| colour | Specifies the colour for the triangle. |
Returns: None
Example
gfx_Triangle(10,10,30,10,20,30,CYAN);

// This example draws a CYAN triangular outline with vertices at 10,10 30,10 20,30
gfx_Dot
Draws a pixel at the current origin using the current object colour.
Syntax: gfx_Dot();
Returns: None
Example
gfx_Bullet
Draws a circle or 'bullet point' with radius r at the current origin using the current object colour.
Syntax: gfx_Bullet(radius);
| Arguments | Description |
|---|---|
| radius | Specifies the radius of the bullet. |
Returns: None
Example
Note
The default PEN_SIZE is set to OUTLINE, however, if PEN_SIZE is set to SOLID, the circle will be drawn filled, if PEN_SIZE is set to OUTLINE, the circle will be drawn as an outline. If the circle is drawn as SOLID, the outline colour can be specified with gfx_OutlineColour(...).
gfx_OrbitInit
Sets up the internal pointers for the gfx_Orbit(..) result variables. The &x_orb and &y_orb parameters are the addresses of the variables or array elements that are used to store the result from the gfx_Orbit(..) function.
Syntax: gfx_OrbitInit(&x_dest, &y_dest);
| Arguments | Description |
|---|---|
| x_dest | Specifies the addresses of the storage locations for the calculated Orbit X-coordinate. |
| y_dest | Specifies the addresses of the storage locations for the calculated Orbit Y-coordinate. |
Returns: None
Example
var targetX, targetY;
gfx_OrbitInit(&targetX, &targetY)

// This example sets the variables that will receive the result from a gfx_Orbit(..) function call
gfx_Orbit
Sets Prior to using this function, the destination address of variables for the calculated coordinates must be set using the gfx_OrbitInit(..) function. The gfx_Orbit(..) function calculates the x, y coordinates of a distant point relative to the current origin, where the only known parameters are the angle and the distance from the current origin. The new coordinates are calculated and then placed in the destination variables that have been previously set with the gfx_OrbitInit(..) function.
Syntax: gfx_Orbit(angle, distance);
| Arguments | Description |
|---|---|
| angle | Specifies the angle from the origin to the remote point. The angle is specified in degrees. |
| distance | Specifies the distance from the origin to the remote point in pixel units. |
Returns: None
Example
var targetX, targetY;

gfx_OrbitInit(&targetX, &targetY);
gfx_MoveTo(30, 30);
gfx_Bullet(5)                                   // mark the start point with a small WHITE circle
gfx_Orbit(30, 50);                              // calculate a point 50 pixels away from origin at
                                                // 30 degrees
gfx_CircleFilled(targetX,targetY,3,0xF800);     // mark the target point
                                                // with a RED circle
See example comments for explanation.
Note
Result is stored in the variables that were specified with the gfx_OrbitInit(..) function.
gfx_PutPixel
Draws a pixel at position x,y using the specified colour.
Syntax: gfx_PutPixel(x, y, colour);
| Arguments | Description |
|---|---|
| x,y | Specifies the screen coordinates of the pixel. |
| colour | Specifies the colour of the pixel. |
Returns: None
Example
gfx_GetPixel
Reads the colour value of the pixel at position x,y.
Syntax: gfx_GetPixel(x, y);
| Arguments | Description |
|---|---|
| x,y | Specifies the screen coordinates of the pixel colour to be returned. |
Returns: The 8 or 16bit colour of the pixel (default 16bit).
Example
gfx_PutPixel(20, 20, 1234);
r := gfx_GetPixel(20, 20);
print(r);

// This example print 1234, the colour of the pixel that was previously placed.
gfx_MoveTo
Moves the origin to a new position.
Syntax: gfx_MoveTo(xpos, ypos);
| Arguments | Description |
|---|---|
| xpos | Specifies the horizontal position of the new origin. |
| ypos | Specifies the vertical position of the new origin. |
Returns: None
Example
#inherit "4DGL_16bitColours.fnc"
func help()
    var x, y, state;

    print("TOUCHE ME");

    touch_Set(TOUCH_ENABLE);                                // lets enable the touch screen
    while(touch_Get(TOUCH_STATUS) != TOUCH_PRESSED);        //Wait for touch

    // we'll need a place on the screen to start with
    gfx_MoveTo(touch_Get( TOUCH_GETX), touch_Get( TOUCH_GETY));
    gfx_Set(OBJECT_COLOUR, WHITE);                      // this will be our line colour

    while(1)
        state := touch_Get(TOUCH_STATUS);               // Look for touch activity
        x := tou ch_Get(TOUCH_GETX);                    // Grab x and the
        y := touch_Get(TOUCH_GETY);                     // y coordinates of the touch

        if(state == TOUCH_PRESSED)                      // if there's a press
            gfx_LineTo(x, y);                           // Draw a line from previous spot
        endif

        if(state == TOUCH_RELEASED)                     // if there's a release;
            gfx_CircleFilled(x, y, 10, RED);            // Draw a solid red circle
        endif

        if(state == TOUCH_MOVING)                       // if there's movement
            gfx_PutPixel(x, y, LIGHT GREEN);            // we'll draw a green pixel
        endif
    wend                                                // Repeat forever
endfunc
Note
This function sets the TEXT_MARGIN the x value, this is so you can easily left align text using \n. If you don’t want this, simply set TEXT_MARGIN to 0 using pokeW(TEXT_MARGIN,0).
gfx_MoveRel
Moves the origin to a new position relative to the old position.
Syntax: gfx_MoveRel(xoffset, yoffset);
| Arguments | Description |
|---|---|
| xoffset | Specifies the horizontal offset of the new origin. |
| yiffset | Specifies the vertical offset of the new origin. |
Returns: None
Example
gfx_MoveTo(10, 20);
gfx_MoveRel(-5, -3);
gfx_Dot();

// This example draws a pixel using the current object colour at x=5, y=17
gfx_IncX
Increment the current X origin by 1 pixel unit. The original value is returned before incrementing. The return value can be useful if a function requires the current point before insetting occurs.
Syntax: gfx_IncX();
Returns: The current X origin before the increment.
Example
var n;
gfx_MoveTo(20,20);
n := 96;

while (n--)
    gfx_ObjectColour(n/3);
    gfx_Bullet(2);
    gfx_IncX();
wend

// This example draws a simple rounded vertical gradient.
gfx_IncY
Increment the current Y origin by 1 pixel unit. The original value is returned before incrementing. The return value can be useful if a function requires the current point before insetting occurs.
Syntax: gfx_IncY();
Returns: The current Y origin before the increment.
Example
var n;
gfx_MoveTo(20,20);
n := 96;
while (n--)
    gfx_ObjectColour(n/3);
    gfx_LineRel(20, 0);
    gfx_IncY();
wend

// This example draws a simple horizontal gradient using lines.
gfx_LineTo
Draws a line from the current origin to a new position. The Origin is then set to the new position. The line is drawn using the current object colour. The line may be tessellated with the gfx_LinePattern(...) function.
Syntax: gfx_LineTo(xpos, ypos);
| Arguments | Description |
|---|---|
| xpos | Specifies the horizontal position of the line end as well as the new origin. |
| ypos | Specifies the vertical position of the line end as well as the new origin. |
Returns: None
Example
gfx_MoveTo(10, 20);
gfx_LineTo(60, 70);

// This example draws a line using the current object colour between x1=10,y1=20 and x2=60,y2=70. The new origin is now set at x=60,y=70.
gfx_LineRel
Draws a line from the current origin to a new position. The line is drawn using the current object colour. The current origin is not altered. The line may be tessellated with the gfx_LinePattern(...) function.
Syntax: gfx_LineRel(xpos, ypos);
| Arguments | Description |
|---|---|
| xpos | Specifies the horizontal end point of the line. |
| ypos | Specifies the vertical end point of the line. |
Returns: None
Example
gfx_LinePattern(0b1100110011001100);
gfx_MoveTo(10, 20);
gfx_LineRel(50, 50);

// This example draws a tessellated line using the current object colour between 10,20 and 50,50.
Note
The gfx_LinePattern(0); must be used after this to return line drawing to normal solid lines.
gfx_BoxTo
Draws a rectangle from the current origin to the new point using the current object colour. The top left corner is anchored by the current origin (x1, y1), the bottom right corner is specified by x2, y2.
Syntax: gfx_BoxTo(x2, y2);
| Arguments | Description |
|---|---|
| x2, y2 | Specifies the diagonally opposed corner of the rectangle to be drawn, the top left corner (assumed to be x1, y1) is anchored by the current origin. |
Returns: None
Example
gfx_MoveTo(40,40);
n := 10;
while (n--)
    gfx_BoxTo(50,50);
    gfx_BoxTo(30,30);
wend

// This example draws 2 boxes, anchored from the current origin.
gfx_SetClipRegion
Forces the clip region to the extent of the last text that was printed, or the last image that was shown.
Syntax: gfx_SetClipRegion();
Returns: None
Example
Note
The default PEN_SIZE is set to OUTLINE, however, if PEN_SIZE is set to SOLID, the rectangle will be drawn filled, if PEN_SIZE is set to OUTLINE, the rectangle will be drawn as an outline. If the circle is drawn as SOLID, the outline colour can be specified with gfx_OutlineColour(...). If OUTLINE_COLOUR is set to 0, no outline is drawn.
gfx_Ellipse
Plots a coloured Ellipse on the screen at centre x,y with xradius = xrad and yradius = yrad.
if PenSize = 0 Ellipse is Solid
if PenSize = 1 Ellipse is Outline
Syntax: gfx_Ellipse(x, y, xrad, yrad, colour);
| Arguments | Description |
|---|---|
| x, y | specifies the horizontal and vertical position of the centre of ellipse. |
| xrad, yrad | Specifies x-radius and y-radius of the ellipse. |
| colour | Specifies the colour for the lines. |
Returns: None
Example
gfx_EllipseFilled
Plots a solid coloured Ellipse on the screen at centre x,y with xradius = xrad and yradius = yrad.
Syntax: gfx_EllipseFilled(x, y, xrad, yrad, colour);
| Arguments | Description |
|---|---|
| x, y | specifies the horizontal and vertical position of the centre of ellipse. |
| xrad, yrad | Specifies x-radius and y-radius of the ellipse. |
| colour | Specifies the colour for the lines. |
Returns: None
Example
gfx_Button
Draws a 3-dimensional Text Button at screen location defined by x, y parameters (top left corner). The size of the button depends on the font, width, height and length of the text. The button can contain multiple lines of text by having the \n character embedded in the string for the end of line marker. In this case, the widest text in the string sets the overall width, and the height of the button is set by the number of text lines. In the case of multiple lines, each line is left justified. If you wish to centre or right justify the text, you will need to prepare the text string according to your requirements.
Syntax: gfx_Button(state, x, y, buttonColour, txtColour, font, txtWidth, txtHeight, text);
| Arguments | Description |
|---|---|
| state | 0 = Button pressed; 1 = Button raised. |
| x, y | Specifies the top left corner position of the button on the screen. |
| buttonColour | Button colour. |
| txtColour | Text Colour. |
| font | Specifies the Font ID. |
| txtWidth | Specifies the width of the text. This value is the font width multiplier and minimum value must be 1. |
| txtHeight | Specifies the height of the text. This value is the font height multiplier and minimum value must be 1. |
| text | Specifies the text string. The text string must be within the range of printable ascii character set. The string may have \n characters embedded to create a multiline button. |
Returns: None
Example
#constant LEFT 30
#constant TOP 150
#constant TEXTWIDTH 2
#constant TEXTHEIGHT 2
//------------------------------------------------------------

func main()
    // Draw a button as a Text Box (indented)
    gfx_Button(DOWN, 0, 30, GREEN, WHITE, FONT_4, TEXTWIDTH, TEXTHEIGHT,"4DGL Demo");
    touch_Set(TOUCH_ENABLE);

    Repeat
        // Dr aw the Push Button (raised)
        gfx_Button(UP, LEFT, TOP, BLUE, RED, FONT 4, TEXTWIDTH,TEXTHEIGHT, " PRESS ");
        // set touch detect region to that of the push button
        touch_DetectRegion(LEFT, TOP, gfx_Get(RIGHT_POS), gfx_Get( BOTTOM_POS));
        // Wait until the button is pressed
        while(touch_Get(TOUCH_STATUS) != TOUCH_PRESSED);

        // now redraw the Push Button (depressed)
        gfx_Button(DOWN, LEFT, TOP, BLUE, WHITE, FONT_4, TEXTWIDTH,TEXTHEIGHT, " PRESS ");
        // Wait until the button is pressed
        while(touch_Get(TOUCH_STATUS) != TOUCH_RELEASED );
    forever

endfunc
gfx_Button2
Draws a 3-dimensional Text Button at screen location defined by x, y parameters (top left corner). The size of the button is defined by the width and height parameters. The text is centred within those bounds. The button has square corners.
Syntax: gfx_Button2(mode, x, y, width, height, buttoncolour, textcolour, text);
| Arguments | Description |
|---|---|
| mode | 0 = Button pressed; 1 = Button raised. |
| x, y | Specifies the top left corner position of the button on the screen. |
| width | Specifies the width of the button. |
| height | Specifies the height of the button. |
| buttonColour | Button colour. |
| txtColour | Text Colour. |
| text | Specifies the text string. The text string must be within the range of printable ascii character set. The string may have \n characters embedded to create a multiline button. |
Returns: None
Example
#constant LEFT 30
#constant TOP 150
#constant BWIDTH 50
#constant BHEIGHT 50
//----------------------------------------------------------------------------------------------
func main()
    touch_Set(TOUCH_ENABLE);

    repeat
        // Draw the Push Button (raised)
        gfx_Button2 (UP, LEFT, TOP, BWIDTH, BHEIGHT, BLUE, RED," PRESS ");
        // set touch detect region to that of the push button
        touch_DetectRegion(LEFT, TOP, gfx_Get(RIGHT_POS), gfx_Get(BOTTOM_POS));

        // Wait until the button is pressed
        while(touch_Get(TOUCH_STATUS) != TOUCH_PRESSED);

        // now redraw the Push Button (
        gfx_Button2(DOWN , LEFT, TOP, BWIDTH, BHEIGHT, BLUE, RED," PRESS ");

        // Wait until the button is pressed
        while(touch_Get(TOUCH_STATUS) != TOUCH_RELEASED );

    forever
endfunc
gfx_Button3
Draws a 3-dimensional Text Button at screen location defined by x, y parameters (top left corner). The size of the button is defined by the width and height parameters. The text is centred within those bounds. The button has rounded corners depending on gfx_BevelRadius().
Syntax: gfx_Button3(mode, x, y, width, height, buttoncolour, textcolour, text);
| Arguments | Description |
|---|---|
| mode | 0 = Button pressed; 1 = Button raised. |
| x, y | Specifies the top left corner position of the button on the screen. |
| width | Specifies the width of the button. |
| height | Specifies the height of the button. |
| buttonColour | Button colour. |
| txtColour | Text Colour. |
| text | Specifies the text string. The text string must be within the range of printable ascii character set. The string may have \n characters embedded to create a multiline button. |
Returns: None
Example
#constant LEFT 30
#constant TOP 150
#constant BWIDTH 50
#constant BHEIGHT 50
//--------------------------------------------------------------------------------------------------------------------------------------
func main()

touch_Set(TOUCH_ENABLE);

repeat
    // Draw the Push Button (
    gfx_Button3 (UP, LEFT, TOP, BWIDTH, BHEIGHT, BLUE, RED," PRESS ");
    // set tou ch detect region to that of the push button
    touch_DetectRegion(LEFT, TOP, gfx_Get(RIGHT_POS), gfx_Get(BOTTOM_POS));
    // Wait until the button is pressed
    while(touch_Get(TOUCH_STATUS) != TOUCH_PRESSED);
    // now redraw the Push Button (depressed)
    gfx_Button3 (DOWN , LEFT, TOP, BWIDTH, BHEIGHT, BLUE, RED," PRESS ");
    // Wait until the button is pressed
    while(touch_Get(TOUCH_STATUS) != TOUCH_RELEASED );
forever

endfunc
gfx_Panel
Draws a 3-dimensional rectangular panel at a screen location defined by x, y parameters (top left corner). The size of the panel is set with the width and height parameters. The colour is defined by colour The state parameter determines the appearance of the panel, 0 = recessed, 1 = raised.
Syntax: gfx_Panel(state, x, y, width, height, Colour);
| Arguments | Description |
|---|---|
| state | 0 = recessed; 1 = raised. |
| x, y | Specifies the top left corner position of the panel on the screen. |
| width | Specifies the width of the panel. |
| height | Specifies the Height of the panel. |
| colour | Specifies the colour of the panel. |
Returns: None
Example
#constant LEFT 15
#constant TOP 15
#constant WIDTH 100
#constant HEIGHT 100

func main()
    // Draw a panel
    gfx_Panel(RAISED, LEFT, TOP, WIDTH, HEIGHT, GRAY);
    repeat forever

endfunc
gfx_RoundPanel
Draws a 3-dimensional rounded rectangular panel at a screen location defined by x, y parameters (top left corner). Width and height may be zero allowing the function to be used for rounded panels, rounded buttons, and circular buttons.
Bounding rectangle is x1-radius-bevelwidth, y1-radius-bevelwidth, x2+radius+bevelwidth, y2+radius+bevelwidth.
Syntax: gfx_RoundPanel(state, x, y, width, height, radius, bevelwidth, Colour);
| Arguments | Description |
|---|---|
| state | 0 = recessed; 1 = raised. 2 = hide (draw object in background colour) |
| x, y | Specifies the top left corner position of the panel on the screen. |
| width | Specifies the width of the panel. |
| height | Specifies the Height of the panel. |
| radius | Specifies the corner radius. |
| bevelwidth | Set Panel bevel width 0-15 pixels. |
| colour | Specifies the colour of the panel. |
Return: None
Example
gfx_Slider2
Draws a vertical or horizontal slider bar on the screen. The gfx_Slider function has several different modes of operation. In order to minimise the amount of graphics functions we need, all modes of operation are selected naturally depending on the parameter values.
Selection rules:
- If width > height, slider is horizontal.
- If height <= width, slider is horizontal.
- If value is positive, thumb is set to the position that is the proportion of value to the scale parameter.(used to set the control to the actual value of a variable)
- If value is negative, thumb is driven to the graphics position set by the ABSolute of value. (used to set thumb to its actual graphical position (usually by touch screen)
- The thumb colour is determine by gfx_Set(OBJECT_COLOUR, value);, however, if the current object colour is BLACK, a darkened shade of the colour parameter is used for the thumb.
Syntax: gfx_Slider2(mode, x1, y1, width, height, colour, scale, value);
| Arguments | Description |
|---|---|
| mode | mode = 0 : Slider Indented, mode = 1 : Slider Raised, mode 2, Slider Hidden (background colour). |
| x1, y1 | Specifies the top left corner position of the slider on the screen. |
| width | Specifies the width of the slider on the screen. |
| height | Specifies the height of the slider on the screen. |
| colour | Specifies the colour of the Slider bar. |
| scale | scale = n : sets the full scale range of the slider for the thumb from 0 to n. |
| value | value = m : sets the relative position of the thumb 0 <= m <= n. |
Returns: If the value parameter was a positive number (i.e:- value is a proportion of the scale parameter), the true (implied x-axis or y-axis) position of the thumb is returned.
If the value parameter was a negative number (i.e:- thumb is being set to an ABSolute graphics position), the actual slider value (which is a proportion of the scale parameter) is returned.
Example
func drawRedSlider()
    gfx_Slider2(0,rSlider[0],rSlider[1], 100 ,50,RED,255, valR);
    txt_MoveCursor(1,12);
    txt_Set(TEXT_OPACITY, OPAQUE);
    txt_Set(TEXT_COLOUR, RED);
    print (" ");
    txt_MoveCursor(1,12);
    print ([DEC] valR);
endfunc
gfx_ScreenCopyPaste
Copies an area of a screen from xs, ys of size given by width and height parameters and pastes it to another location determined by xd, yd.
Syntax: gfx_ScreenCopyPaste(xs, ys, xd, yd, width, height);
| Arguments | Description |
|---|---|
| xs, ys | Specifies the horizontal and vertical position of the top left corner of the area to be copied (source). |
| xd, yd | Specifies the horizontal and vertical position of the top left corner of where the paste is to be made (destination). |
| width | Specifies the width of the copied area. |
| height | Specifies the height of the copied area. |
Returns: None
Example
gfx_ScreenCopyPaste(10,10, 100, 100, 40, 40);
// Copies 40x40 pixels originating from point (10,10) to (100,100);
gfx_Slider
Draws a vertical or horizontal slider bar on the screen. The gfx_Slider function has several different modes of operation. In order to minimise the amount of graphics functions we need, all modes of operation are selected naturally depending on the parameter values.
Selection rules:
- If x2-x1 > y2-y1 slider is assumed to be horizontal (ie: if width > height, slider is horizontal).
- If x2-x1 <= y2-y1 slider is assumed to be vertical (ie: if height <= width, slider is horizontal).
- If value is positive, thumb is set to the position that is the proportion of value to the scale parameter.(used to set the control to the actual value of a variable).
- If value is negative, thumb is driven to the graphics position set by the ABSolute of value. (used to set thumb to its actual graphical position (usually by touch screen).
- The thumb colour is determine by gfx_Set(OBJECT_COLOUR, value);, however, if the current object colour is BLACK, a darkened shade of the colour parameter is used for the thumb.
Syntax: gfx_Slider(mode, x1, y1, x2, y2, colour, scale, value);
| Arguments | Description |
|---|---|
| mode | mode = 0 : Slider Indented, mode = 1 : Slider Raised, mode 2, Slider Hidden (background colour). |
| x1, y1 | Specifies the top left corner position of the slider on the screen. |
| x2, y2 | Specifies the bottom right corner position of the slider on the screen. |
| colour | Specifies the colour of the Slider bar. |
| scale | scale = n : sets the full scale range of the slider for the thumb from 0 to n. |
| value | if value positive, sets the relative position of the thumb on the slider bar, else set thumb to ABS position of the negative number. |
Returns: If the value parameter was a positive number (i.e:- value is a proportion of the scale parameter), the true (implied x-axis or y-axis) position of the thumb is returned.
If the value parameter was a negative number (i.e:- thumb is being set to an ABSolute graphics position), the actual slider value (which is a proportion of the scale parameter) is returned.
Example
func drawRedSlider()
    gfx_Slider(0,rSlider[0],rSlider[1],rSlider[2],rSlider[3],RED,255, valR);
    txt_MoveCursor(1,12);
    txt_Set(TEXT_OPACITY, OPAQUE);
    txt_Set(TEXT_COLOUR, RED);
    print (" ");
    txt_MoveCursor(1,12);
    print ([DEC] valR);
endfunc
gfx_RGBto565
Returns the 16bit (RED: 5, GREEN: 6, BLUE: 5 format) colour value of a 24bit (RED: 8, GREEN: 8, BLUE: 8 format) colour.
Syntax: gfx_RGBto565(RED, GREEN, BLUE);
| Arguments | Description |
|---|---|
| RED | 8bit colour value for RED. |
| GREEN | 8bit colour value for GREEN. |
| BLUE | 8bit colour value for BLUE. |
Returns: The 16bit (RED: 5, GREEN: 6, BLUE: 5 format) colour value.
Example
var colorRGB;
colorRGB := gfx_RGBto565(170, 126, 0); // convert 8bit Red, Green and Blue color values to 16bit 565 color value
gfx_332to565
Returns the 16bit (RED: 5, GREEN: 6, BLUE: 5 format) value of an 8bit (RED: 3, GREEN: 3, BLUE: 2 format) colour.
Syntax: gfx_332to565(COLOUR8BIT);
| Arguments | Description |
|---|---|
| COLOUR8BIT | 8bit colour value. 3bits for RED, 3bits for GREEN, 2bits for BLUE. |
Returns: The 16bit (RED: 5, GREEN: 6, BLUE: 5 format) value.
Example
var color565;
color565 := gfx_332to565(0b11010100); // Convert 8bit 332 color value to 16bit 565 color value
gfx_565to332
Returns the 8bit (RED: 3, GREEN: 3, BLUE: 2 format) value of a 16bit (RED: 5, GREEN: 6, BLUE: 5 format) colour.
Syntax: gfx_565to332(COLOUR16BIT);
| Arguments | Description |
|---|---|
| COLOUR16BIT | 16bit colour value. 5bits for RED, 6bits for GREEN, 5bits for BLUE. |
Returns: The 8bit (RED: 3, GREEN: 3, BLUE: 2 format) value.
Example
var color332;
color332 := gfx_565to332(0x7F00); // Convert 16bit 565 color value to 8bit 332 color value
gfx_TriangleFilled
Draws a Solid triangle between vertices x1,y1 , x2,y2 and x3,y3 using the specified colour. Vertices must be specified in an anti-clockwise fashion.
Syntax: gfx_TriangleFilled(x1, y1, x2, y2, x3, y3, colour);
| Arguments | Description |
|---|---|
| x1, y1 | Specifies the first vertices of the triangle. |
| x2, y2 | Specifies the second vertices of the triangle. |
| x3, y3 | Specifies the third vertices of the triangle. |
| colour | Specifies the colour for the triangle. |
Returns: None
Example
gfx_TriangleFilled(10,10,30,10,20,30,CYAN);

// This example draws a CYAN Solid triangle with vertices at 10,10 30,10 20,30
gfx_PolygonFilled
Draws a solid Polygon between specified vertices: x1,y1 x2,y2 ... xn,yn using the specified colour. The last point is drawn back to the first point, completing the polygon. Vertices must be minimum of 3 and can be specified in any fashion.
Syntax: gfx_PolygonFilled(n, vx, vy, colour);
| Arguments | Description |
|---|---|
| n | Specifies the number of elements in the x and y arrays specifying the vertices for the polygon. |
| vx | Specifies the addresses of the storage of the array of elements for the x coordinates of the vertices. |
| vy | Specifies the addresses of the storage of the array of elements for the y coordinates of the vertices. |
| colour | Specifies the colour for the polygon. |
Returns: None
Example
var vx[7], vy[7];

func main()
    vx[0] := 10; vy[0] := 10;
    vx[1] := 35; vy[1] := 5;
    vx[2] := 80; vy[2] := 10;
    vx[3] := 60; vy[3] := 25;
    vx[4] := 80; vy[4] := 40;
    vx[5] := 35; vy[5] := 50;
    vx[6] := 10; vy[6] := 40;
    gfx_PolygonFilled(7, vx, vy, RED);
    repeat forever
endfunc

// This example draws a simple filled polygon.
gfx_Origin
Sets relative screen offset for horizontal and vertical for the top left corner for graphics objects.
Syntax: gfx_Origin(x, y);
| Arguments | Description |
|---|---|
| x, y | Specifies the horizontal and vertical position of the top left corner of the clipping window. |
Returns: None
Example
gfx_Get
Returns various graphics parameters to caller.
The following graphics parameters can be queried:
| Mode | Description |
|---|---|
X_MAX |
Current orientations Max X Value (X_MAX) |
Y_MAX |
Current orientations Max Y Value (Y_MAX) |
LEFT_POS |
Left location of Object |
TOP_POS |
Top location of Object |
RIGHT_POS |
Right location of Object |
BOTTOM_POS |
Bottom location of Object |
X_ORG |
Get current internal X position |
Y_ORG |
Get current internal Y position |
Syntax: gfx_Get(mode);
| Arguments | Description |
|---|---|
| mode | Specifies graphics parameter to query. |
Returns:
| Mode | Description |
|---|---|
| 0 | Returns the maximum horizontal value of the display. |
| 1 | Returns the maximum vertical value of the display. |
| 2 | Returns the left location of the last drawn object such as a slider or button or an image/video. |
| 3 | Returns the top location of the last drawn object such as a slider or button or an image/video. |
| 4 | Returns the right location of the last drawn object such as a slider or button or an image/video. |
| 5 | Returns the bottom location of the last drawn object such as a slider or button or an image/video. |
| 6 | Returns the internal X position that was set with gfx_MoveTo(x, y); or gfx_Set(X_ORG, pos); |
| 7 | Returns the internal Y position that was set with gfx_MoveTo(x, y); or gfx_Set(X_ORG, pos); |
Example
var := gfx_Get(X_MAX);          //Returns the maximum horizontal resolution of the display
var := gfx_Get(0);
var := gfx_Get(Y_MAX);          //Returns the maximum vertical resolution of the display
var := gfx_Get(1);
var := gfx_Get(RIGHT_POS);      //Returns the right location of the last drawn object
                                //that only has top, left parameters such as a button
                                // or an image/video.
var := gfx_Get(2);
var := gfx_Get(BOTTOM_POS);     //Returns the bottom location of the last drawn object
                                //that only has top, left parameters such as a button
                                //or an image/video.
var := gfx_Get(3);
gfx_ClipWindow
Specifies a clipping window region on the screen such that any objects and text placed onto the screen will be clipped and displayed only within that region. For the clipping window to take effect, "Clipping" setting must be enabled separately using gfx_Set(CLIPPING, ON) or the shortcut gfx_Clipping(ON).
Syntax: gfx_ClipWindow(x1, y1, x2, y2);
| Arguments | Description |
|---|---|
| x1, y1 | Specifies the horizontal and vertical position of the top left corner of the clipping window. |
| x2, y2 | Specifies the horizontal and vertical position of the bottom right corner of the clipping window. |
Returns: None
Example
var n;
gfx_ClipWindow(10, 10, 50, 50 )
n := 50000;
while(n--)
    gfx_PutPixel(RAND()%100, RAND()%100, RAND());
wend
repeat forever

// This example will draw 50000 random colour pixels, only the pixels within the clipping area will be visible
gfx_Set
Given a function number and a value, set the required graphics control parameter, such as size, colour, and other parameters. (See the Single parameter short-cuts for the gfx_Set functions below). It is strongly recommended to use the pre-defined constants rather than the mode numbers.
Single parameter short-cuts for the gfx_Set functions
| Predefined Name | Description | Value |
|---|---|---|
| PEN_SIZE | Set the draw mode for gfx_LineTo, gfx_LineRel, gfx_Dot, gfx_Bullet and gfx_BoxTo (default mode is OUTLINE)* | 0 or SOLID 1 or OUTLINE |
| BACKGROUND_COLOUR | Set the screen background colour | Colour, 0-65535 |
| OBJECT_COLOUR | Generic colour for gfx_LineTo, gfx_LineRel, gfx_Dot, gfx_Bullet and gfx_BoxTo | Colour, 0-65535 |
| CLIPPING | Turns clipping on/off. The clipping points are set with gfx_ClipWindow and must be set first. |
1 or 0 (ON or OFF) |
| TRANSPARENT_COLOUR | Colour that needs to be made transparent. | Colour, 0-65535 |
| TRANSPARENCY | Turn the transparency ON or OFF. Transparency is automatically turned OFF after the next image or video command. | 1 or 0 (ON or OFF) |
| FRAME_DELAY | Set the inter frame delay for media_Video | 0 to 255msec |
| SCREEN_MODE | Set required screen behaviour/orientation. | 0 or LANDSCAPE 1 or LANDSCAPE_R 2 or PORTRAIT 3 or PORTRAIT_R |
| OUTLINE_COLOUR | Outline colour for rectangles and circles(set to 0 for no effect) | Colour, 0-65535 |
| CONTRAST | LCD MODULES: contrast 0 = display OFF, 1-15 = contrast level (Actually backlight brightness) |
0 or OFF 1 to 15 for levels |
| LINE_PATTERN | Sets the line draw pattern for line drawing. If set to zero, lines are solid, else each '1' bit represents a pixel that is turned off. Example: gfx_Set(LINE_PATTERN, 0b1111000011110000); // draw dotted line |
0 or OFF 1 to 0xFFFF 0 bits for pixels on 1 bits for pixels off |
| COLOUR_MODE | Sets 8 or 16bit colour mode. Function not available, fixed as 16bit mode. |
0 or COLOUR16 1 or COLOUR8 |
| BEVEL_WIDTH | Set Button Bevel Width, 0 pixel to 15pixels. | 0 None 1 to 15 pixels |
| BEVEL_SHADOW | graphics button bevel shadow depth | 0 None 1 to 15 pixels |
| X_ORIGIN | sets the origin of drawn objects to a position other than 0,0 | |
| Y_ORIGIN | sets the origin of drawn objects to a position other than 0,0 | |
| DISPLAY_PAGE | Choose Page to be displayed. Applies to 4.3” products with a Solomon SSD1961 and SSD1961 Driver IC only, with a 4.3” display only, such as uLCD-43D/DT/DCT series and gen4-uLCD-43D/DT/DCT series of displays. Please refer to module datasheets for information on what SSD196x is present on your module. ** | 0 or 1 for SSD1961 0, 1 or 2 for SSD1963 |
| READ_PAGE | Choose Page to be read. Applies to 4.3” products with a Solomon SSD1961 and SSD1961 Driver IC only, with a 4.3” display only, such as uLCD-43D/DT/DCT series and gen4-uLCD-43D/DT/DCT series of displays. Please refer to module datasheets for information on what SSD196x is present on your module. ** | 0 or 1 for SSD1961 0, 1 or 2 for SSD1963 |
| WRITE_PAGE | Choose Page to be written. Applies to 4.3” products with a Solomon SSD1961 and SSD1961 Driver IC only, with a 4.3” display only, such as uLCD-43D/DT/DCT series and gen4-uLCD-43D/DT/DCT series of displays. Please refer to module datasheets for information on what SSD196x is present on your module. ** | 0 or 1 for SSD1961 0, 1 or 2 for SSD1963 |
Single parameter short-cuts for the gfx_Set functions
| Function Syntax | Function Action | Value |
|---|---|---|
| gfx_PenSize(mode) | Set the draw mode for gfx_LineTo, gfx_LineRel, gfx_Dot, gfx_Bullet and gfx_BoxTo* | 0 or SOLID 1 or OUTLINE |
| gfx_BGcolour(colour) | Set the screen background colour | Colour 0-65535 |
| gfx_ObjectColour(colour) | Generic colour for gfx_LineTo, gfx_LineRel, gfx_Dot, gfx_Bullet and gfx_BoxTo | Colour 0-65535 |
| gfx_Clipping(mode) | Turns clipping on/off. The clipping points are set with gfx_ClipWindow. |
0 or 1 (ON or OFF) |
| gfx_TransparentColour(colour) | Colour that needs to be made transparent. | Colour, 0-65535 |
| gfx_Transparency(mode) | Turn the transparency ON or OFF. | 0 or 1 (ON or OFF) |
| gfx_FrameDelay(delay) | Set the inter frame delay for media_Video. | 0 to 255msec |
| gfx_ScreenMode(mode) | Graphics orientation LANDSCAPE, LANDSCAPE_R, PORTRAIT, PORTRAIT_R | 1 or LANDSCAPE 2 or LANDSCAPE_R 3 or PORTRAIT 4 or PORTRAIT_R |
| gfx_OutlineColour(colour) | Outline colour for rectangles and circles.(set to 0 for no effect) | Colour 0-65535 |
| gfx_Contrast(value) | LCD MODULES: contrast 0 = display OFF, 1-15 = contrast level (Actually backlight brightness) |
0 or OFF 1 to 15 for levels |
| gfx_LinePattern(pattern) | Sets the line draw pattern for line drawing. If set to zero, lines are solid, else each '1' bit represents a pixel that is turned off. See code examples for further reference. Example: gfx_Set(LINE_PATTERN, 0b1111000011110000);// draw dotted line |
0 or OFF 1 to 0xFFFF 0 bits for pixels on 1 bits for pixels off |
| gfx_BevelRadius(radius) | graphics button bevel radius | 0 None 1 to 15 pixels |
| gfx_BevelWidth(mode) | graphics button bevel width | 0 None 1 to 15 pixels |
| gfx_BevelShadow(value) | graphics button bevel shadow depth | 0 None 1 to 15 pixels |
| gfx_Xorigin(offset) | graphics X origin | |
| gfx_Yorigin(offset) | graphics Y origin |
Syntax: gfx_Set(function, value);
| Arguments | Description |
|---|---|
| function | The function number determines the required action for various graphics control functions. Usually a constant, but can be a variable, array element, or expression. There are pre-defined constants for each of the functions. |
| mode | A variable, array element, expression or constant holding a value for the selected function. |
Returns: None
Example
Note
Although it is often required to be able to set graphics functions with a single function call for graphics engine related functions, there is a complete set of single parameter shortcut functions that have exactly the same function as each of the gfx_Set modes and saves 1 parameter, i.e. uses less memory.
*pen size is set to OUTLINE for normal operation.
**SSD1961 has 2 Pages, SSD1963 has 3 pages.
gfx_Arc
Draws an arc at "xc":"yc" with radius "radius", starting at "startangle" and ending at "endangle". Colour is determined by current object colour.
Syntax: gfx_Arc(cx, cy, radius, step, startangle, endangle, mode);
| Arguments | Description |
|---|---|
| cx, cy | Center of the arc. |
| radius | Radius of the arc. |
| step | Step is the stepping angle increment for the fineness of the arc. |
| startangle | Starting angle of the arc. |
| endangle | Ending angle of the arc. |
| mode | mode = 0, outer circumference line only. mode = 1, outer circumference and lines back to cx:cy. |
Returns: None
Example
gfx_Arc(120, 150, 100, 1, 0, 90 ,0);
/*
* Draws an arc with 100 pixel radius with center at point (120,150)
* The arc starts from from 0 to 90 degree angle
* Lines from the ends of the arc to the center are not drawn.
*/
gfx_CheckBox
Draws a CheckBox at screen location defined by x,y arguments (top left corner).
Syntax: gfx_CheckBox(state, x, y, Width, Height, boxColour, textColour, text);
| Arguments | Description |
|---|---|
| state | state = 1 = UNCHECKED : CheckBox Unchecked state = 0 = CHECKED : Checkbox Checked |
| x, y | Top left corner of the Checkbox. |
| width | Width of the checkbox. |
| height | Height of the checkbox. |
| boxColour | Checkbox colour. |
| textCplour | Text colour. |
| text | The text is to the right of the checkbox and truncated if necessary |
Returns: None
Example
gfx_CheckBox(1, 20, 20, 100, 25, BLUE , LIME , "4D Labs");
/*
* Draws a n UNCHECKED checkbox, top left corner at (20
* The checkbox has a width of 100 pixels to conta in ‘4D Labs’
*/
gfx_RadioButton
Draws a Radio-button at screen location defined by x,y arguments (top left corner).
Syntax: gfx_RadioButton(state, x, y, width, height, boxColour, textColour, text);
| Arguments | Description |
|---|---|
| state | state = 1 = UNCHECKED : Radio-button Unchecked state = 0 = CHECKED : Radio-button Checked |
| x,y | Top left corner of the Radio-button. |
| width | Width of the Radio-button. |
| height | Height of the Radio-button. |
| boxColour | Radio-button colour. |
| textColour | Text colour. |
| text | The text is to the right of the Radio-button and truncated if necessary |
Returns: None
Example
gfx_RadioButton(0, 20, 20, 100, 25, BLUE, LIME, "4D Labs");
/*
* Draws a CHECKED radio button, top left corner at (20, 150)
* The radio button has a width of 100 pixels to contain ‘4D Labs'
*/
gfx_FillPattern
Selects a tessellating pattern for painting solid objects. ‘patptr’ points to a 8x8 tile for rendering filled areas. Rendering is turned off with gfx_FillPattern(0, mode); or gfx_FillPattern(OFF, mode);
‘mode’ maybe TRANSPARENT or OPAQUE (0 or 1), for OPAQUE mode, the current screen colour is used for the 'off' pixels, for transparent mode, the 'off' pixels are not drawn.
gfx_FillPattern affects all filled object, including polygons. There are 32 builtin patterns; these are obtained using the pre-defined constants FILLPATTERN_0 to FILLPATTERN_31. Note that the constants range from 0xFFE0 to 0xFFFF, any other value is assumed to be a pointer to a user’s 8 byte block pattern. Predefined constants are used to select the internal patterns, FILLPATTERN_0 through to FILLPATTERN_31
Syntax: gfx_FillPattern(patptr, mode);
| Arguments | Description |
|---|---|
| patptr | 0 = 0ff, 0xFFE0 to 0xFFFF = builtin patterns, else patptr points to a users 8 byte pattern. |
| mode | TRANSPARENT or OPAQUE (0 or 1) |
Returns: The handle of the previous pattern.
Example
gfx_FillPattern(OFF, TRANSPARENT); // Turns OFF pattern rendering

gfx_FillPattern(FILLPATTERN_31, TRANSPARENT);
// Renders FILLPATTERN_31 in transparent mode for filled objects

gfx_FillPattern(FILLPATTERN_17, OPAQUE);
// Renders FILLPATTERN_17 in OPAQUE mode for filled objects
gfx_Gradient
Draws a graduated colour rectangle at the specified co-ordinate. Rendering can be obtained with gfx_FillPattern(PATTRN); or gfx_FillPattern(OFF); for no fill pattern.
Syntax: gfx_Gradient(style, x1, y1, x2, y2, color1, color2);
| Arguments | Description |
|---|---|
| style | Specifies gradient style. GRAD_DOWN gradient changes in the vertical direction GRAD_RIGHT gradient change in the horizontal direction GRAD_UP gradient changes in the vertical direction GRAD_LEFT gradient change in the horizontal direction GRAD_WAVE_VER gradient wave in the vertical direction GRAD_WAVE_HOR gradient wave in the horizontal direction |
| x1, y1 | Specifies top left corner of the rectangle. |
| x2, y2 | Specifies bottom right corner of the rectangle. |
| color1 | Specifies starting colour. |
| color2 | Specifies ending colour. |
Returns: None
Example
gfx_RoundGradient
Draws a graduated colour rectangle at the specified co-ordinate.
X1 may equal X2, and Y1 = Y2 allowing the function to be used for rounded panels, rounded buttons, circular buttons.
Rendering can be obtained with gfx_FillPattern(PATTRN); or gfx_FillPattern(OFF); for no fill pattern.
Syntax: gfx_RoundGradient(style, x1, y1, x2, y2, radius, color1, color2);
| Arguments | Description |
|---|---|
| style | Specifies gradient style. GRAD_DOWN gradient changes in the vertical direction GRAD_RIGHT gradient change in the horizontal direction GRAD_UP gradient changes in the vertical direction GRAD_LEFT gradient change in the horizontal direction GRAD_WAVE_VER gradient wave in the vertical direction GRAD_WAVE_HOR gradient wave in the horizontal direction |
| x1, y1 | Specifies top left corner of the rectangle. |
| x2, y2 | Specifies bottom right corner of the rectangle. |
| radius | Specifies the corner radius. |
| color1 | Specifies starting colour. |
| color2 | Specifies ending colour. |
Returns: None
Example
//Draw graduated colour rounded rectangle
gfx_RoundGradient(GRAD_WAVE_HOR, 10, 10,230, 160, 10, BLACK, WHITE);
gfx_PieSlice
Draws a pie slice (filled arc) at xc:yc with radius, starting at startangle and ending at endangle. Rendering can be obtained with gfx_FillPattern(PATTRN); or gfx_FillPattern(OFF); for no fill pattern.
Syntax: gfx_PieSlice(cx, cy, spread, radius, step, startangle, endangle, mode, colour);
| Arguments | Description |
|---|---|
| cx, cy | Center of the slice. |
| spread | Center offset: it is used to offset the centrepoint of the pieslice to shift a pie chart piece away from the centrepoint. |
| radius | Radius of the Slice. |
| step | Step is the stepping angle increment for the fineness of the slice. |
| startangle | Starting angle of the slice. |
| endangle | Ending angle of the slice. |
| mode | mode = 0, no outline. mode = 1, outer circumference line only. mode = 2, outer circumference and slice lines. |
| colour | Specifies colour of the colour of the PieSlice. |
Returns: None
Example
gfx_PieSlice(120, 150, 0, 100, 1, 0, 90, 0, LIME);
/*
* Draws a filled arc, 100 pixel radius, center at point (120,150)
* The arc starts from from 0 to 90 degree angle
* Outlines are not drawn
*/
gfx_PointWithinBox
Returns true if last touch co-ordinates are within the box test area.
Syntax: gfx_PointWithinBox(x, y, &rect);
| Arguments | Description |
|---|---|
| x, y | Coordinates |
| &rect | An array of 4 vars, x1, y1, width, height. |
Returns: True if last touch co-ordinates are within the box test area.
Example
var x, y;
var rect[4] := [0,0,480,320];
touch_Set(TOUCH_ENABLE);

repeat
    x := touch_Get(TOUCH_GETX);
    y := touch_Get(TOUCH_GETY);
    if (gfx_PointWithinBox(x,y,rect) == 1)
        txt_MoveCursor(0,0);
        print("X: ",[DEC]x, " Y: ", [DEC]y, " \nTOUCHED");
    endif
forever
gfx_PointWithinRectangle
Returns true if last touch co-ordinates are within the rectangle test area.
Syntax: gfx_PointWithinRectangle(x, y, &recta);
| Arguments | Description |
|---|---|
| x, y | Coordinates |
| &recta | An array of 4 vars, x1, y1, x2, y2. |
Returns: True if last touch co-ordinates are within the rectangle test area.
Example
var x, y;
var rect[4] := [0,0,100,120];
touch_Set(TOUCH_ENABLE);

repeat
    x := touch_Get(TOUCH_GETX);
    y := touch_Get(TOUCH_GETY);
    if (gfx_PointWithin Rectangle (x,y,rect) == 1)
        txt_MoveCursor(0,0);
        print("X: ",[DEC]x, " Y: ", [DEC]y, " \nTOUCHED");
    endif
forever
gfx_readBresLine
Due to the fact that most LCDs are not double buffered, and memory is limited on small platforms, gfx_ReadBresLine offers a simple but powerful way of manipulating raster lines by storing all the pixels for an arbitrary line.
Typically, gfx_ReadBresLine is used when ‘rubber banding’ a rectangular area when dragging a marker rectangle, or drawing a needle on a pre-rendered meter or gauge image. The power of this function is further extended when used with the array math functions.
gfx_ReadBresLine reads an arbitrary line from the display to an array. If "ptr" is 0, the correctly sized array is created, in which case it is up to the caller to eventually destroy it when no longer required. Otherwise, "ptr" is expected to point to a correctly sized array.
Syntax: gfx_readBresLine(x1, y1, x2, y2, ptr);
| Arguments | Description |
|---|---|
| x1, y1 | Line mapping start point. |
| x2, y2 | Line mapping end point. |
| ptr | If zero is passed, an array of the required size to map the line is created. If non zero, it is expected that this is a pointer to an array large enough to store each pixel that is read. |
Returns: A pointer to the created array, or the users array. In the case of ptr=0 (creation of array), if there is insufficient memory to create the array, zero is returned.
Example
var array;
array := gfx_ReadBresLine(50,50,250,175,0);
// Copy the pixels of the line with endpoint at (50,50) and (250, 175)
// and saves it to the generated array. The address is then returned
// and saved to the variable 'array'

gfx_BGcolour(LIME);
gfx_Cls(); // Sets the background to a single color

gfx_WriteBresLine(100,100,300,225,array);
// Copies the line to the new
// Endpoints are at (100,100) and (300,225)
Note
If an array is supplied, its size must be large enough, and may be calculated:
gfx_WriteBresLine
Cast pixel values from array to arbitrary line.
Syntax: gfx_WriteBresLine(x1, y1, x2, y2, ptr);
| Arguments | Description |
|---|---|
| x1, y1 | Line mapping start point. |
| x2, y2 | Line mapping end point. |
| ptr | Points to the array to be written. |
Returns: None
Example: See gfx_ReadBresLine.
gfx_ReadGRAMarea
Reads an arbitrary rectangular area from the display to an array. If "ptr" is 0, the correctly sized array is created, in which case it is up to the caller to eventually destroy it. Otherwise, "ptr" is expected to point to a correctly sized array.
Syntax: gfx_ReadGRAMarea(x1, y1, x2, y2, ptr);
| Arguments | Description |
|---|---|
| x1, y1 | Top left corner of the rectangular area. |
| x2, y2 | Bottom right corner of the rectangular area. |
| ptr | If zero is passed, an array of the required size to map the line is created. If non zero, it is expected that this is a pointer to an array large enough to store each pixel that is read. |
Returns: A pointer to the created aray, or the users array. In the case of ptr=0, if there is insufficient memory to create the array, zero is returned.
Example
var array;
array := gfx_Read GRAMarea (50, 50, 250, 175, 0);
// Copy the pixels of the GRAM area with top left and bottom right
// endpoints at (50,50) and (250,175) and saves it to the generated
// array. The address is then returned and saved to variable ‘array'

gfx_BGcolour(LIME);
gfx_Cls(); // Sets the background to a single color

gfx_WriteGRAMarea (100,100,300,225,array);
// Copies the GRAM area to the new coordinates,
// Top left and bottom right corners are at (100,100) and (300, 225)
Note
If an array is supplied, its size must be large enough, and maybe calculated:
gfx_WriteGRAMarea
Write an array back to the rectangular area.
Syntax: gfx_WriteGRAMarea(x1, y1, x2, y2, ptr);
| Arguments | Description |
|---|---|
| x1, y1 | Top left corner of the rectangular area. |
| x2, y2 | Bottom right corner of the rectangular area. |
| ptr | Points to an array to be written. |
Returns: None
Example: See gfx_ReadGRAMarea.
gfx_Surround
Draws an outline rectangle at the given co-ordinates with optional rounded corners determined by ‘rad1’. ‘rad2’ is added to ‘rad1’ to form the outer rounded rectangle. If ‘rad1’ is zero, the inner rectangle will have square corners.
Syntax: gfx_Surround(x1, y1, x2, y2, rad1, rad2, color);
| Arguments | Description |
|---|---|
| x1, y1 | Specifies the top left corner position of the surround on the screen. |
| x2, y2 | Specifies the bottom right corner position of the surround on the screen. |
| rad1 | Inner corner radius. |
| rad2 | Outer corner radius. |
| color | The colour of the surround. |
Returns: None
Example
// Draw a surround with rounded corners, 3 pixels wide
gfx_Surround(40, 40, 100, 60, 15, 3, YELLOW);
gfx_Scope
Draws up to 4 waveforms from table(s) of vertices at the specified origin. Also useful for drawing line graphs.
X position is incremented each point by "Xstep" pixels. Values are skipped for negative values. Y values are derived from a Y buffer.
After the waveform is drawn, "newy" buffer is automatically copied to "oldy" buffer. Use 0 as the buffers for any unused waveforms.
Syntax: gfx_Scope(left, width, Yzero, N, Xstep, Yamp, colourbg, old_y1, new_y1, colour1, old_y2, new_y2, colour2, old_y3, new_y3, colour3, old_y4, new_y4, colour4);
| Arguments | Description |
|---|---|
| left | The left margin of the Scope. |
| width | The width of the Scope. |
| Yzero | The y position that corresponds to a y value of zero, normally "Top" + "Height" for a graph, or "Top" + "Height"/2 for a scope. |
| N | The number of elements in each buffer. This will need to be greater than "width" for negative "Xstep" values. |
| Xstep | X position is incremented each point by "xstep" pixels. |
| Yamp | Amplification in the Y direction, 100 is unity. |
| colourbg | The color of the Scope’s Background. |
| oldy1..4 | Buffer containing most recent set of points to be un-drawn. |
| newy1..4 | Buffer containing new points to be drawn. |
| colour1..4 | Colour of the waveform. |
Returns: None
Example
gfx_RingSegment
Draw a Segment of a ring at x, y from rad1 to rad2 starting at starta to enda in colour.
Syntax: gfx_RingSegment(x, y, Rad1, Rad2, starta, enda, colour);
| Arguments | Description |
|---|---|
| x, y | Center |
| Rad1 | Outer radius |
| Rad2 | Inner radius |
| starta | Start angle |
| enda | End angle |
| colour | Colour |
Returns: None
Example
gfx_AngularMeter
Draw an angular meter as defined by MeterDef (if required), using MeterRam positioning at position value. See the reference for the MeterDef values.
#DATA
word Gauge1Info
    // Scale parameters
    90,                         // Range scale outer edge radius
    70,                         // Range scale inner edge radius
    20,                         // Number of partitions of marker ticks
    2,                          // Number of minor ticks before next major tick (0 to disable)
    17,                         // Length for major ticks radiating from scale outer edge
    5,                          // Length for minor ticks radiating from scale outer edge
    10,                         // Length for major ticks radiating from scale inner edge
    2,                          // Length for minor ticks radiating from scale inner edge
    1,                          // Tick width
    0xFFFF,                     // Tick color
    270,                        // Starting angle for range scale second ring section
    337,                        // Starting angle for range scale third ring section
    0xDF,                       // Range scale first ring section color
    0x3BF,                      // Range scale second ring section color
    0xF800,                     // Range scale third ring section color
    0,                          // Range scale section incremental step size
    10,                         // Total number of marker scale labels
    1,                          // Marker scale label font style
    0xFFFF,                     // Marker scale label text color
    15,                         // Marker scale label offset distance (relative to range scale midpoint)
    0,                          /* Labels */ // Pointer to label strings (Default is numeric is set to zero (0))
    (0 + 0 + 0 + 0),            // Gauge Options
    2,                          // Caption
    0xFFFF,                     // Caption text color
    -26,                        // Caption horizontal offset from rotation centre
    56,                         // Caption vertical offset from rotation centre
    Caption,                    // Caption text pointer

    // Gauge parameters common to needle
    10,                         // Top-Left X-position
    10,                         // Top-Left Y-position
    235,                        // Width
    197,                        // Height
    128,                        // Rotation centre X-position
    125,                        // Rotation centre Y-position
    0x0,                        // Background color (required for erasing needle path)
    135,                        // Starting angle
    405,                        // Ending angle
    0,                          // Minimum value
    100,                        // Maximum value

    // Needle parameters
    60,                         // Needle length
    NEEDLE_F_TRIANGLE,          // Needle style options
    0,                          // Needle offset distance from center
    6,                          // Needle width (Half value of overall needle thickness)
    30,                         // Needle tail length (Applicable only for double triangle style)
    0xFFFF,                     // Needle color
    6,                          // Needle Hub radius
    0xFFFF,                     // Needle Hub color
    2,                          // Needle Pin radius
    0xF800                      // Needle Pin color

byte Caption "Caption\0"                            // Caption string (Use null terminator "\0" to end string)
byte Labels "Text1\0Text2\0Text3\0Text4\0Text5\0"   // Label text strings (Use null terminator "\0" as separators)

#END
ANGULAR_F_LABEL_STRINGS         //Set bit for swapping gauge direction
ANGULAR_F_BG_TRANSPARENT        //Set bit for toggling background transparency
ANGULAR_F_TICK_PCT_COLOUR       //Set bit for replacing tick color with range scale section colors
ANGULAR_F_TEXT_PCT_COLOUR       //Set bit for replacing marker label color with range scale section colors
Note
The angular meter function will require the gfx_Needle in order to function.
Syntax: gfx_AngularMeter(value, &MeterRam, &MeterDef);
| Arguments | Description |
|---|---|
| value | A value (usually a constant) specifying the current frame of the widget. |
| &MeterRam | A pointer to a variable array for widget utilization. |
| &MeterDef | A pointer to the Data Block holding the widget parameters. |
Returns: None
Example
var state;
var Gauge1Ram[10];

#DATA
    word Gauge1Info 90, 70, 20, 2, 17, 5, 10, 2, 1, 0xFFFF, 270, 337, 0xDF,
                    0x3BF, 0xF800, 0, 10, FONT1, 0xFFFF, 15, 0, (0 + 0 + 0 + 0), FONT2, 0xFFFF,
                    26, 56, Gauge1Caption, 10, 10, 235, 197, 128, 125, 0x0, 135, 405, 0, 100,
                    60, NEEDLE_F_TRIANGLE, 0, 6, 30, 0xFFFF, 6, 0xFFFF, 2, 0xF800
    byte Gauge1Caption "Caption\0"
#END

func main()
    gfx_AngularMeter(state, Gauge1Ram, Gauge1Info); // Gauge
    repeat forever
endfunc
gfx_Panel2
Draws a panel2 (groupbox) at screen location defined by x, y, width and height with left colour "cl" and right colour "cr"and option fill colour "cf".
w1 and w2 define the width of the outer and inner borders.
state = 0 : recessed
state = 1 : raised
state + PANEL2_FILLED : draws with fill color "cf"
Syntax: gfx_Panel2(state, x, y, width, height, w1, w2, cl, cr, cf);
| Arguments | Description |
|---|---|
| state | Bevel direction (0 – Inwards, 1 – Outwards) Additional bit for filling panel with fill color (0x8000 - PANEL2_FILLED). |
| x, y | Top-Left X-position, Top-Left Y-position |
| width | Panel width. |
| height | Panel height. |
| w1 | Outer bevel offset. |
| w2 | Inner bevel offset. |
| cl | Main bevel color. |
| cr | Shadows bevel color. |
| cf | Panel fill color. |
Returns: None
Example
func main()
    gfx_Panel2(1, 10, 10, 77, 81, 5, 5, 0xFFFF, 0x528A , 0x8800 ); // Panelobject
    repeat forever
endfunc
gfx_Needle
Draw a Needle as defined by NeedleDef (if required), using NeedleRam positioning at position value. See the reference for the NeedleDef values.
#DATA
    word NeedleInfo 10,             // Top-Left X-position
                    10,             // Top-Left Y-position
                    235,            // Width
                    197,            // Height
                    128,            // Rotation centre X-position
                    125,            // Rotation centre Y-position
                    0x0,            // Background color (required for erasing needle path)
                    135,            // Starting angle
                    405,            // Ending angle
                    0,              // Minimum value
                    100,            // Maximum value
                    60,             // Needle length
                    NEEDLE_F_LINE,  // Needle style options
                    0,              // Needle offset distance from center
                    6,              // Needle width (Half value of overall needle thickness)
                    30,             // Needle tail length (Applicable only for DoubleTriangle style)
                    0xFFFF,         // Needle color
                    6,              // Needle Hub radius
                    0xFFFF,         // Needle Hub color
                    2,              // Needle Pin radius
                    0xF800          // Needle Pin color
#END
NEEDLE_F_LINE                       //Line needle pointer
NEEDLE_F_RECTANGLE                  //Rectangular needle pointer
NEEDLE_F_POINTRECTANGLE             //Pointed rectangular needle pointer
NEEDLE_F_TRIANGLE                   //Triangular needle pointer
NEEDLE_F_DOUBLETRIANGLE             //Double ended triangular needle pointer
NEEDLE_F_ROUNDEDRECTANGLE           //Rounded corner rectangular needle pointer
Syntax: gfx_Needle(value, &NeedleRam, &NeedleDef);
| Arguments | Description |
|---|---|
| value | A value (usually a constant) specifying the current frame of the widget. |
| &NeedleRam | A pointer to a variable array for widget utilization. |
| &NeedleDef | A pointer to the Data Block holding the widget parameters. |
Returns: None
Example
var frame;
var NeedleRam[10];

#DATA
    word NeedleInfo 10, 10, 235, 197, 128, 125, 0x0, 135, 405, 0, 100, 60,
                    NEEDLE_F_TRIANGLE, 0, 6, 30, 0xFFFF, 6, 0xFFFF, 2, 0xF800
#END
func main()
    gfx_Needle(frame, NeedleRam, NeedleInfo); // Rotating Needle
repeat forever
endfunc
Note
The needle function can be used standalone without the angular meter function, but the angular meter function will require the needle function.
gfx_Dial
Draw a Dial as defined by DialDef (if required), using DialRam positioning at position value. See the reference for the DialDef values.
#DATA
    word Knob1Info 10,                      // Top-Left X-position
                    10,                     // Top-Left Y-position
                    152,                    // Width
                    129,                    // Height
                    87,                     // Knob centre X-position
                    80,                     // Knob centre Y-position
                    38,                     // Knob radius
                    135,                    // Rotation starting angle
                    405,                    // Rotation ending angle
                    0,                      // Minimum value
                    100,                    // Maximum value
                    0x0,                    // Background color
                    0x52AA,                 // Knob color
                    5,                      // Bevel thickness
                    0xB5B6,                 // Bevel gradient color 1 (Left side)
                    0x3186,                 // Bevel gradient color 2 (Right side)
                    200,                    // Starting angle for Partition 2
                    300,                    // Starting angle for Partition 3
                    0x280,                  // Partition 1 low color
                    0x528A,                 // Partition 2 low color
                    0x5800,                 // Partition 3 low color
                    0x7E0,                  // Partition 1 high color
                    0xFFE0,                 // Partition 2 low color
                    0xF800,                 // Partition 3 low color
                    12,                     // Indicator ticks offset distance
                    3,                      // Indicator size 1 (Radius/Width of circle, triangle or rectangle)
                    6,                      // Indicator size 2 (Length of line, triangle or rectangle)
                    0xF800,                 // Knob pointer color
                    3,                      // Knob pointer size 1 (Radius/Width of circle, triangle or rectangle)
                    30,                     // Knob pointer size 2 (Length of line, triangle or rectangle)
                    0xFFFF,                 // Knob indicator label text color
                    2,                      // Knob indicator label font style
                    22,                     // Knob indicator label offset distance
                    10,                     // Number of indicator labels
                    0,                      /*Labels*/ // Pointer to string indicator labels (Numeric labels if zero (0))
                    2,                      // Caption font style
                    0xFFFF,                 // Caption text color
                    -15,                    // Caption horizontal offset from knob centre
                    50,                     // Caption vertical offset from knob centre
                    Caption,                // Knob Caption text
                    (0 + 0 + 0)             // Option bits (See Widget Parameter Data Block Option Bits)
    byte Caption "KNOB\0" // Caption string (Use null terminator "\0" to end string)
    byte Labels "Text1\0Text2\0Text3\0Text4\0Text5\0" // Label text strings (Use null terminator "\0" as separators)
#END
DIAL_F_LABEL_STRINGS                //Set bit for dial indicator string (default is numeric)
DIAL_F_BG_TRANSPARENT               //Set bit for widget transparency
DIAL_F_HANDLE_CIRCLE                //Set bit for circular knob pointer style
DIAL_F_HANDLE_TRIANGLE              //Set bit for triangular knob pointer style
DIAL_F_HANDLE_RECTANGLE             //Set bit for rectangular pointer style
DIAL_F_HANDLE_LINE                  //Set bit for line pointer style
DIAL_F_INDICATOR_CIRCLE             //Set bit for circular dial indicator style
DIAL_F_INDICATOR_TRIANGLE           //Set bit for triangular dial indicator style
DIAL_F_INDICATOR_RECTANGLE          //Set bit for rectangular dial indicator style
DIAL_F_INDICATOR_LINE               //Set bit for line dial indicator style
Syntax: gfx_Dial(value, &DialRam, &DialDef);
| Arguments | Description |
|---|---|
| value | A value (usually a constant) specifying the current frame of the widget. |
| &DialRam | A pointer to a variable array for widget utilization. |
| &DialDef | A pointer to the Data Block holding the widget parameters. |
Returns: None
Example
var frame;
var Knob1Ram[10];

#DATA
    word Knob1Info 10, 10, 152, 129, 87, 80, 38, 135, 405, 0, 100, 0x0,
                    0x52AA, 5, 0xB5B6, 0x3186, 200, 300, 0x280, 0x528A, 0x5800, 0x7E0, 0xFFE0,
                    0xF800, 12, 3, 6, 0xF800, 3, 30, 0xFFFF, FONT2, 22, 10, Labels, FONT2,
                    0xFFFF, 15, 50, Knob1Caption, (0 + DIAL_F_HANDLE_CIRCLE + DIAL_F_INDICATOR_LINE)

    byte Labels "Text1\0Text2\0Text3\0Text4\0Text5\0"
    byte Knob1Caption "KNOB\0"
#END

func main()
    gfx_ Dial(frame , Knob1Ram , Knob1Info); // Dial Internal Widget
    repeat forever
endfunc
gfx_Gauge
Draw a Gauge as defined by GaugeDef (if required), using GaugeRam positioning at position value. See the reference for the GaugeDef values.
#DATA
    word Gauge1Info 10,             // Top-Left X-position
                    10,             // Top-Left Y-position
                    181,            // Gauge length
                    59,             // Gauge width
                    11,             // Number of Gauge bars
                    0,              // Minimum gauge value
                    100,            // Maximum gauge value
                    10,             // Bar thickness
                    5,              // Bar spacing
                    0x18E3,         // Inter 'bar' gap color
                    0x280,          // Partition 1 low colour
                    0x7E0,          // Partition 1 active colour
                    0x5280,         // Partition 2 low colour
                    0xFFE0,         // Partition 2 active colour
                    0xA000,         // Partition 3 low colour
                    0xF800,         // Partition 3 active colour
                    8,              // Partition 2 starting bar
                    5,              // Partition 3 starting bar
                    (0)             // Gauge Option bits
#END
Syntax: gfx_Gauge(value, &GaugeRam, &GaugeDef);
| Arguments | Description |
|---|---|
| value | A value (usually a constant) specifying the current frame of the widget. |
| &GaugeRam | A pointer to a variable array for widget utilization. |
| &GaugeDef | A pointer to the Data Block holding the widget parameters. |
Returns: None
Example
var frame;
var Gauge1Ram[10];

#DATA
    word Gauge1Info 10, 10, 181, 59, 11, 0, 100, 10, 5, 0x18E3, 0x280, 0x7E0,
                    0x5280, 0xFFE0, 0xA000, 0xF800, 8, 5, (GAUGE_F_HORZ + GAUGE_F_TOPRIGHT)
#END

func main()
    gfx_Gauge(frame, Gauge1Ram, Gauge1Info); // Gauge Internal Widget
    repeat forever
endfunc
Note
For optimal appearance, calculate number of bars for given height first using this formula:
bars = ( (gauge height / 2) + (spacing / 2) + 1) / ( (bar thickness / 2) + (spacing / 2) + 2)
then calculate exact height given the calculated ticks:
height = bars * ( (bar thickness / 2) + (spacing / 2) +2) – (spacing / 2) - 1
gfx_LedDigits
Draw a series of 7 segment Led Digits as defined by LedDigitDef, using LedDigitRam positioning at position value. See the reference for LedDigitDef values.
#DATA
    word Digits1Info    10,                 // Top-Left X-position
                        10,                 // Top-Left Y-position
                        66,                 // Widget width (Used only for touch region)
                        106,                // Widget height (Used only for touch region)
                        2,                  // Number of digits
                        0,                  // Separator placement (To disable separator use -1)
                        0,                  // Spacing distance between each digits
                        5,                  // Digit size
                        0xFFFF,             // LED segment ON color
                        0x630C,             // LED segment OFF color
                        (0 + 0 + 0)         // Option bits (See Widget Parameter Data Block Option Bits)
#END
LEDDIGITS_F_GENERAL                         //Set bit for LED digit general format
LEDDIGITS_F_FIXED                           //Set bit for LED digit fixed format
LEDDIGITS_F_SCIENTIFIC                      //Set bit for LED digit scientific format
LEDDIGITS_F_INT16                           //Set bit for 16-bit Integer LED digit format
LEDDIGITS_F_INT32                           //Set bit for 32-bit Integer LED digit format
LEDDIGITS_F_FLOAT                           //Set bit for Float LED digit format
LEDDIGITS_F_UNSIGNED                        //Set bit for unsigned LED digit format
LEDDIGITS_F_SIGNED                          //Set bit for signed LED digit format
LEDDIGITS_F_LEADING0                        //Set bit for setting leading digits as zeroes
LEDDIGITS_F_LEADINGb                        //Set bit for setting leading digits as blanks
LEDDIGITS_F_DP_DOT                          //Set bit for using dots as separator
LEDDIGITS_F_DP_COMMA                        //Set bit for using commas as separator
Syntax: gfx_LedDigits(value, &LedDigitRam, &LedDigitDef);
| Arguments | Description |
|---|---|
| value | For the int16 format, a value specifying the current frame of the widget. For other formats (Int32 and Float) are both 32-bits therefore value is the address of a two element array containing the value. |
| &LedDigitRam | A pointer to a variable array for widget utilization. |
| &LedDigitDef | A pointer to the Data Block holding the widget parameters. |
Returns: None
Example
var value;
var Digits1RAM [12];

#DATA
    word Digits1Info 10, 10, 66, 106, 2, 0 , 0, 5, 0xFFFF,
                        0x630C,(LEDDIGITS_F_LEADING0 | LEDDIGITS_F_UNSIGNED | LEDDIGITS_F_INT16 | LEDDIGITS_F_DP_DOT)
#END

func main()
    gfx_ LedDigits value , Digits1RAM , Digits1Info ); // LED digit Widget
    repeat forever
endfunc
gfx_LedDigit
Draws a single 7 segment led Digit at x, y of size digitsize using oncolour and offcolour. The value can be 0-9 (0-9), A-F (0x0a-0x0f), blank(0x10) and - (0x11). Or value with LEDDIGIT_F_SHOW_DP to show a decimal point, LEDDIGIT_F_DP_COMMA to make the Decimal point a comma and LEDDIGIT_F_DP_ON to turn the decimal point on LEDDIGIT_F_SET_SEGMENTS can be used to turn value into a series of bits to turn on individual segments e.g. LEDDIGIT_F_SET_SEGMENTS + 9 will turn on the top and bottom segments. Again LEDDIGIT_F_SHOW_DP and LEDDIGIT_F_DP_COMMA can be used, but in this case the DP is the 8th segment.
Syntax: gfx_LedDigit(x, y, digitsize, oncolour, offcolour, value);
| Arguments | Description |
|---|---|
| x, y | x- and y-coordinates of position. |
| digitsize | Size of digit. |
| oncolour | Color when status is on. |
| offcolour | Color when status is off. |
| value | Value to show. |
Returns: None
Example
gfx_Slider5
Draw a Slider as defined by SliderDef (if required), using SliderRam positioning at position value. See the reference for the SliderDef values
#DATA
    word Slider1Info    10,             // Top-Left X-position
                        10,             // Top-Left Y-position
                        250,            // Widget length
                        40,             // Widget width
                        (0 + 0 + 0),    // Option bits (See Widget Parameter Data Block Option Bits)
                        0,              // Minimum value
                        100,            // Maximum value
                        0x1082,         // Base color
                        0x0,            // Track fill color (from Right/Top to current position)
                        0x7E0,          // Track fill color (from Left/Bottom to current position)
                        30,             // Total Marker partition for Top/Left Side (0 for no ticks)
                        30,             // Total Marker partition for Bottom/Right Side (0 for no ticks)
                        2,              // Minor ticks between each major ticks T/L Side (0 for small ticks)
                        2,              // Minor ticks between each major ticks B/R Side (0 for small ticks)
                        10,             // Major tick length
                        0x7E0,          // Major tick color
                        5,              // Minor tick length
                        0x7E0,          // Minor tick color
                        FONT3,          // Value indicator font style
                        0xFFE0,         // Value indicator text color
                        0x1082,         // Slider knob bevel gradient color 1
                        0x9CD3,         // Slider knob bevel gradient color 2
                        GRAD_DOWN,      // Slider knob bevel gradient style
                        0x1082,         // Slider knob face gradient color 1
                        0x9CD3,         // Slider knob face gradient color 2
                        GRAD_UP         // Slider knob face gradient style
#END
Syntax: gfx_Slider5(value, &SliderRam, &SliderDef);
| Arguments | Description |
|---|---|
| value | A value (usually a constant) specifying the current frame of the widget. |
| &SliderRam | A pointer to a variable array for widget utilization. |
| &SliderDef | A pointer to the Data Block holding the widget parameters. |
Returns: None
Example
var frame;
var Slider1Ram[10];
var Gauge1Ram[10];

#DATA

    word Slider1Info    10, 10, 250, 40, (0 + 0 + 0), 0, 100, 0x1082, 0x0,0x7E0,
                        30, 30, 2, 2, 10, 0x7E0, 5, 0x7E0, FONT 3 , 0xFFE0, 0x1082, 0x9CD3, GRAD_DOWN,
                        0x1082, 0x9CD3, GRAD_UP
    word Gauge1Info     10, 60, 250, 40, (SLIDER5_F_PROGRESSBAR +
                        SLIDER5_F_ORIENT_VERT + SLIDER5_F_TICKS + SLIDER5_F_VALUE_IND), 0, 100,
                        0x1082, 0x0, 0 x7E0, 30, 30, 2, 2, 10, 0x7E0, 5, 0x7E0, FONT 3 , 0xFFE0, 0x1082,
                        0x9CD3, GRAD_DOWN, 0x1082, 0x9CD3, GRAD_UP
#END

func main()
    gfx_Slider5(frame, Slider1Ram, Slider1Info);    // Slider Internal Widget
    gfx_Slider5(frame, Gauge1Ram, Gauge1Info);      // Gauge Internal Widget
    repeat forever
endfunc
gfx_Switch
Draw a Switch as defined by SwitchDef (if required), using SwitchRam positioning at position value. See the reference for the SwitchDef values.
#DATA
    word Button1Info    10,                     // Top-Left X-position
                        10,                     // Top-Left Y-position
                        90,                     // Widget length
                        49,                     // Widget height
                        1,                      // Option bits (See Widget Parameter Data Block Option Bits)
                        0x9772,                 // Container bevel main color
                        0x8C1,                  // Container bevel shadow color
                        4,                      // Container bevel thickness
                        3,                      // Switch bevel thickness
                        0x1C43,                 // Switch face color (State 1)
                        0x32A6,                 // Switch face color (State 0)
                        Button1LabelOn,         // Container text (State 1)
                        Button1LabelOff,        // Container text (State 0)
                        3,                      // Container text font style
                        1,                      // Container text size multiplier
                        0xFFFF,                 // Container text color (State 1)
                        0x120                   // Container text color (State 0)

    byte Button1LabelOn "ON\0"                  // Button label string (Use null terminator "\0" to end string)
    byte Button1LabelOff "OFF\0"                // Button label string (Use null terminator "\0" to end string)
#END
Syntax: gfx_Switch(state, &SwitchRam, &SwitchDef);
| Arguments | Description |
|---|---|
| state | A value (usually a constant) specifying the current frame of the widget. |
| &SwitchRam | A pointer to a variable array for widget utilization. |
| &SwitchDef | A pointer to the Data Block holding the widget parameters. |
Returns: None
Example
var state;
var Button1Ram[10];

#DATA
    word Button1Info    10, 10, 90, 49, 1, 0x9772, 0x8C1, 4, 3, 0x1C43, 0x32A6,
                        Button1LabelOn, Button1LabelOff, FONT3, 1, 0xFFFF, 0x120

    byte Button1LabelOn "ON\0"
    byte Button1LabelOff "OFF\0"
#END

func main()
    gfx_Switch(state, Button1Ram, Button1Info); // Button Internal Widget
    repeat forever
endfunc
gfx_Button4
Draw a Button as defined by ButtonDef (if required), using ButtonRam positioning at position value. See the reference for the ButtonDef values.
Widget Parameter Data Block Format
#DATA
    // Circular button with braille grid pattern on button face
    word Button1Info    10,                 // Top-Left X-position
                        10,                 // Top-Left Y-position
                        50,                 // Radius
                        0x9CD3,             // Outer bevel gradient color 1
                        0x5ACB,             // Outer bevel gradient color 2
                        GRAD_WAVE_VER,      // Outer bevel gradient style
                        0x8800,             // Ring Color (at state 0)
                        0xF800,             // Ring Color (at state 1)
                        0xDEDB,             // Button bevel gradient color 1
                        0x2104,             // Button bevel gradient color 2
                        GRAD_DOWN,          // Button bevel gradient (at state 0)
                        GRAD_UP,            // Button bevel gradient (at state 1)
                        0x6B6D,             // Button face color
                        0,                  // Button text (numeric zero (0) for Braille design)
                        0xBDD7,             // Braille grid gradient color 1
                        0x2965,             // Braille grid gradient color 2
                        GRAD_DOWN           // Braille grid gradient style
    // Circular button with Text on button face
    word Button2Info    120,                // Top-Left X-position
                        10,                 // Top-Left Y-position
                        50,                 // Radius
                        0x9CD3,             // Outer bevel gradient color 1
                        0x5ACB,             // Outer bevel gradient color 2
                        GRAD_WAVE_VER,      // Outer bevel gradient style
                        0x8800,             // Ring color (at state 0)
                        0xF800,             // Ring color (at state 1)
                        0xDEDB,             // Button bevel gradient color 1
                        0x2104,             // Button bevel gradient color 2
                        GRAD_DOWN,          // Button bevel gradient (at state 0)
                        GRAD_UP,            // Button bevel gradient (at state 1)
                        0x6B6D,             // Button face color
                        ButtonText,         // Button text label (Use pointer)
                        0xFFFF,             // Button text font color (at state 0)
                        0x0,                // Button text font color (at state 1)
                        FONT1,              // Button text font style
                        1                   // Button text size multiplier

    byte ButtonText "Button\0"              // Button label string (Use null terminator "\0" to end string)
#END
Syntax: gfx_Button4(state, &gfx_ButtonRam, &gfx_ButtonDef);
| Arguments | Description |
|---|---|
| state | A value (usually a constant) specifying the current frame of the widget. |
| &gfx_ButtonRam | A pointer to a variable array for widget utilization. |
| &gfx_ButtonDef | A pointer to the Data Block holding the widget parameters. |
Returns: None
Example
var state;
var Button1Ram[10];
var Button2Ram[10];

#DATA

    word Button1Info 0, 0, 50, 0x9CD3, 0x5ACB, GRAD_WAVE_VER, 0x8800, 0xF800,
                    0xDEDB, 0x2104, GRAD_DOWN, GRAD_UP, 0x6B6D, 0, 0xBDD7, 0x2965, GRAD_DOWN

    word Button2Info 10, 120, 50, 0x9CD3, 0x5ACB, GRAD_WAVE_VER, 0x8800, 0xF800,
                    0xDEDB, 0x2104, GRAD_DOWN, GRAD_UP, 0x6B6D, ButtonText, 0xFFFF, 0x0, FONT1 , 1

    byte ButtonText "Button\0"
#END

func main()
    gfx_Button4(state, Button1Ram, Button1Info);    // Button with braille
    gfx_Button4(state, Button2Ram, Button2Info);    // Button with text
    repeat forever
endfunc
gfx_Led
Draw a LED as defined by LedDef (if required), using LedRam positioning in state. See the reference for the LedDef values.
Widget Parameter Data Block Format
#DATA
    word Led1Info   10,             // Top-Left X-position
                    10,             // Top-Left Y-position
                    113,            // Widget width
                    96,             // Widget height
                    0x2965,         // Base gradient color 1
                    0x0,            // Base gradient color 2
                    0xDEFB,         // LED shine effect color
                    0xF800,         // LED color (State 1)
                    0x5800,         // LED color (State 0)
                    35,             // Base bevel inner radius
                    40,             // Base bevel outer radius
                    20,             // LED Shine effect radius
                    30,             // Outer LED radius
                    1               // LED Shine effect (1 - enable, 0 - disable)
#END
Syntax: gfx_Led(state, &LedRam, &LedDef);
| Arguments | Description |
|---|---|
| state | A value (usually a constant) specifying the current frame of the widget. |
| &LedRam | A pointer to a variable array for widget utilization. |
| &LedDef | A pointer to the Data Block holding the widget parameters. |
Returns: None
Example
var state;
var Led1Ram[10];

#DATA
    word Led1Info 10, 10, 113, 96, 0x2965, 0x0, 0xFFFF, 0xF800, 0x5800, 35, 40, 20, 30, 1
#END

func main()
    gfx_Led(state, Led1Ram, Led1Info); // LED Internal Widget
    repeat forever
endfunc
gfx_Scale
Draw a Scale as defined by ScaleDef, setting LedRam for use in touch processing. See the reference for the ScaleDef values. If touch processing is not required 0 may be used as the ScaleRam parameter.
#DATA
    word Image1Info 36,                         // Top-Left X-position
                    10,                         // Top-Left Y-position
                    197,                        // Length
                    0,                          // Minimum value
                    100,                        // Maximum value
                    5,                          // Major tick partitions
                    10,                         // Major tick length
                    2,                          // Number of minor ticks inside each partition
                    5,                          // Minor tick length
                    0xFFFF,                     // Tick color
                    0x0,                        // Marker text background color
                    0xFFFF,                     // Marker text color
                    3,                          // Marker text font style
                    0,                          // Gap size for centred marker text to ticks
                    (0 + 0 + 0)                 // Option bits (See Widget Parameter Data Block Option Bits)
#END
SCALE_TL                    //Set bit to align marker scale position to Top/Left side of the axis
SCALE_BR                    //Set bit to align marker scale position to Bottom/Right side of the axis
SCALE_CENTRE                //Set bit to align marker scale position to Centre of the axis
SCALE_NONE                  //Set bit to disable marker scale
SCALE_TICKS_TL              //Set bit to project marker ticks to Top/Left side of the axis
SCALE_TICKS_BR              //Set bit to project marker ticks to Bottom/Right side of the axis
SCALE_TICKS_BOTH            //Set bit to project marker ticks on both side of the axis
SCALE_TICKS_NONE            //Set bit to disable marker ticks
SCALE_VERT                  //Set bit for scale vertical orientation
SCALE_HORZ                  //Set bit for scale horizontal orientation
SCALE_END_ALIGN             //Set bit for aligning the end markers to the last marker ticks
SCALE_NO_END_ALIGN          //Set bit for removing end alignment
SCALE_SHOW_ZERO             //Set bit for showing zero digit in the marker scale
SCALE_HIDE_ZERO             //Set bit for hiding zero digit in the marker scale
Syntax: gfx_Scale(&ScaleRam, &ScaleDef);
| Arguments | Description |
|---|---|
| &ScaleRam | A pointer to a variable array for widget utilization. |
| &ScaleDef | A pointer to the Data Block holding the widget parameters. |
Returns: None
Example
var ImageRAM1[10];

#DATA

    word Image1Info 36, 10, 197, 0, 100, 5, 10, 2, 5, 0xFFFF, 0x0, 0xFFFF,
                    FONT3 , 0, (SCALE_CENTRE | SCALE_TICKS_BOTH | SCALE_VERT | SCALE_END_ALIGN |
                    SCALE_SHOW_ZERO)
#END

func main()
    gfx_Scale(ImageRAM1, Image1Info); // Scale obj ect
    repeat forever
endfunc
gfx_RulerGauge
Draw a RulerGauge as defined by RulerGaugeDef (if required), using RulerGaugeRam positioning at position value. See the reference for the RulerGaugeDef values.
#DATA
    word Gauge1Info 10,                         // Top-Left X-position
                    10,                         // Top-Left Y-position
                    250,                        // Widget length
                    52,                         // Widget width
                    100,                        // Widget total frames
                    6,                          // Number of partitions between each major ticks
                    5,                          // Number of minor tick partitions between each major ticks
                    10,                         // Minor tick length
                    20,                         // Major tick length
                    50,                         // Starting frame for medium range scale
                    75,                         // Starting frame for high range scale
                    0x3A08,                     // Base color
                    0x1F,                       // Low range color
                    0xFD20,                     // Medium range color
                    0xF800,                     // High range color
                    0xFFFF,                     // Marker tick color
                    RULERGAUGE_TICKS_BOTTOM     // Option bits (See Flash Data Block Option Bits)
#END
Syntax: gfx_RulerGauge(value, &RulerGaugeRam, &RulerGaugeDef);
| Arguments | Description |
|---|---|
| value | A value (usually a constant) specifying the current frame of the widget. |
| &RulerGaugeRam | A pointer to a variable array for widget utilization. |
| &RulerGaugeDef | A pointer to the Data Block holding the widget parameters. |
Returns: None
Example
var value;
var Gauge1Ram[10];

#DATA
    word Gauge1Info 10, 10, 250, 52, 100, 6, 5, 10, 20, 50, 75, 0x3A08, 0x1F,
                    0xFD20, 0xF800, 0xFFFF, RULERGAUGE_TICKS_BOTTOM
#END

func main()
    gfx_ RulerGauge(value , Gauge1Ram , Gauge1Info ); // Gauge Internal Widget
    repeat forever
endfunc
gfx_GradientShape
Produce a shaped color gradient using the supplied parameters.
Syntax: gfx_GradientShape(GradientRAM, HorzVert, OuterWidth, X, Y, W, H, TLrad, TRrad, BLrad, BRrad, Darken, OuterColor, OuterType, OuterLevel, InnerColor, InnerType, InnerLevel, Split);
| Arguments | Description |
|---|---|
| GradientRAM | This Function requires a quantity or RAM to work. It also needs to be initialised and it's size varies accoring to the largest corner radius. Multiple gradient shape calls can share the same GradientRAM. egr gradientRAM[29+91*2] := [-1,-1,-9999,0,0,91] ; Would support a maximum radius of 90 degrees, note the 91 in two places. |
| HorzVert | Horizontal or Vertical -- 0 or 1. |
| OuterWidth | Outer gradient width. |
| X | x co-ordinate. |
| Y | y co-ordinate. |
| W | Width |
| H | Height |
| TLrad | Top left corner radius. |
| TRrad | Top right corner radius. |
| BLrad | Bottom left radius. |
| BRrad | Bottom right radius. |
| Darken | Darken both colours by a value. Can be a -ve value to lighten. |
| OuterColor | Outer Gradient colour. |
| OuterType | Outer Gradient type (0 - 3 horizontal, +4 vertical) 0 - Raised 1 - Sunken 2 - Raised flatter middle 3 - Sunken flatter middle |
| OuterLevel | Outer Gradient level 0 - 63. |
| InnerColor | Inner Gradient colour. |
| InnerType | Outer Gradient type (0 - 3 horizontal, +4 vertical) 0 - Raised 1 - Sunken 2 - Raised flatter middle 3 - Sunken flatter middle |
| InnerLevel | Inner Gradient level 0 - 63. |
| Split | Split gradient. 0 - no split 1 – top 2 - bottom |
Returns: None
Example
gfx_GradientShape(GradientRAM, HorzVert, OuterWidth, X, Y, W, H, TLrad,
                    TRrad, BLrad, BRrad, Darken, OuterColor, OuterType, OuterLevel, InnerColor,
                    InnerType, InnerLevel, Split) ;
gfx_GradientColor
Given the parameters, adjust the input color to produce the output color.
Syntax: gfx_GradientColor(Type, Darken, Level, H, Pos, Color);
| Arguments | Description |
|---|---|
| Type | Gradient type (0 - 3 horizontal, +4 vertical) 0 – Raised 1 – Sunken 2 - Raised flatter middle 3 - Sunken flatter middle |
| Darken | Darken colour by a value. Can be a -ve value to lighten. |
| Level | Gradient level 0 - 63. |
| H | Height of the object that gradient is applied. |
| Pos | Position in the height that gradient is calculated. |
| Color | Source colour that gradient is applied to. |
Returns: Color after adjustment.
Example
gfx_GradTriangleFilled
Produce a triangle with or without a gradient.
Syntax: gfx_GradTriangleFilled(X0, Y0, X1, Y1, X2, Y2, SolidCol, GradientCol, GradientHeight, GradientY, GradientLevel, Type);
| Arguments | Description |
|---|---|
| X0 | First triangle point x coordinate. |
| Y0 | First triangle point y coordinate. |
| X1 | Second triangle point x coordinate. |
| Y1 | Second triangle point y coordinate. |
| X2 | Third triangle point x coordinate. |
| Y2 | Third triangle point y coordinate. |
| SolidCol | Colour that will be used if the Solid or Gradient parameter is set to 0. |
| GradientCol | Colour that will be used if the Solid or Gradient parameter is set to 1. |
| GradientHeight | Height of the area that the gradient will be calculated. Can be larger than the triangle. |
| GradientY | Position on the Y axis that the gradient will be calculated from with respect to triangle position. |
| GradientLevel | Level of gradient applied. |
| Type | Select wether solid triangle or gardient triangle is drawn. |
Returns: None
Example
gfx_XYrotToVal
Convert a rotational angle into a value. Calculates a position for a rotary input starting at mina and continuing to maxa. Both angles must be greater than 0.
Syntax: gfx_XYrotToVal(x,y,base,mina,maxa,minv,maxv);
| Arguments | Description |
|---|---|
| x | Relative x-coordinate (x-coordinate – x-center). |
| y | Relative y-coordinate (y-coordinate – y-center). |
| base | Base can be XYROT_EAST, used for internal widgets, or XYROT_SOUTH, used for GCI widgets. |
| mina | Start angle (Clockwise from 0 angle). |
| maxa | End angle (Clockwise from 0 angle). |
| minv | Minimum value. |
| maxv | Maximum value. |
Returns: A value from minv to maxv.
Example
gfx_XYlinToVal
Convert a linear position into a value. Calculates a position for a linear input starting at minpos and continuing to maxpos.
Syntax: gfx_XYlinToVal(x,y,base,minpos,maxpos,minv,maxv);
| Arguments | Description |
|---|---|
| x | Relative x-coordinate (x-coordinate – x-center). |
| y | Relative y-coordinate (y-coordinate – y-center). |
| base | Base can be XYLIN_X, to use the x value for calculations, or XYLIN_Y, to use the y value. |
| mina | Start position. |
| maxa | End position. |
| minv | Minimum value. |
| maxv | Maximum value. |
Returns: A value from minv to maxv.
Example
I2C Master Functions
I2C_Open
Calling this function configures the I2C module and initialises it to be ready for service. The I2C clock speed is specified by the Speed parameter. Multiple I2C Speed settings are available to suit various requirements.
| Constant | Speed |
|---|---|
| I2C_SLOW | 100KHz |
| I2C_MED | 400KHz |
| I2C_FAST | 1MHz |
| I2C_10KHZ | 10KHz |
| I2C_20KHZ | 20KHz |
| I2C_50KHZ | 50KHz |
| I2C_250KHZ | 250KHz |
Syntax: I2C1_Open(Speed, SCLpin, SDApin); or I2C2_Open(Speed, SCLpin, SDApin); or I2C3_Open(Speed, SCLpin, SDApin);
| Arguments | Description |
|---|---|
| Speed | Specifies the I2C bus speed (See the table above). |
| SCLpin | Specifies the GPIO pin to use for the SCL signal. |
| SDApin | Specifies the GPIO pin to use for the SDA signal. |
Returns: 1 if Successful, otherwise 0.
Example
Note
Normally the I2C pins are PA0 to PA13, use of these pins has a couple of limitations, a) There is no slew rate control at I2C_MED and b) I2C_FAST is not truly 1MHz. If either of these restrictions need to be addressed, a special case of SCLpin = PA14 and SDApin = PA15 exists ONLY for speeds I2C_MED (which uses slew rate control) and I2C_FAST (which is truly 1MHz).
I2C_Close
Calling this function closes the I2C port and disables the I2C hardware
Syntax: I2C1_Close(); or I2C2_Close(); or I2C3_Close();
Returns: None
Example
I2C_Start
Calling this function sends an I2C start condition. The hardware first pulls the SDA (data) line low, and next pulls the SCL (clock) line low.
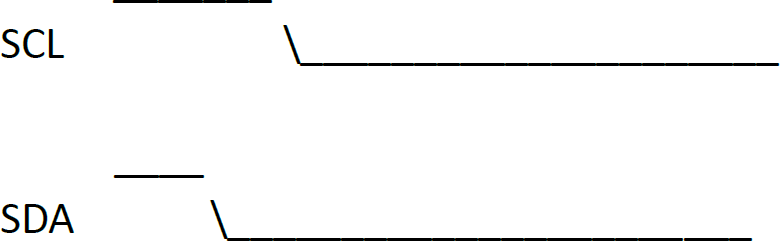
Syntax: I2C1_Start(); or I2C2_Start(); or I2C3_start();
Returns: 1 if Successful, otherwise 0.
Example
I2C_Stop
Calling this function sends an I2C stop condition. The hardware first releases the SCL to high state, and then releases the SDA line high.
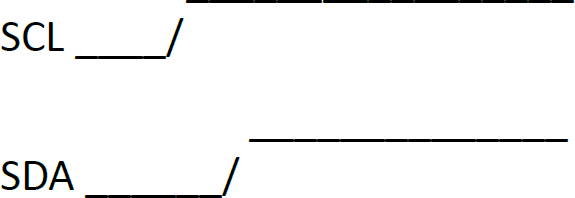
Syntax: I2C1_Stop(); or I2C2_Stop(); or I2C3_Stop();
Returns: 1 if Successful, otherwise 0.
Example
I2C_Restart
Calling this function generates a restart condition.
Syntax: I2C1_Restart(); or I2C2_Restart(); or I2C3_Restart();
Returns: 1 if Successful, otherwise 0.
Example
I2C_Read
Calling this function reads a single byte from the I2C bus.

Syntax: I2C1_Read(); or I2C2_Read(); or I2C3_Read();
Returns: Byte from the I2C Bus in the lower 8-bits.
Example
Note
Data can only change when the clock is low.
I2C_Write
Calling this function sends a single byte to the I2C bus

Syntax: I2C1_Write(byte); or I2C2_Write(byte); or I2C3_Write(byte);
Returns: The byte to be written to the I2C Bus.
Example
I2C_Ack
Calling this function sends an I2C acknowledge condition. The hardware first pulls the SDA line low, and next releases SCL high followed by pulling SCL low again thus generating a clock pulse, SDA is then released high.

Syntax: I2C1_Ack(); or I2C2_Ack(); or I2C3_Ack();
Returns: None
Example
Note
Data can only change when the clock is low.
I2C_Nack
Calling this function sends an I2C negative acknowledge condition. The hardware first release the SDA line high, and next releases SCL HI followed by pulling SCL low thus generating a clock pulse.
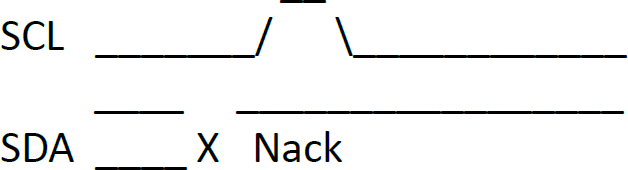
Syntax: I2C1_Nack(); or I2C2_Nack(); or I2C3_Nack();
Returns: None
Example
Note
Data can only change when the clock is low.
I2C_AckStatus
Call this function to get the ACK status from the slave device The state of SDA is returned.
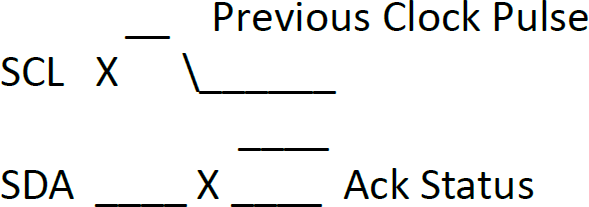
Syntax: I2C1_AckStatus(); or I2C2_AckStatus(); or I2C3_AckStatus();
Returns: Device Ack Status.
Example
Note
Returns the state of SDA after the last clock pulse.
I2C_AckPoll
Call this function to wait for a device to return an ACK during ACK polling. The SDA is monitored for an Ack.
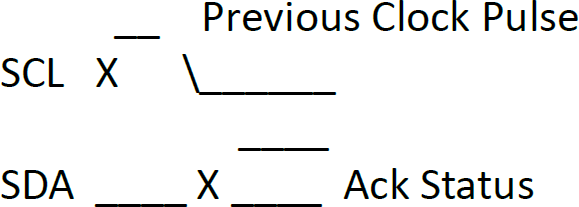
Syntax: I2C1_AckPoll(); or I2C2_AckPoll(); or I2C3_AckPoll();
Returns: Device Ack Status.
Example
r := I2C2_AckPoll(0xA0);    //send the control byte the wait for a device
                            //to return poll the device until an ACK
                            //is received.
Note
Returns the state of SDA after the last clock pulse.
I2C_Idle
Call this function to wait until the I2C bus is inactive.
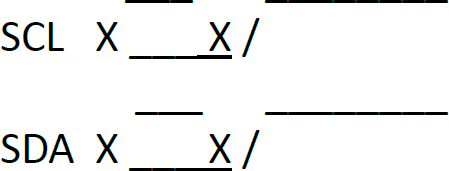
Syntax: I2C1_Idle(); or I2C2_Idle(); or I2C2_Idle();
Returns: 1 if Successful, otherwise 0.
Example
Note
Wait for the bus to become idle. Times out if not inactive within 1 second.
I2C_Gets
Reads up to size characters into buffer from an ascii string stored in a device. Reads up to the ASCII NULL terminator and includes the terminator.
Syntax: I2C1_Gets(buffer, size); or I2C2_Gets(buffer, size); or I2C3_Gets(buffer, size);
| Arguments | Description |
|---|---|
| buffer | Storage for the string being read from the device. |
| size | Maximum size of the string to be read. |
Returns: The count of bytes actually read.
Example
I2C_Getn
Reads count bytes in to buffer and returns True if function succeeds.
Syntax: I2C1_Getn(buffer, count); or I2C2_Getn(buffer, count); or I2C3_Getn(buffer, count);
| Arguments | Description |
|---|---|
| buffer | Storage for the bytes being read from the device. |
| size | Number of bytes to be read. |
Returns: True if block read ok, otherwise False.
Example
I2C_Puts
Writes an ASCII string from buffer to a device. The ASCII NULL terminator is also written.
Syntax: I2C1_Puts(buffer); or I2C2_Puts(buffer); or I2C3_Puts(buffer);
| Arguments | Description |
|---|---|
| buffer | Storage for the string being written to the device. |
Returns: The count of the bytes actually written.
Example
I2C_Putn
Writes count bytes from the buffer to the device, and returns written if function succeeds.
Syntax: I2C1_Putn(buffer, count); or I2C2_Putn(buffer, count); or I2C3_Putn(buffer, count);
| Arguments | Description |
|---|---|
| buffer | Storage for the bytes being written to the device. |
| count | Number of bytes to be written. |
Returns: Number of bytes written.
Example
Image Control Functions
img_SetPosition
This function requires that an image control has been created with the file_LoadImageControl(...); function.
Sets the position where the image will next be displayed. Returns TRUE if index was ok and function was successful. (the return value is usually ignored).
You may turn off an image so when img_Show() is called, the image will not be shown.
This function requires that an image control has been created with the file_LoadImageControl(...); function.
Syntax: img_SetPosition(handle, index, xpos, ypos);
| Arguments | Description |
|---|---|
| handle | Pointer to the Image List. |
| index | Index of the images in the list. |
| xpos | Top left horizontal screen position where image is to be displayed. |
| ypos | Top left vertical screen position where image is to be displayed. |
Returns: True if index OK, otherwise false.
Example
// make a simple 'window'
gfx_Panel(PANEL_RAISED, 0, 0, 239, 239, GRAY);
img_SetPosition(Ihndl, BTN_EXIT, 224,2);            //set checkout box position
img_Enable(Ihndl, BTN_EXIT);                        //enable checkout box
img_Enable
This function requires that an image control has been created with the file_LoadImageControl(...); function.
Enables a selected image in the image list. Returns TRUE if index was ok and function was successful. This is the default state so when img_Show() is called all the images in the list will be shown.
To enable all the images in the list at the same time set index to -1.
To enable a selected image, use the image index number.
Syntax: img_Enable(handle, index);
| Arguments | Description |
|---|---|
| handle | Pointer to the Image List. |
| index | Index of the images in the list. |
Returns: True if index OK, otherwise False.
Example
img_Disable
This function requires that an image control has been created with the file_LoadImageControl(...); function.
Disables an image in the image list. Returns TRUE if index was ok and function was successful. Use this function to turn off an image so that when img_Show() is called the selected image in the list will not be shown.
To disable all the images in the list at the same time set index to -1.
Syntax: img_Disable(handle, index);
| Arguments | Description |
|---|---|
| handle | Pointer to the Image List. |
| index | Index of the images in the list. |
Returns: True if index OK, otherwise False.
Example
img_Darken
This function requires that an image control has been created with the file_LoadImageControl(...); function.
Darken an image in the image list. Returns TRUE if index was ok and function was successful. Use this function to darken an image so that when img_Show() is called the control will take effect. To darken all the images in the list at the same time set index to -1.
Syntax: img_Darken(handle, index);
| Arguments | Description |
|---|---|
| handle | Pointer to the Image List. |
| index | Index of the images in the list. |
Returns: True if index OK, otherwise False.
Example
Note
This feature will take effect one time only and when img_Show() is called again the darkened image will revert back to normal.
img_Lighten
This function requires that an image control has been created with the file_LoadImageControl(...); function.
Lighten an image in the image list. Returns TRUE if index was ok and function was successful. Use this function to lighten an image so that when img_Show() is called the control will take effect. To lighten all the images in the list at the same time set index to -1.
Syntax: img_Lighten(handle, index);
| Arguments | Description |
|---|---|
| handle | Pointer to the Image List. |
| index | Index of the images in the list. |
Returns: True if index OK, otherwise False.
Example
Note
This feature will take effect one time only and when img_Show() is called again the lightened image will revert back to normal.
img_SetWord
This function requires that an image control has been created with the file_LoadImageControl(...); function. Set specified word in an image entry.
| Offset Constant | Value | Description |
|---|---|---|
| IMAGE_XPOS | 2 | WORD image location X |
| IMAGE_YPOS | 3 | WORD image location Y |
| IMAGE_FLAGS | 6 | WORD image flags |
| IMAGE_DELAY | 7 | WORD inter frame delay |
| IMAGE_INDEX | 9 | WORD current frame |
| IMAGE_TAG | 12 | WORD user variable #1 |
| IMAGE_TAG2 | 13 | WORD user variable #2 |
Syntax: img_SetWord(handle, index, offset, word);
| Arguments | Description |
|---|---|
| handle | Pointer to the Image List. |
| index | Index of the images in the list. |
| offset | Offset of the required word in the image entry. |
| word | The word to be written to the entry. |
Returns: True if successful, usually ignored.
Example
func cat()
    var private frame := 0;                 // start with frame 0
    var private image := SPRITE_CAT;        // cat image, can be changed with
                                            // cat.image := xxx
    var private speed := 30;

    img_SetWord(Ihndl, image, IMAGE_INDEX, frame++);
    frame := frame % img_GetWord(Ihndl, image, IM AGE_FRAMES);
    img_Show(Ihndl, image);
    sys_SetTimer(TIMER3,speed); // reset the event timer
endfunc
Note
Not all Constants are listed as some are Read Only. img_Show(..) will now show error box for out of range video frames. Also, if frame is set to -1, just a rectangle will be drawn in background colour to blank an image. It applies to PmmC R29 or above.
img_GetWord
This function requires that an image control has been created with the file_LoadImageControl(...) function.
Returns specified word from an image entry.
| Offset Constant | Value | Description |
|---|---|---|
| IMAGE_LOWORD | 0 | WORD image address LO |
| IMAGE_HIWORD | 1 | WORD image address HI |
| IMAGE_XPOS | 2 | WORD image location X |
| IMAGE_YPOS | 3 | WORD image location Y |
| IMAGE_WIDTH | 4 | WORD image width |
| IMAGE_HEIGHT | 5 | WORD image height |
| IMAGE_FLAGS | 6 | WORD image flags |
| IMAGE_DELAY | 7 | WORD inter frame delay |
| IMAGE_FRAMES | 8 | WORD number of frames |
| IMAGE_INDEX | 9 | WORD current frame |
| IMAGE_CLUSTER | 10 | WORD image start cluster pos (for FAT16 only) |
| IMAGE_SECTOR | 11 | WORD image start sector in cluster pos (for FAT16 only) |
| IMAGE_TAG | 12 | WORD user variable #1 |
| IMAGE_TAG2 | 13 | WORD user variable #2 |
Syntax: img_GetWord(handle, index, offset);
| Arguments | Description |
|---|---|
| handle | Pointer to the Image List. |
| index | Index of the images in the list. |
| offset | Offset of the required word in the image entry. |
Returns: The image entry in the list.
Example
img_Show
This function requires that an image control has been created with the file_LoadImageControl(...) function.
Enable the displaying of the image entry in the image control.
Syntax: img_Show(handle, index);
| Arguments | Description |
|---|---|
| handle | Pointer to the Image List. |
| index | Index of the images in the list. |
Returns: True if successful, usually ignored.
Example
img_SetAttributes
This function SETS one or more bits in the IMAGE_FLAGS field of an image control entry. "value" refers to various bits in the image control entry (see image attribute flags).
A '1' bit in the "value" field SETS the respective bit in the IMAGE_FLAGS field of the image control entry.
| Flag Constant | Bit | Value | Description |
|---|---|---|---|
| I_ENABLED | 15 | 0x8000 | Set for image enabled. |
| I_DARKEN | 14 | 0x4000 | Display dimmed. |
| I_LIGHTEN | 13 | 0x2000 | Display bright. |
| I_TOUCHED | 12 | 0x1000 | Touch test result. |
| I_Y_LOCK | 11 | 0x0800 | Stop Y movement. |
| I_X_LOCK | 10 | 0x0400 | Stop X movement. |
| I_TOPMOST | 9 | 0x0200 | Draw on top of other images next update. |
| I_STAYONTOP | 8 | 0x0100 | Draw on top of other images always. |
| I_TOUCH_DISABLE | 5 | 0x0020 | Set to disable touch for this image, default=1 for movie, 0 for image. |
Syntax: img_SetAttributes(handle, index, value);
| Arguments | Description |
|---|---|
| handle | Pointer to the Image List. |
| index | Index of the images in the list. |
| value | Refers to various bits in the image control entry (see image attribute flags). |
Returns: True if successful, usually ignored.
Example
:
:
img_Enable(Ihndl, SPRITE_CAT);                      // we'll also use small cat video
img_SetAttributes(Ihndl, SPRITE_CAT, I_NOGROUP);
img_SetPosition(Ihndl, SPRITE_CAT, 160, 180);       // set its position
:
img_ClearAttributes
Clear various image attribute flags in an image control entry. (see image attribute flags below)
This function requires that an image control has been created with the file_LoadImageControl(...) function.
| Flag Constant | Bit | Value | Description |
|---|---|---|---|
| I_ENABLED | 15 | 0x8000 | Set for image enabled. |
| I_DARKEN | 14 | 0x4000 | Display dimmed. |
| I_LIGHTEN | 13 | 0x2000 | Display bright. |
| I_TOUCHED | 12 | 0x1000 | Touch test result. |
| I_X_LOCK | 10 | 0x0400 | Stop X movement. |
| I_TOPMOST | 9 | 0x0200 | Draw on top of other images next update. |
| I_STAYONTOP | 8 | 0x0100 | Draw on top of other images always. |
| I_TOUCH_DISABLE | 5 | 0x0020 | Set to disable touch for this image, default=1 for movie, 0 for image. |
Syntax: img_ClearAttributes(handle, index, value);
| Arguments | Description |
|---|---|
| handle | Pointer to the Image List. |
| index | Index of the images in the list. |
| value | a '1' bit indicates that a bit should be set and a '0' bit indicates that a bit is not altered. |
Note
If index is set to -1, the attribute is altered in ALL of the entries in the image list. The constant ALL is set to -1 specifically for this purpose.
Returns: Returns TRUE if successful, usually ignored
Example
Note
Image attribute flags may be combined with the + or | operators, e.g.:- img_ClearAttributes(hndl, ALL, I_Y_LOCK | I_X_LOCK ); // allow all images to move in any direction.
img_Touched
This function requires that an image control has been created with the file_LoadImageControl(...) function.
Returns index if image touched or returns -1 image not touched. If index is passed as -1 the function tests all images and returns -1 if image not touched or returns index.
Syntax: img_Touched(handle, index);
| Arguments | Description |
|---|---|
| handle | Pointer to the Image List. |
| index | Index of the images in the list. |
Returns: index of image touched, released or being held, or -1 if none
Example
if(state == TOUCH_PRESSED)
    n := img_Touched(Ihndl, -1);            //scan image list, looking for a touch
    if(n != -1)
        last := n;
        button := n;
        img_Lighten(Ihndl, n);              //lighten the button touched
        img_Show(Ihndl, -1);                // restore the images
    endif
endif
img_SelectReadPosition
This Functions sets a position in an image control for sequential reading of pixels from the uSD card (fat16 or raw modes supported).
No image window area is set, the image will not be shown.
This function provides a means of preparing to load an image, or part of an image, to an array. (see img_SequentialRead)
Syntax: img_SelectReadPosition(handle, index, frame, xpos, ypos);
| Arguments | Description |
|---|---|
| handle | Pointer to the Image List. |
| index | Index of the images in the list. |
| frame | Frame to read if the ‘image’ is a video, else 0. |
| xpos | Image location, x position (top left corner). |
| ypos | Image location, Y position (top left corner). |
Returns: TRUE if index was ok and function successful.
Example
var subpic[55*60];

func main()
    var i, h, p, w ;
    if (!file_Mount())
        putstr("\nDrive not mounted...");       // simplistic error handling
        repeat forever
    endif

    handle := file_LoadImageControl("Nemo240.dat", "Nemo240.gci", 1);
    h := img_GetWord(handle, 0, IMAGE_HEIGHT);
    w := img_GetWord(handle, 0, IMAGE_WIDTH);
    img_SelectReadPosition(handle, 0, 520, 55 ,
    p := subpic ;
    for (i := 0; i < 60; i++)
        img_SequentialRead(55, p) p);                   // read pixels from selected read
                                                        // position of an image
        p += 55 ;
        img_SequentialRead(w 55, 0) 0);                 // skip to next line
    next
    gfx_WriteGRAMarea(0, 240, 54, 299, subpic)

    img_SetWord( handle, 0, IMAGE_INDEX, 520) 520);     // frame is 0 to 604
    img_Show(handle,0)
    repeat forever                                      // intial testing only
endfunc
img_SequentialRead
Once a position has been set with the img_SelectReadPosition function, this function can then be used for sequential reading of pixels from image storage.
If "ptr" is 0, "count" pixels from the stream are simply skipped.
If "ptr" is 1, "count" pixels are written to the GRAM area.
"ptr" must point to a valid array that is at least the size of "count", or part of an image, to an array. (see img_SelectReadPosition)
Syntax: img_SequentialRead(count, ptr);
| Arguments | Description |
|---|---|
| count | Number of Pixels to read. |
| ptr | A pointer to an array to read count pixels into. |
Returns: TRUE if index was ok and function successful.
Example: See img_SelectReadPosition example
img_FileRead
This function requires that an image file control has been created with the file_LoadImageControl(...) function under Mode 3.
Reads the number of bytes specified by "size" from the file referenced by "handle" into a destination memory buffer. If "dest" is zero, data is directed to GRAM window.
Syntax: img_FileRead(*dest, size, handle, index);
| Arguments | Description |
|---|---|
| dest | Pointer to a destination memory buffer. |
| size | Number of bytes to be read. |
| handle | Pointer to the image file control. |
| index | Index of the entry in the handle. |
Returns: Number of characters read
Example
Note
This function is only for files embedded in a GCF, for Flash only, ie this is not valid for GCI and uSD card access.
img_FileSeek
This function requires that an image file control has been created with the file_LoadImageControl(...) function under Mode 3.
Set file position to specified address for the file handle so subsequent data may be read from that position onwards with img_FileGetC(...), img_FileGetW(...) or img_FileGetS(...).
Syntax: img_FileSeek(handle, index, HiWord, LoWord);
| Arguments | Description |
|---|---|
| handle | Pointer to the image file control. |
| index | Index of the entry in the handle. |
| HiWord | Contains the upper 16bits of the file position. |
| LoWord | Contains the lower 16bits of the file position. |
Returns: True if successful, usually ignored.
Example
Note
This function is only for files embedded in a GCF, for Flash only, ie this is not valid for GCI and uSD card access.
img_FileIndex
This function requires that an image file control has been created with the file_LoadImageControl(...) function under Mode 3.
Set file seek position to specified address for the file handle so subsequent data may be read from that position onwards with img_FileGetC(...), img_FileGetW(...) or img_FileGetS(...).
Syntax: img_FileIndex(handle, index, HiSize, LoSize, recordnum)
| Arguments | Description |
|---|---|
| handle | Pointer to the image file control. |
| index | Index of the entry in the handle. |
| HiSize | Contains the upper 16bits of the size of the file records. |
| LoSize | Contains the lower 16bits of the size of the file records. |
| recordnum | The index of the required record. |
Returns: True if successful, usually ignored.
Example
Note
This function is only for files embedded in a GCF, for Flash only, ie this is not valid for GCI and uSD card access.
img_FileTell
This function requires that an image file control has been created with the file_LoadImageControl(...) function under Mode 3.
Reads the current 32-bit file pointer and stores it into the two variables specified in "HiWord" and "LoWord".
Syntax: img_FileTell(handle, index, &HiWord, &LoWord);
| Arguments | Description |
|---|---|
| handle | Pointer to the image file control. |
| index | Index of the entry in the handle. |
| HiWord | Specifies location for the upper 16bits of the file pointer. |
| LoWord | Specifies location for the lower 16bits of the file pointer. |
Returns: True if successful.
Example
Note
This function is only for files embedded in a GCF, for Flash only, ie this is not valid for GCI and uSD card access.
img_ FileSize
This function requires that an image file control has been created with the file_LoadImageControl(...) function under Mode 3.
Reads the 32-bit file size and stores it into the two variables specified in "HiWord" and "LoWord".
Syntax: img_FileSize(handle, index, &HiWord, &LoWord);
| Arguments | Description |
|---|---|
| handle | Pointer to the image file control. |
| index | Index of the entry in the handle. |
| HiWord | Specifies location for the upper 16bits of the file size. |
| LoWord | Specifies location for the lower 16bits of the file size. |
Returns: True if successful.
Example
Note
This function is only for files embedded in a GCF, for Flash only, ie this is not valid for GCI and uSD card access.
img_FileGetC
This function requires that an image file control has been created with the file_LoadImageControl(...) function under Mode 3.
This function reads a byte from the file, at the position indicated by the associated file-position pointer and advances the pointer appropriately (incremented by 1).
Syntax: img_FileGetC(handle, index);
| Arguments | Description |
|---|---|
| handle | Pointer to the image file control. |
| index | Index of the entry in the handle. |
Returns: Next char from file.
Example
Note
This function is only for files embedded in a GCF, for Flash only, ie this is not valid for GCI and uSD card access.
img_FileGetW
This function requires that an image file control has been created with the file_LoadImageControl(...) function under Mode 3.
This function reads a word (2 bytes) from the file, at the position indicated by the associated file-position pointer and advances the pointer appropriately (incremented by 2).
Syntax: img_FileGetW(handle, index);
| Arguments | Description |
|---|---|
| handle | Pointer to the image file control. |
| index | Index of the entry in the handle. |
Returns: The next word read in file.
Example
Note
This function is only for files embedded in a GCF, for Flash only, ie this is not valid for GCI and uSD card access.
img_FileGetS
This function requires that an image file control has been created with the file_LoadImageControl(...) function under Mode 3.
This function reads a line of text to a buffer (specified by "*string") from a file at the current file position indicated by the associated file-position pointer and advances the pointer appropriately.
This function reads only reads up to "size - 1" characters into "string*" (one character is reserved for the null-terminator). Characters are read until either a newline or an EOF is received or until the number of characters read reaches "size - 1**" or a read error is received.
img_FileGetS(...) automatically appends a null-terminator to the data read.
img_FileGetS(...) will stop reading when any of the following conditions are true:
- It has read n-1 bytes (one character is reserved for the null-terminator).
- It encounters a newline character (a line-feed in the compilers tested here), or
- It reaches the end of file.
- A read error occurs.
Syntax: img_FileGetS(*string, size, handle, index);
| Arguments | Description |
|---|---|
| string | Destination buffer. |
| size | The maximum number of bytes to be read from the file. |
| handle | Pointer to the image file control. |
| index | Index of the entry in the handle. |
Returns: Pointer to string or null if failed.
Example
Note
This function is only for files embedded in a GCF, for Flash only, ie this is not valid for GCI and uSD card access.
img_FileRewind
This function requires that an image file control has been created with the file_LoadImageControl(...) function under Mode 3.
Resets the file pointer to the beginning of the open file.
Syntax: img_FileRewind(handle, index);
| Arguments | Description |
|---|---|
| handle | Pointer to the image file control. |
| index | Index of the entry in the handle. |
Returns: True if file rewound successfully, usually ignored
Example
Note
This function is only for files embedded in a GCF, for Flash only, ie this is not valid for GCI and uSD card access.
img_FileLoadFunction
This function requires that an image file control has been created with the file_LoadImageControl(...) function under Mode 3.
Load a function or program from disk and return a function pointer to the allocation.
The function can then be invoked just like any other function would be called via a function pointer. Parameters may be passed to it in a conventional way. The callers stack is shared by the loaded function, however any global variables in the loaded function are private to that function.
The function may be discarded at any time when no longer required, freeing its memory resources through mem_Free(..).
Syntax: img_FileLoadFunction( handle, index);
| Arguments | Description |
|---|---|
| handle | Pointer to the image file control. |
| index | Index of the entry in the handle. |
Returns: A pointer to the memory allocation where the function has been loaded from file which can be then used as a function call.
Example
Note
This function is only for files embedded in a GCF, for Flash only, ie this is not valid for GCI and uSD card access.
img_FileRun
This function requires that an image file control has been created with the file_LoadImageControl(...) function under Mode 3.
Load a program from disk where the current program releases any allocated memory but retains the stack and global memory.
If arglistptr is 0, no arguments are passed, else, arglist points to an array, the first element being the number of elements in the array.
The func 'main' in the called program accepts the arguments, if any. The arguments can only be passed by value, no pointers or references can be used as all memory is cleared before the file is loaded.
Refer to img_FileExec(...) and img_FileLoadFunction(…) for functions that can pass by reference.
Syntax: img_FileRun(handle, index, arglistptr);
| Arguments | Description |
|---|---|
| handle | Pointer to the image file control. |
| index | Index of the entry in the handle. |
| arglistptr | Pointer to the list of arguments to pass to the new program. |
Returns: The value from main in the called program.
Example
Note
This function is only for files embedded in a GCF, for Flash only, ie this is not valid for GCI and uSD card access.
img_FileExec
This function requires that an image file control has been created with the file_LoadImageControl(...) function under Mode 3.
Load a program from disk and returns like a function, the calling program is kept active and control returns to it.
The func 'main' in the called program accepts the arguments, if any. If arglistptr is 0, no arguments are passed, else arglist points to an array, the first element being the number of elements in the array
This function is similar to img_FileLoadFunction(...), however, the function argument list is passed by pointer, and the memory consumed by the function is released as soon as the function completes.
Syntax: img_FileExec(handle, index, arglistptr);
| Arguments | Description |
|---|---|
| handle | Pointer to the image file control. |
| index | Index of the entry in the handle. |
| arglistptr | Pointer to the list of arguments to pass to the new program. |
Returns: The value from main in the called program.
Example
Note
This function is only for files embedded in a GCF, for Flash only, ie this is not valid for GCI and uSD card access.
img_FilePlayWAV
This function requires that an image file control has been created with the file_LoadImageControl(...) function under Mode 3.
Play a wave file at index "index" in the image filesystem "handle". This function automatically grabs a chunk of memory for a file buffer, and a wave buffer.
The minimum memory requirement is about 580 bytes for the disk I/O service and a minimum wave buffer size of 1024. The size of the wave buffer allocation can be increased by the snd_BufSize function. The default size 1024 bytes. The memory is only required during the duration of play, and is automatically released while not in use.
See Sound Control Functions for additional play control functions.
This function may return the following error values:
| Value | Description |
|---|---|
| -7 | Insufficient memory available for WAV buffer and file |
| -6 | cant play this rate |
| -5 | no data chunk found in first rsector |
| -4 | no format data |
| -3 | no wave chunk signature |
| -2 | bad wave file format |
| -1 | file not found |
Syntax: img_FilePlayWAV(handle, index);
| Arguments | Description |
|---|---|
| handle | Pointer to the image file control. |
| index | Index of the entry in the handle. |
Returns: Number of blocks to play (1 to 32767) or negative value in case of errors
Example
print("\nding.wav\n");
for (n:=0; n<45; n++)
    pitch := NOTES[n];
    print([UDEC] pitch,"\r");
    snd_Pitch(pitch);
    file_PlayWAV("ding.wav");
    while(snd_Playing());
    // pause(500);
next
Note
This function is only for files embedded in a GCF, for Flash only, ie this is not valid for GCI and uSD card access.
img_TxtFontID
This function requires that an image file control has been created with the file_LoadImageControl(...) function under Mode 3.
Set the font to a font held in the image file system.
Syntax: img_TxtFontID(handle, index);
| Arguments | Description |
|---|---|
| handle | Pointer to the image file control. |
| index | Index of the entry in the handle. |
Returns: None
Example
Math Functions
ABS
This function returns the absolute value of value.
Syntax: ABS(value);
| Arguments | Description |
|---|---|
| value | A variable, array element, expression or constant. |
Returns: The absolute value.
Example
var myvar, number;
number :=100;
myvar := ABS(number * 5);

// This example returns 500 in variable **myvar**.
MIN
This function returns the smallest of value1 and value2.
Syntax: MIN(value1, value2);
| Arguments | Description |
|---|---|
| value1 | A variable, array element, expression or constant. |
| value2 | A variable, array element, expression or constant. |
Returns: The smallest of the two values.
Example
var myvar, number1, number2;
number1 := 33;
number2 := 66;
myvar := MIN(number1, number2);

// This example returns 33 in variable **myvar**.
MAX
This function returns the largest of value1 and value2.
Syntax: MAX(value1, value2);
| Arguments | Description |
|---|---|
| value1 | A variable, array element, expression or constant. |
| value2 | A variable, array element, expression or constant. |
Returns: The largest of the two values.
Example
var myvar, number1, number2;
number1 := 33;
number2 := 66;
myvar := MAX(number1, number2);

// This example returns 66 in variable **myvar**.
SWAP
Given the addresses of two variables (var1 and var2), the values at these addresses are swapped.
Syntax: SWAP(&var1, &var2);
| Arguments | Description |
|---|---|
| &var1 | The address of the first variable. |
| &var2 | The address of the second variable. |
Returns: None
Example
var number1, number2;
number1 := 33;
number2 := 66;
SWAP(number1, number2);

// This example swaps the values in **number1** and **number2**. After the function is executed, **number1** will hold 66, and **number2** will hold 33.
SIN
This function returns the SIN of an angle.
Syntax: SIN(angle);
| Arguments | Description |
|---|---|
| angle | The angle in degrees. |
Note
The input value is automatically shifted to lie within 0-359 degrees.
Returns: The sine in radians of an argument specified in degrees. The returned value range is from 127 to -127 which is a more useful representation for graphics work. The real sine values vary from 1.0 to -1.0 so appropriate scaling must be done in user code as required.
Example
var myvar, angle;
angle := 133;
myvar := SIN(angle);

// This example returns 92 in variable **myvar**.
COS
This function returns the COSINE of an angle.
Syntax: COS(angle);
| Arguments | Description |
|---|---|
| angle | The angle in degrees. |
Note
The input value is automatically shifted to lie within 0-359 degrees.
Returns: The cosine in radians of an argument specified in degrees. The returned value range is from 127 to -127 which is a more useful representation for graphics work. The real sine values vary from 1.0 to -1.0 so appropriate scaling must be done in user code as required.
Example
var myvar, angle;
angle := 133;
myvar := COS(angle);

// This example returns -86 in variable **myvar**.
RAND
This function returns a pseudo random signed number ranging from -32768 to +32767.
The random number generator may first be seeded by using the SEED(number) function. The seed will generate a pseudo random sequence that is repeatable. You can use the modulo operator (%) to return a number within a certain range, e.g. n := RAND() % 100; will return a random number between -99 and +99. If you are using random number generation for random graphics points, or only require a positive number set, you will need to use the ABS function so only a positive number is returned, e.g.: X1 := ABS(RAND() % 100); will set co-ordinate X1 between 0 and 99.
Syntax: RAND();
Returns: A pseudo random signed number ranging from -32768 to +32767 each time the function is called.
Example
SEED(1234);
print(RAND(), ", ", RAND());

// This example will print **3558**, **1960** to the display.
Note
that if the random number generator is not seeded, the first number returned after reset or power up will be zero. This is normal behavior.
RANDVAL
Returns a random number between low and high limits such that low <= N < high The random number generator may first be seeded by using the SEED(number) function.
RANDVAL is the equivalent of aggregate functions: myvar = ABS( (RAND()%(high-low)+low) );
Syntax: RANDVAL(low, high);
| Arguments | Description |
|---|---|
| low | Low limit for the random numbers. |
| high | High limit for the random numbers. |
Returns: A random number between low and high limits.
Example
SEED(1234);
print(RAND(), ", ", RAND());

// This example will print **3558**, **1960** to the display.
Note
The lower limit is inclusive, but the upper limit is exclusive. If the random number generator is not seeded, the first number returned after reset or power up will be the low number in the range. This is normal behaviour.
SEED
This function seeds the pseudo random number generator so it will generate a new repeatable sequence. The seed value can be a positive or negative number.
Syntax: SEED(number);
| Arguments | Description |
|---|---|
| number | Specifies the seed value for the pseudo random number generator. |
Returns: None
Example
SEED(-50);
print(RAND() , ", ", RAND());

// This example will print **30129**, **27266** to the display.
SQRT
This function returns the integer square root of a number.
Syntax: SQRT(number);
| Arguments | Description |
|---|---|
| number | Specifies the positive number for the SQRT function. |
Returns: The integer square root which is the greatest integer less than or equal to the square root of number.
Example
var myvar;
myvar := SQRT(26000);

// This example returns 161 in variable **myvar** which is the **integer square root** of 26000.
OVF
This function returns the high order 16-bits from certain math and shift functions. It is extremely useful for calculating 32-bit address offsets for MEDIA access.
It can be used with the shift operations, addition, subtraction, multiplication and modulus operations.
Syntax: OVF();
Returns: The high order 16-bits from certain math and shift functions.
Example
var loWord, hiWord;
loWord := 0x2710 * 0x2710;                  // (10000 * 10000 in hexformat)
hiWord := OVF();
print ("0x", [HEX] hiWord, [HEX]loWord);

// This example will print **0x05F5E100** to the display , which is 100,000,000 in hexadecimal
CY
This function returns the carry status of an unsigned overflow from any 16 or 32bit additions or subtractions.
Syntax: CY();
Returns: Status of carry, 0 or 1.
Example
var myvar;
myvar := 0xFFF8 + 9;                            // result = 1
print(“myvar ”, myvar,"\nCarry ", CY(),"\n");   // carry = 1

/*
This example will print
**myvar 1**
**Carry 1**
*/
EVE_SP
Used for debugging to assess the current stack level, mainly for checking stack leaks.
Syntax: EVE_SP();
Returns: The current stack level.
Example
EVE_SSIZE
Used to get the current stack size. Mainly for debugging purposes.
Syntax: EVE_SSIZE();
Returns: The stack size.
Example
uadd_3232
Performs an unsigned addition of 2 x 32bit values placing the 32bit result in a 2 word array.
Syntax: uadd_3232(&res32, &val1, &val2);
| Arguments | Description |
|---|---|
| &res32 | Points to 32bit result register. |
| &val1 | points to 32bit augend. |
| &val2 | points to 32bit addend. |
Returns: Returns 1 on 32bit unsigned overflow (carry). Carry flag is also set on 32bit unsigned overflow and can be read with the CY() function.
Example
var carry, valA[2], valB[2], Result[2];
var p;
valA[0] := 0;
valA[1] := 1;
valB[0] := 0;
valB[1] := 1;

carry := uadd_3232(Result, valA, valB);
p := str_Ptr(Result);
print("0x");
str_Printf(&p, "%lX");                      //prints the value at pointer in Hex long format.

// This example will print 0x20000.
usub_3232
Performs an unsigned subtraction of 2 x 32bit values placing the 32bit result in a 2 word array.
Syntax: usub_3232(&res32, &val1, &val2);
| Arguments | Description |
|---|---|
| &res32 | Points to 32bit result register. |
| &val1 | Points to 32bit minuend. |
| &val2 | Points to 32bit subtrahend. |
Returns: Returns 1 on 32bit unsigned overflow (carry). Carry flag is also set on 32bit unsigned overflow and can be read with the CY() function.
Example
var carry, valA[2], valB[2], Result[2];
var p;
valA[0] := 0;
valA[1] :=0xFFFF;
valB[0] := 0;
valB[1] := 0xEFFF;

carry := usub_3232(Result, valA, valB);
p := str_Ptr(Result);
print("0x");
str_Printf(&p, "%lX");
repeat forever

// This example will print 0x10000000.
umul_1616
Performs an unsigned multiply of 2 x 16bit values placing the 32bit result in a 2 word array.
Syntax: umul_1616(&res32, val1, val2);
| Arguments | Description |
|---|---|
| &res32 | Points to 32bit result register. |
| val1 | 16bit register or constant. |
| val2 | 16bit register or constant. |
Returns: A pointer to the 32bit result. Carry and overflow are not affected.
Example
var val32[2];
var p;
umul_1616(val32, 500, 2000);
p := str_Ptr(val32);
str_Printf(&p, "%ld");

// This example prints 1000000.
udiv_3232
Performs an unsigned division of 2 x 32bit values placing the 32bit result in a 2 word array.
Syntax: udiv_3232(&res32, val1, val2);
| Arguments | Description |
|---|---|
| &res32 | Points to 32bit result register. |
| val1 | 32bit register or dividend. |
| val2 | 32bit register or divisor. |
Returns: A pointer to the 32bit result. Carry and overflow are not affected.
Example
var val32[2], dividend[2], divisor[2] ;
var p;
dividend[0] := 0x5c21 ;                 // part of 1661985
dividend[1] := 0x19 ;                    // part of 1661985
divisor[0] := 13 ;
divisor[1] := 0 ;

udiv_3232(val32, dividend, divisor);
p := str_Ptr(val32);
str_Printf(&p, "%ld");                  // 1661985 / 13 = 127845
Note
A division by zero will result is 0xFFFFFFFF.
ucmp_3232
Performs an unsigned comparison of 2 x 32bit values.
Syntax: ucmp_3232(&val1, &val2);
| Arguments | Description |
|---|---|
| &val1 | Points to 32bit variable. |
| &val2 | Points to 32bit variable. |
Returns: 0 if equal. 1 if val1 > val2. -1 if val1 < val2
Example
var carry, valA[2], valB[2], Result;
valA[0] := 0;
valA[1] := 0xFFFF;
valB[0] := 0;
valB[1] :=0xEFFF;

Result := cmp_3232(valA, valB); //val1 > val2
print(Result);
repeat forever

// This example will print 1.
Media Functions
media_Init
Initialise a uSD/SD/SDHC memory card for further operations. The SD card is connected to the SPI (serial peripheral interface) of the processor.
Syntax: media_Init();
Returns: 1 if memory card is present and successfully initialised. 0 if no card is present or not able to initialise.
Example
while(!media_Init())
    gfx_Cls();
    pause(300);
    puts(“Please insert SD card”);
    pause(300);
wend

// This example waits for SD card to be inserted and initialised, flashing a message if no SD card detected.
media_SetAdd
Set media memory internal Address pointer for access at a non sector aligned byte address.
Syntax: media_SetAdd(HIword, LOword);
| Arguments | Description |
|---|---|
| HIword | Specifies the high word (upper 2 bytes) of a 4 byte media memory byte address location. |
| LOword | Specifies the low word (lower 2 bytes) of a 4 byte media memory byte address location. |
Returns: None
Example
media_SetAdd(0, 513);

// This example sets the media address to byte 513 (which is sector #1, 2nd byte in sector) for subsequent operations.
media_SetSector
Set media memory internal Address pointer for sector access.
Syntax: media_SetSector(HIword, LOword);
| Arguments | Description |
|---|---|
| HIword | Specifies the high word (upper 2 bytes) of a 4 byte media memory sector address location. |
| LOword | Specifies the low word (lower 2 bytes) of a 4 byte media memory sector address location. |
Returns: Result
Example
media_SetSector(0, 10);

// This example sets the media address to the 11th sector (which is also byte address 5120) for subsequent operations.
media_RdSector
Reads and Returns 512 bytes (256 words) into a destination block (e.g. rdblock[256]) pointed to by the internal Sector pointer. After the read the Sector pointer is automatically incremented by 1.
Syntax: media_RdSector(Destination_Address);
| Arguments | Description |
|---|---|
| Destination_Address | Destination block pointed to by the internal Sector pointer. |
Returns: TRUE if media response was TRUE. 512 bytes (256 words) in to a destination block.
Example
var rdblock[256];
media_SetSector(0,10);
if (media_RdSector(rdblock));
print(“Data collected”);
endif
// This example sets a 512 bytes block and collects data from the address pointed to by media_SetSector command.
media_WrSector
Writes 512 bytes (256 words) from a source memory block (e.g. wrblock[256]) into the uSD card. After the write the Sect pointer is automatically incremented by 1.
Syntax: media_WrSector(Source_Address);
| Arguments | Description |
|---|---|
| Source_Address | Source memory block of 512bytes. |
Returns: TRUE if media response was TRUE.
Example
var wrblock[256];
func main()
prepare_block();
media_SetSector(0,10)
if (media_WrSector(wrblock));
print(“Data transferred”);
endif
:
:
// This example sets a 512 bytes block and transfers data to the address pointed to by media_SetSector command.
media_ReadByte
Returns the byte value from the current media address. The internal byte address will then be internally incremented by one.
Syntax: media_ReadByte();
Returns: byte value.
Example
var LObyte, HIbyte;
if(media_Init())
media_SetAdd(0, 510);
LObyte := media_ReadByte();
HIbyte := media_ReadByte();
print([HEX2]HIbyte,[HEX2]LObyte);
endif
repeat forever
// This example initialises the media, sets the media byte address to 510, and reads the last 2 bytes from sector 0. If the card happens to be FAT formatted, the result will be “AA55”. The media internal address is internally incremented for each of the byte operations.
media_ReadWord
Returns the word value (2 bytes) from the current media address. The internal byte address will then be internally incremented by two. If the address is not aligned, the word will still be read correctly.
Syntax: media_ReadWord();
Returns: Returns the word value (2 bytes) from the current media address.
Example
var myword;
if(media_Init())
media_SetAdd(0, 510);
myword := media_ReadWord();
print([HEX4]myword);
endif
repeat forever
// This example initialises the media, sets the media byte address to 510 and reads the last word from sector 0. If the card happens to be formatted, the result will be “AA55”.
media_WriteByte
Writes a byte to the current media address that was initially set with media_SetAdd() or media_SetSector(...); After the write operation, the Address pointer is automatically incremented by 1.
Syntax: media_WriteByte(byte_val);
| Arguments | Description |
|---|---|
| byte_val | The lower 8-bits specifies the byte to be written at the current media address location. |
Returns: Non-zero if write was successful.
Example
var n, char;
while (media_Init()==0); // wait if no SD card detected
media_SetSector(0, 2); // at sector 2
//media_SetAdd(0, 1024); // (alternatively, use media_SetAdd(),
// lower 9 bits
while (n < 10)
media_WriteByte(n++ +'0'); // write ASCII '0123456789' to the
wend // first 10 locations.
to(MDA); putstr("Hello World"); // now write a ascii test string
media_WriteByte('A'); // write a further 3 bytes
media_WriteByte('B');
media_WriteByte('C');
media_WriteByte(0); // terminate with zero
media_Flush(); // we're finished, close the sector
media_SetAdd(0, 1024+5); // set the starting byte address
while(char:=media_ReadByte()) putch(char); // print result, starting
// from '5'
repeat forever
// This example initialises the media, writes some bytes to the required sector, then prints the result from the required location.
Note
Writing bytes or words to a media sector must start from the beginning of the sector. All writes will be incremental until the media_Flush() function is executed, or the sector address rolls over to the next sector. When media_Flush() is called, any remaining bytes in the sector will be padded with 0xFF, destroying the previous contents. An attempt to use the media_SetAdd(..) function will result in the lower 9 bits being interpreted as zero. If the writing rolls over to the next sector, the media_Flush() function is issued automatically internally.
media_WriteWord
Writes a word to the current media address that was initially set with media_SetAdd() or media_SetSector(...); After the write operation, the Address pointer is automatically incremented by 2.
Syntax: media_WriteWord(word_val);
| Arguments | Description |
|---|---|
| word_val | The 16-bit word to be written at the current media address location. |
Returns: Non-zero if write was successful.
Example
var n;
while (media_Init()==0); // wait until a good SD card is found
n:=0;
media_SetAdd(0, 1536); // set the starting byte address
while (n++ < 20)
media_WriteWord(RAND()); // write 20 random words to first 20
wend // word locations.
n:=0;
while (n++ < 20)
media_WriteWord(n++*1000);// write sequence of 1000*n to next 20
wend // word locations.
media_Flush(); // we're finished, close the sector
media_SetAdd(0, 1536+40); // set the starting byte address
n:=0;
while(n++<8) // print result of fist 8 multiplication calcs
print([HEX4] media_ReadWord()," n");
wend
repeat forever
// This example initialises the media, writes some words to the required sector, then prints
// The result from the required location.
Note
Writing bytes or words to a media sector must start from the beginning of the sector. All writes will be incremental until the media_Flush() function is executed, or the sector address rolls over to the next sector. When media_Flush() is called, any remaining bytes in the sector will be padded with 0xFF, destroying the previous contents. An attempt to use the media_SetAdd(..) function will result in the lower 9 bits being interpreted as zero. If the writing rolls over to the next sector, the media_Flush() function is issued automatically internally.
media_Flush
After writing any data to a sector, media_Flush() should be called to ensure that the current sector that is being written is correctly stored back to the media else write operations may be unpredictable.
Syntax: media_Flush();
Returns: non-zero if OK, 0 if Failed.
Example: See the media_WriteByte(..) and media_WriteWord(..) examples.
media_Image
Displays an image from the media storage at the specified co-ordinates. The image address is previously specified with the media_SetAdd(..) or media_SetSector(...) function. If the image is shown partially off-screen, it may not be displayed correctly.
Syntax: media_Image(x, y);
| Arguments | Description |
|---|---|
| x, y | Specifies the top left position where the image will be displayed. |
Returns: None
Example
while(media_Init()==0); // wait if no SD card detected
media_SetAdd(0x0001, 0xDA00); // point to the books04 image
media_Image(10,10);
gfx_Clipping(ON); // turn off clipping to see the difference
media_Image(-12,50); // show image off screen to the left
media_Image(50, -12); // show image off screen at the top
repeat forever
// This example draws an image at several positions, showing the effects of clipping.
media_Video
Displays a video clip from the media storage device at the specified co-ordinates. The video address location in the media is previously specified with the media_SetAdd(..) or media_SetSector(...) function. If the video is shown partially off-screen, it may not be displayed correctly. Note that showing a video blocks all other processes until the video has finished showing. See the media_VideoFrame(...) functions for alternatives.
Syntax: media_Video(x, y);
| Arguments | Description |
|---|---|
| x, y | Specifies the top left position where the video clip will be displayed. |
Returns: None
Example
while(media_Init()==0); // wait if no SD card detected
media_SetAdd(0x0001, 0x3C00); // point to the 10 gear clip
media_Video(10,10);
gfx_Clipping(ON); // turn off clipping to see the difference
media_Video(-12,50); // show video off screen to the left
media_Video(50, -12); // show video off screen at the top
repeat forever
// This example plays a video clip at several positions, showing the effects of clipping.
media_VideoFrame
Displays a video from the media storage device at the specified co-ordinates. The video address is previously specified with the media_SetAdd(..) or media_SetSector(...) function. If the video is shown partially off it may not be displayed correctly. The frames can be shown in any order. This function gives you great flexibility for showing various icons from an image strip, as well as showing videos while doing other tasks.
media_VideoFrame(..) will now show error box for out of range video frames. Also, if frame is set to -1, just a rectangle will be drawn in background colour to blank an image. It applies to PmmC R29 or above.
Syntax: media_VideoFrame(x, y, frameNumber);
| Arguments | Description |
|---|---|
| x, y | Specifies the top left position where the video clip will be displayed. |
| frameNumber | Specifies the required frame to be shown. |
Returns: None
Example
var frame;
while (media_Init()==0); // wait if no SD card detected
while (media_Init()==0); // wait if no SD card detected
media_SetAdd(0x0002, 0x3C00); // point to the 10 gear image
repeat
frame := 0; // start at frame 0
repeat
media_VideoFrame(30,30, frame++); // display a frame
pause(peekB(IMAGE_DELAY)); // pause for the time given in
// the image header
until(frame == peekW(IMG_FRAME_COUNT)); // loop until we've
// shown all the frames
forever // do it forever
// This first example shows how to display frames as required while possibly doing other tasks.
var framecount, frame, delay, colr;
frame := 0;
// show the first frame so we can get the video header info
// into the system variables, and then to our local variables.
media_VideoFrame(30,30, 0);
framecount := peekW(IMG_FRAME_COUNT); // we can now set some local
// values.
delay := peekB(IMAGE_DELAY); // get the frame count and delay
repeat
repeat
pokeW(TIMER0, delay); // set a timer
media_VideoFrame(30,30, frame++); // show next frame
gfx_MoveTo(64,35);
print([DEC2Z] frame); // print the frame number
media_VideoFrame(30,80, framecount frame); // show movie
// backwards.
gfx_MoveTo(64,85);
print([DEC2Z] framecount frame); // print the frame number
if ((frame & 3) == 0)
gfx_CircleFilled(80,20,2,colr); // a blinking circle fun
colr := colr ^ 0xF800; // alternate colour,
endif // BLACK/RED using XOR
//do more here if required
while(peekW(TIMER0)); // wait for timer to expire
until(frame == peekW(IMG_FRAME_COU NT));
frame := 0;
forever
// This second example employs a timer for the framing delay, and shows the same movie simultaneously running forward and backwards with time left for other tasks as well. A number of videos (or animated icons) can be shown simultaneously using this method.
Note
The frame timing (although not noticeable in this small example) is not correct as the delay commences after the image frame is shown, therefore adding the display overheads to the frame delay.
Memory Allocation Functions
mem_alloc
Allocate a block of memory to pointer myvar. The allocated memory contains garbage but is a fast allocation.
The block must later be released with mem_Free(myvar);
Syntax: mem_Alloc(size);
| Arguments | Description |
|---|---|
| size | Specifies the number of bytes that's allocated from the heap. |
Returns: Value is the pointer (Word) to the allocation if successful. If function fails returns a null (0).
Example
mem_AllocV
Allocate a block of memory to pointer myvar. The block of memory is filled with initial signature values.
The block starts with A5,5A then fills with incrementing number e.g.:- A5,5A,00,01,02,03...FF,00,11....
This can be helpful when debugging. The block must later be released with mem_Free(myvar).
Syntax: mem_AllocV(size);
| Arguments | Description |
|---|---|
| size | Specifies the number of bytes that's allocated from the heap. |
Returns: Value is the pointer (Word) to the allocation if successful. If function fails returns a null (0).
Example
mem_Allocz
Allocate a block of memory to pointer myvar. The block of memory is filled with zeros.
The block must later be released with mem_Free(myvar);
Syntax: mem_Allocz(size);
| Arguments | Description |
|---|---|
| size | Specifies the number of bytes that's allocated from the heap. |
Returns: Value is the pointer to the allocation if successful. If function fails returns a null (0).
Example
mem_Realloc
The function may move the memory block to a new location, in which case the pointer to the new location is returned.
The content of the memory block is preserved up to the least of the new and old sizes, even if the block is moved.
If the new size is larger, the value of the newly allocated portion is indeterminate.
In case that ptr is NULL, the function behaves exactly as mem_Alloc(), assigning a new block of size bytes and returning a pointer to the beginning of it.
In case that the size is 0, the memory previously allocated in ptr is deallocated as if a call to mem_Free(myvar) was made, and a NULL pointer is returned.
Syntax: mem_Realloc(ptr, size);
| Arguments | Description |
|---|---|
| ptr | Specifies the new location to reallocate the memory block. |
| size | Specifies the number of bytes of the block. |
Returns: Pointer to the new object location.
Example
mem_free
The function de-allocates a block of memory previously created with mem_Alloc(...), mem_AllocV(...) or mem_AllocZ(...).
Syntax: mem_Free(allocation);
| Arguments | Description |
|---|---|
| allocation | specifies the location of memory block to free up. |
Returns: Non-zero if function is successful, 0 if the function fails.
Example
mem_Heap
Returns byte size of the largest chunk of memory available in the heap.
Syntax: mem_Heap();
Returns: The largest available byte memory chunk in the heap.
Example
mem_Set
Fill a block of memory with a byte value.
Syntax: mem_Set(ptr, char, size);
| Arguments | Description |
|---|---|
| ptr | Specifies the memory block. |
| char | Specifies the value to fill the block with. |
| size | Specifies the size of the block in Bytes. |
Returns: The pointer.
Example
var mybuf[5];
var i;
func main()
mem_Set(mybuf,0x55,5); //Only fills half of
for(i:=0;i<sizeof(mybuf);i++) //Show what is in the buffer
print(" 0x",[HEX]mybuf[i]);
next
mem_Set(mybuf,0xAA,sizeof(mybuf)*2); //Fill entire buffer
print("\n"); //New line
for(i:=0;i<sizeof(mybuf);i++)
print(" 0x",[HEX]mybuf[i]);
next
repeat
forever
endfunc
mem_Copy
Copy a word aligned block of memory from source to destination.
Syntax: mem_Copy(source, destination, count);
| Arguments | Description |
|---|---|
| source | Specifies the source memory block. |
| destination | Specifies the destination memory block. |
| count | Specifies the size of the blocks in bytes. |
Returns: Source.
Example
Note
The count is a byte count, this facilitates comparing word aligned byte arrays when using word aligned packed strings. Source can be a string constant e.g. ``` cpp myptr := mem_Copy("TEST STRING", ptr2, 12); ````
mem_Compare
Compare two blocks of memory ptr1 and ptr2.
Syntax: mem_Compare(ptr1, ptr2, count);
| Arguments | Description |
|---|---|
| ptr1 | Specifies the 1st memory block. |
| ptr2 | Specifies the 2nd memory block. |
| count | Specifies the number of bytes to compare. |
Returns:
- 0 if we have a match
- -1 if ptr1 < ptr2
- +1 if ptr2 > ptr1. (The comparison is done alphabetically)
Example
mem_ArrayOp1
This function (and the similar mem_ArrayOp2 function) can be used to perform highly optimised operation against an array of data. Mem_ArrayOp1 is for Single Arrays.
Single Word Array Operations:
| Pre-Defined Name | Value | Description |
|---|---|---|
| OP1_NOP | 0 | No operation. |
| OP1_SET | 1 | "set" the entire array with "value". |
| OP1_AND | 2 | "and" the entire array with "value". |
| OP1_IOR | 3 | "inclusive or" the entire array with "value". |
| OP1_XOR | 4 | "exclusive or" the entire array with "value". |
| OP1_ADD | 5 | signed add each element of entire array with "value"> |
| OP1_SUB | 6 | signed subtract "value" from each element of entire array. |
| OP1_MUL | 7 | signed multiply each element of entire array with "value". |
| OP1_DIV | 8 | signed divide each element of entire array by "value". |
| OP1_REV | 9 | reverse the elements of an array (value is ignored). |
| OP1_SHL | 10 | shift an array left by "value" positions. |
| OP1_SHR | 11 | shift an array right by "value" positions. |
| OP1_ROL | 12 | rotate an array left by "value" positions. |
| OP1_ROR | 13 | rotate an array right by "value" positions. |
Graphics only Operations:
| Pre-Defined Name | Value | Description |
|---|---|---|
| OP1_GRAY | 14 | convert an array of RGB565 elements to grayscale, "value" is ignored. |
| OP1_WHITEN | 15 | saturate an array of RGB565 elements to white, "value" determines saturation. |
| OP1_BLACKEN | 16 | saturate an array of RGB565 elements to black, "value" determines saturation. |
| OP1_LIGHTEN | 17 | increase luminance of an array of RGB565 elements, "value" determines saturation. |
| OP1_DARKEN | 18 | decrease luminance of an array of RGB565 elements, "value" determines saturation. |
Syntax: mem_ArrayOp1(memarray, count, op, value);
| Arguments | Description |
|---|---|
| memarray | Pointer to the array to be operated on. |
| count | Size of the array. |
| op | One of the constants defining the operation to be performed (see below). |
| value | Value that may be required by the selected operation. |
Returns: None
Example
var a1[20];
func dumpA1d(var cnt)
var i;
for (i := 0; i < cnt; i++)
print([DEC5ZB] a1[i], " ") ;
next
print("\n") ;
endfunc
func main()
var i, j, res[2], v1[2], v2[2] ;
a1[0] := 100; a1[1] := 1000 ; a1[2] := 10000 ; a1[3] := 40000 ;
dumpA1d(4) ;
print("ADD ") ;
mem_ArrayOp1(a1, 4, OP1_ADD, 10) ;
dumpA1d(4) ;
a1[0] := 100; a1[1] := 1000 ; a1[2] := 10000 ; a1[3] := 40000
print("SUB ") ;
mem_ArrayOp1(a1, 4, OP1_SUB , 10) ;
dumpA1d(4) ;
a1[0] := 100; a1[1] := 1000 ; a1[2] := 10000 ; a1[3] := 40000 ;
print("MUL ") ;
mem_ArrayOp1(a1, 4, OP1_MUL, 10) ;
dumpA1d(4) ;
a1[0] := 100; a1[1] := 1000 ; a1[2] := 10000 ; a1[3] := 40000 ;
print("DIV ") ;
mem_ArrayOp1(a1, 4, OP1_DIV, 10) ;
dumpA1d(4) ;
a1[0] := 100; a1[1] := 1000 ; a1[2] := 10000 ; a1[3] := 40000 ;
print("REV ") ;
mem_ArrayOp1(a1, 4, OP1_REV, 10) ;
dumpA1d(4) ;
repeat
forever
endfunc
mem_ArrayOp2
This function (and the similar mem_ArrayOp1 function) can be used to perform highly optimised operation against an array of data. Mem_ArrayOp2 is for Dual Arrays.
Boolean and Maths Operations:
| Pre-Defined Name | Value | Description |
|---|---|---|
| OP2_AND | 1 | "and" arrays, result to array1 (value is ignored). |
| OP2_IOR | 2 | "inclusive or" arrays, result to array1 (value is ignored). |
| OP2_XOR | 3 | "exclusive or" arrays, result to array1 (value is ignored). |
| OP2_ADD | 4 | "add" arrays, result to array1, array1 + (array2+value). |
| OP2_SUB | 5 | "subtract" array2 from array1, result to array1, array1-(array2+value). |
| OP2_MUL | 6 | "multiply" arrays, result to array1 (value is ignored). |
| OP2_DIV | 7 | "divide array1 by array2" , result to array1 (value is ignored). |
| OP2_COPY | 8 | "copy" array2 to array1 (value is ignored). |
Graphics only Operations:
| Pre-Defined Name | Value | Description |
|---|---|---|
| OP2_BLEND | 9 | blend arrays, blend percentage determined by "value", result to "array1". |
Syntax: mem_ArrayOp2(memarray1, memarray2, count, op, value);
| Arguments | Description |
|---|---|
| memarray1 | Pointer to the 1st array to be operated on. |
| memarray2 | Pointer to the 2nd array to be operated on. |
| count | Size of the array. |
| op | One of the constants defining the operation to be performed (see below). |
| value | Value that may be required by the selected operation. |
Returns: None
Example
var a1[5], a2[5] ;
func main()
gfx_ScreenMode(LANDSCAPE) ; // change manually if orientation change
a1[0] := 0xAAAA; a1[1] := 0x0606 ; a1[2] := 0x1234 ; a1[3] := 0xABCD ;
a2[0] := 0xFFFF; a2[1] := 0x00FF ; a2[2] := 0xFF00 ; a2[3] := 0x0000 ;
print("a1 ") ;
dumpArray(a1, 4) ;
print("a2 ") ;
dumpArray(a2, 4) ;
mem_ArrayOp2(a1, a2,4, OP2_AND, 0);
print("AND ") ;
dumpArray(a1, 4) ;
a1[0] := 0xAAAA; a1[1] := 0x0606 ; a1[2] := 0x1234 ; a1[3] := 0xABCD ;
mem_ArrayOp2(a1, a2,4, OP2_XOR, 0);
print("XOR ") ;
dumpArray(a1, 4) ;
mem_ArrayOp2(a1, a2,4, OP2_COPY, 0);
print("COPY ") ;
dumpArray(a1, 4) ;
repeat
forever
endfunc
func dumpArray(var * array, var cnt)
var i ;
for (i := 0; i < cnt; i++)
print([HEX4] array[i], " ") ;
next
print("\n") ;
endfunc
Miscellaneous System Functions
sys_PmmC
Prints the system PmmC name and revision e.g. "DIABLO-16\n1.0"
Can be captured to a buffer using the to() function
Syntax: sys_Pmmc();
Returns: None
Example
sys_Driver
Prints the system driver name and date string e.g. "uLCD-32WDTU-A\n130411”
Can be captured to a buffer using the to() function
Syntax: sys_Driver();
Returns: None
Example
Serial (UART) Functions
COM_RX_pin
Use this function to specify which GPIO is going to be assigned to the relative com ports receive line.
If the pin argument is 0 the function has no effect.
The pin is automatically set to an input. If the COMx RX pin is set to same pin as COMx TX pin (e.g. for a loopback check) it is necessary to configure the input pin first.
| 4D Pin Name (Predefined) | DIABLO-16 Pin Number | Availability |
|---|---|---|
| PA0 | 61 | Yes |
| PA1 | 62 | Yes |
| PA2 | 63 | Yes |
| PA3 | 64 | Yes |
| PA4 | 46 | Yes |
| PA5 | 49 | Yes |
| PA6 | 50 | Yes |
| PA7 | 51 | Yes |
| PA8 | 52 | Yes |
| PA9 | 53 | Yes |
| PA10 | 43 | Yes |
| PA11 | 44 | Yes |
| PA12 | 31 | Yes(See Note (1)) |
| PA13 | 32 | Yes(See Note (1)) |
| PA14 | 37 | No |
| PA15 | 36 | No |
Syntax: COM1_RX_pin(pin); or COM2_RX_pin(pin); or COM3_RX_pin(pin);
| Arguments | Description |
|---|---|
| pin | Specifies the GPIO pin to use for the com ports receive line. |
Returns: True if the function succeeded, usually ignored.
Example
Note
Only a single pin can be mapped to any given com ports RX.
Some 4D Systems display modules utilise this pin for additional peripherals such as Resistive or Capacitive Touch. To ensure that the pin is available for use, refer to the appropriate product’s datasheet.
COM_TX_pin
Use this function to specify which GPIO is going to be assigned to the relative com ports transmit line.
If the pin argument is 0, COMx TX is disconnected from all pins.
The pin is automatically set to an output.
| 4D Pin Name (Predefined) | DIABLO-16 Pin Number | Availability |
|---|---|---|
| PA0 | 61 | No |
| PA1 | 62 | Yes |
| PA2 | 63 | No |
| PA3 | 64 | Yes |
| PA4 | 46 | Yes |
| PA5 | 49 | Yes |
| PA6 | 50 | Yes |
| PA7 | 51 | Yes |
| PA8 | 52 | Yes |
| PA9 | 53 | Yes |
| PA10 | 43 | No |
| PA11 | 44 | No |
| PA12 | 31 | Yes(See Note (1)) |
| PA13 | 32 | Yes(See Note (1)) |
| PA14 | 37 | No |
| PA15 | 36 | No |
Syntax: COM1_TX_pin(pin); or COM2_TX_pin(pin); or COM3_TX_pin(pin);
| Arguments | Description |
|---|---|
| pin | Specifies the GPIO pin to use for the com ports transmit line. |
Returns: True if the function succeeded, usually ignored.
Example
Note
Only a single pin can be mapped to any given com ports TX.
Some 4D Systems display modules utilise this pin for additional peripherals such as Resistive or Capacitive Touch. To ensure that the pin is available for use, refer to the appropriate product’s datasheet.
setbaud
Use this function to set the required baud rate. The default Baud Rate for COM0 is 115,200 bits per second or 115,200 baud.
If a value other than 0-19 is used, a run time error (error 25).
| Buad Number | Pre-defined Constant |
Baud Rate Error (%) |
Actual Baud Rate |
|---|---|---|---|
| 0 | BAUD_110 | 0.00 | 110 |
| 1 | BAUD_300 | 0.00 | 300 |
| 2 | BAUD_600 | 0.00 | 600 |
| 3 | BAUD_1200 | 0.00 | 1200 |
| 4 | BAUD_2400 | 0.04 | 2401 |
| 5 | BAUD_4800 | 0.04 | 4802 |
| 6 | BAUD_9600 | 0.16 | 9615 |
| 7 | BAUD_14400 | 0.27 | 14439 |
| 8 | BAUD_19200 | 0.38 | 19273 |
| 9 | BAUD_31250 or MIDI |
0.00 | 31250 |
| 10 | BAUD_38400 | 0.83 | 38717 |
| 11 | BAUD_56000 | 0.16 | 56090 |
| 12 | BAUD_57600 | 1.27 | 58333 |
| 13 | BAUD_115200 | 2.64 | 118243 |
| 14 | BAUD_128000 | 0.53 | 128676 |
| 15 | BAUD_256000 | 0.53 | 257353 |
| 16 | BAUD_300000 | 4.17 | 312500 |
| 17 | BAUD_375000 | 6.06 | 397727 |
| 18 | BAUD_500000 | 9.38 | 546875 |
| 19 | BAUD_600000 | 4.17 | 625000 |
Syntax: setbaud(baudnum);
| Arguments | Description |
|---|---|
| baudnum | Specifies the baud rate of COM0 using the baud number or pre-defined constant. |
Returns: None
Example
Note
Baud rates each have degree of accuracy for several reasons. The actual baud rate you would receive and relevant error% compared to the setting value, can be calculated.
ActualBaud is calculated using the following formula: ActualBaud = 4375000/(trunc(4375000/RequiredBaud))
Example for 115200 is, 4375000/115200 = 37.977, Trucated is 37. 4375000/37 = 118243 (rounded).
Error% therefore is % difference between 115200 and 118243, therefore 2.64%
It is desirable to only use a baud rate between 2 devices which has a difference of typically < 2%. Note both devices will have a degree of error, not just this 4D Processor, both need to be considered.
com_SetBaud
Use this function to set the required baud rate for the required Com port. Sets to any viable baud rate from 160 to 655350.
Syntax: com_SetBaud(“comport”, “baudrate/10”);
| Arguments | Description |
|---|---|
| comport | Specifies the Com port, COM0: COM1: COM2: COM3: |
| baudrate/10 | Specifies the baud rate. |
Returns: True if BAUD rate was acceptable.
Example
stat := com_SetBaud(COM2 , 9600) // To set Com 2 to 9600 BAUD rate.
if (stat)
print(“Com2 set to 9600 BAUD”);
endif
Note
The default Baud Rate for COM0 is 115,200 bits per second or 115,200 baud. The default Baud Rate for COM1, COM2 and COM3 is 9600 bits per second or 9600 baud.
As of the v1.1 PmmC several ‘low’ values have special meanings
- 2187500 baud
- 1458333 baud
- 1093750 baud
- 875000 baud
- 729167 baud
Baud rates each have degree of accuracy for several reasons. The actual baud rate you would receive and relevant error% compared to the setting value, can be calculated.
Actual Baud is calculated using the following formula:
Actual Baud = 4375000/(trunc(4375000/RequiredBaud))
Example for 115200 is, 4375000/115200 = 37.977, Trucated is 37. 4375000/37 = 118243 (rounded).
Error% therefore is % difference between 115200 and 118243, therefore 2.64%
It is desirable to only use a baud rate between 2 devices which has a difference of typically < 2%. Note both devices will have a degree of error, not just this 4D Processor, both need to be considered.
serin
serin(): Receives a character from the Serial Port COM0.
serin1(): Receives a character from the Serial Port COM1.
serin2(): Receives a character from the Serial Port COM2.
serin3(): Receives a character from the Serial Port COM3.
serin may be buffered (refer to com_Init(..) functions). If it is desired to be able to receive the BREAK signal using buffered functions then the com_InitBrk() function must be used instead.
The transmission format is: No Parity, 1 Stop Bit, 8 Data Bits (N,8,1).
Syntax: serin(); or serin1(); or serin2(); or serin3();
Returns: A positive value 0 to 255 for a valid character received.
-1 if no character is available.
-2 if a framing error or over-run has occurred (auto cleared).
-3 (BREAK) if a break signal is detected.
Example
var char;
char := serin(); //test the com 0 port
if (char >= 0) // if a valid character is received
process(char); // process the character
endif
Note
COM0 pins cannot be mapped, and are fixed as pins 42(Rx0) and 33(Tx0) on the DIABLO-16 chip. Rx and Tx of COM1, COM2 or COM3 should be defined before using serin1(), serin2() or serin3().
serout
serout(): Transmits a single byte to the Serial Port COM0.
serout1(): Transmits a single byte to the Serial Port COM1.
serout2(): Transmits a single byte to the Serial Port COM2.
serout3(): Transmits a single byte to the Serial Port COM3.
The transmission format is:
No Parity, 1 Stop Bit, 8 Data Bits (N,8,1).
Unless com_Mode() has been used to alter it.
serout may be buffered (refer to com_TXbuffer(..) functions). If it is desired to be able to transmit the BREAK signal using buffered functions then the com_TXbufferBrk() function must be used instead.
Syntax: serout(char); or serout1(char); or serout2(char); or serout3(char);
| Arguments | Description |
|---|---|
| char | Specifies the data byte to be sent to the serial port. |
Returns: None
Example
Note
COM0 pins cannot be mapped, and are fixed as pins 42(Rx0) and 33(Tx0) on the DIABLO-16 chip. Rx and Tx of COM1, COM2 or COM3 should be defined before using serout1(), serout2() or serout3().
The BREAK signal can be transmitted using the predefined constant BREAK as the char to serout().
com_Init
This is the initialisation function for the serial communications buffered service. Once initialised, the service runs in the background capturing and buffering serial data without the user application having to constantly poll the serial port. This frees up the application to service other tasks.
MODES OF OPERATION
- No qualifier – simple ring buffer (aka circular queue)
If the qualifier is set to zero, the buffer is continually active as a simple circular queue. Characters when received from the host are placed in the circular queue (at the 'head' of the queue) Bytes may be removed from the circular queue (from the 'tail' of the queue) using the serin() function. If the tail is the same position as the head, there are no bytes in the queue, therefore serin() will return -1, meaning no character is available, also, the com_Count() function can be read at any time to determine the number of characters that are waiting between the tail and head of the queue. If the queue is not read frequently by the application, and characters are still being sent by the host, the head will eventually catch up with the tail setting the internal COM_FULL flag (which can be read with the com_Full() function) . Any further characters from the host are now discarded, however, all the characters that were buffered up to this point are readable. This is a good way of reading a fixed size packet and not necessarily considered to be an error condition. If no characters are removed from the buffer until the COM_FULL flag (which can be read with the com_Full() function) becomes set, it is guaranteed that the bytes will be ordered in the buffer from the start position, therefore, the buffer can be treated as an array and can be read directly without using serin() at all. In the latter case, the correct action is to process the data from the buffer, re-initialise the buffer with the com_Init(..) function, or reset the buffered serial service by issuing the com_Reset() function (which will return serial reception to polled mode) , and send an acknowledgement to the host (traditionally a ACK or 6) to indicate that the application is ready to receive more data and the previous 'packet' has been dealt with, or conversely, the application may send a negative acknowledgement to indicate that some sort of error occurred, or the action could not be completed (traditionally a NAK or 16) .
If any low level errors occur during the buffering service (such as framing or over-run) the internal COM_ERROR flag will be set (which can be read with the com_Error() function). Note that the COM_FULL flag will remain latched to indicate that the buffer did become full, and is not reset (even if all the characters are read) until the com_Init(..) or com_Reset() function is issued.
- Using a qualifier
If a qualifier character is specified, after the buffer is initialised with com_Init(..) , the service will ignore all characters until the qualifier is received and only then initiate the buffer write sequence with incoming data. After that point, the behaviour is the same as above for the 'non-qualified' mode.
com_Init(buffer, bufsize, qualifier): Initialize a serial capture buffer for COM0.
com1_Init(buffer, bufsize, qualifier): Initialize a serial capture buffer for COM1.
com2_Init(buffer, bufsize, qualifier): Initialize a serial capture buffer for COM2.
com3_Init(buffer, bufsize, qualifier): Initialize a serial capture buffer for COM3.
Syntax: com_Init(buffer, bufsize, qualifier); or com1_Init(buffer, bufsize, qualifier); or com2_Init(buffer, bufsize, qualifier); or com3_Init(buffer, bufsize, qualifier);
| Arguments | Description |
|---|---|
| buffer | Specifies the address of a buffer used for the background buffering service. |
| bufsize | Specifies the byte size of the user array provided for the buffer (each array element holds 2 bytes). If the buffer size is zero, a buffer of 128 words (256 bytes) should be provided for automatic packet length mode (see below). |
| qualifier | Specifies the qualifying character that must be received to initiate serial data reception and buffer write. A zero (0x00) indicates no qualifier to be used. |
Returns: None
Example
com_Reset
Resets the serial communications buffered service and returns it to the default polled mode.
com_Reset() Reset COM0
com1_Reset() Reset COM1
com2_Reset() Reset COM2
com3_Reset() Reset COM3
Syntax: com_Reset(); or com1_Reset(); or com2_Reset(); or com3_Reset();
Returns: None
Example
com_Count
Can be read at any time (when in buffered communications is active) to determine the number of characters that are waiting in the buffer.
com_Count(); Charcters countr in COM0
com1_Count(); Charcters countr in COM1
com2_Count(); Charcters countr in COM2
com3_Count(); Charcters countr in COM3
Syntax: com_Count(); or com1_Count(); or com2_Count(); or com3_Count();
Returns: Current count of characters in the communications buffer.
Example
com_Full
If the queue is not read frequently by the application, and characters are still being sent by the host, the head will eventually catch up with the tail setting the COM_FULL flag which is read with this function. If this flag is set, any further characters from the host are discarded, however, all the characters that were buffered up to this point are readable.
Syntax: com_Full(); or com1_Full(); or com2_Full(); or com3_Full();
Returns: 1 if buffer or queue has become full, or is overflowed, else returns 0.
Example
com_Error
If any low level errors occur during the buffering service (such as framing or over-run) the internal COM_ERROR flag will be set which can be read with this function.
Syntax: com_Error(); or com1_Error(); or com2_Error(); or com3_Error();
Returns: 1 if any low level communications error occurred, else returns 0
Example
if(com_Error()) // if there were low level comms errors,
resetMySystem(); // take corrective action
endif
com_Sync
If a qualifier character is specified when using buffered communications, after the buffer is initialized with com_Init(..), com1_Init(..), com2_Init(..), or com3_Init(..) the service will ignore all characters until the qualifier is received and only then initiate the buffer write sequence with incoming data. com_Sync(), com1_Sync(), com2_Sync(), com3_Sync() is called to determine if the qualifier character has been received yet.
Syntax: com_Sync(); or com1_Sync(); or com2_Sync(); or com3_Sync();
Returns: 1 if the qualifier character has been received, else returns 0.
Example
com_TXbuffer
Initialise a serial buffer for the COM0, COM1, COM2 or COM3 output. The program must declare a var array as a circular buffer. When a TX buffer is declared for comms, the transmission of characters becomes non-blocking. If the buffer has insufficient space to accept the next character from a serout(..), serout1(..), serout2(..) or serout3(..) function, the excess characters will be ignored, and the com_Full(), com1_Full(), com2_Full() or com3_Full() error will be asserted. If the TX buffer is no longer required, just set the buffer pointer to zero, the size in this case doesn't matter and is ignored. The function can be resized or reallocated to another buffer at any time. The buffer is flushed before any changes are made.
"pin" designates an IO pin to control a bidirectional control device for half duplex mode. "pin" will go HI at the start of a transmission, and will return low after the final byte is transmitted.
Syntax: com_TXbuffer(buf, bufsize, pin); or com1_TXbuffer(buf, bufsize, pin); or com2_TXbuffer(buf, bufsize, pin); or com3_TXbuffer(buf, bufsize, pin);
| Arguments | Description |
|---|---|
| buf | Specifies the address of a buffer used for the buffering service. |
| bufsize | Specifies the byte size of the user array provided for the buffer (each array element holds 2 bytes). |
| pin | Specifies the turnaround pin. If not required, just set "pin" to zero. |
Returns: None
Example
com_TXbuffer(mybuf, 1024, PA1 ); // set the TX buffer of COM0
com_TXbuffer(0, 0, 0); // revert COM0 to non buffered service
com_TXbufferHold
This function is used in conjunction with com_TXbuffer(...), com1_TXbufferHold(ON), com2_TXbufferHold(ON) or com3_TXbufferHold(ON).
It is often necessary to hold off sending serial characters until a complete frame or packet has been built in the output buffer. com_TXbufferHold(OFF), com1_TXbufferHold(OFF), com2_TXbufferHold(OFF), com3_TXbufferHold(OFF) is used for this, to stop the buffer being sent while it is being loaded. Normally, when using buffered comms, the transmit process will begin immediately. This is fine unless you are trying to assemble a packet.
To build a packet and send it later, issue a com_TXbufferHold(ON), com1_TXbufferHold(ON), com2_TXbufferHold(ON), com3_TXbufferHold(ON) build the packet, when packet is ready, issuing com_TXbufferHold(OFF), com1_TXbufferHold(OFF), com2_TXbufferHold(OFF), com3_TXbufferHold(OFF) will release the buffer to the com port.
Also, if using com_TXemptyEvent, com1_TXemptyEvent, com2_TXemptyEvent, com3_TXemptyEvent, erroneous empty events will occur as the transmit buffer is constantly trying to empty while you are busy trying to fill it.
Also refer to the pin control for com_TXbuffer(..), com1_TXbuffer(..), com2_TXbuffer(..), or com3_TXbuffer(..) function.
Syntax: com_TXbufferHold(state); or com1_TXbufferHold(state); or com2_TXbufferHold(state); or com3_TXbufferHold(state);
| Arguments | Description |
|---|---|
| state | Specifies the state of the buffer used for the buffering service. |
Returns:
- Buffer count when called with argument of 1, for example com_TXbufferHold(ON)
- -1 if function is called illegally when TX comms is not buffered.
- 0 when argument is zero, e.g. com_TXbufferHold(OFF)
Example: Refer to the com_TXemptyEvent(functionAddress) example.
Note
If you fill the buffer whilst it is held comms error 4 will be set and the data written will be lost.
com_TXcount
Return count of characters remaining in COM0, COM1 or COM2 or COM3 transmit buffer that was previously allocated with com_TXbuffer(..), com1_TXbuffer(..), com2_TXbuffer(..), or com3_TXbuffer(..).
Syntax: com_TXcount(); or com1_TXcount(); or com2_TXcount(); or com3_TXcount();
Returns: Count of characters.
Example
com_TXemptyEvent
If a comms TX buffer that was previously allocated with com_TXbuffer(..), com1_TXbuffer(..), com2_TXbuffer(..), or com3_TXbuffer(..). This function can be used to set up a function to be called when the COM0, COM1, COM2 or COM3 TX buffer is empty.
This is useful for either reloading the TX buffer, setting or clearing a pin to change the direction of e.g. a RS485 line driver, or any other form of traffic control. The event function must not have any parameters. To disable the event, simply call com_TXemptyEvent(0), com1_TXemptyEvent(0) , com2_TXemptyEvent(0) or com3_TXemptyEvent(0).
com_TXbuffer(..), com1_TXbuffer(..), com2_TXbuffer(..), or com3_TXbuffer(..) also resets any active event.
Syntax: com_TXemptyEvent(functionAddress); or com1_TXemptyEvent(functionAddress); or com2_TXemptyEvent(functionAddress); or com3_TXemptyEvent(functionAddress);
| Arguments | Description |
|---|---|
| functionAddress | Address of the event Function to be queued when COM0, COM1, COM2 or COM3 TX buffer empty. |
Returns: Any previous event function address or zero if there was no previous function.
Example
#platform uLCD 32PT_GFX2
/**************************************************
* Description: buffered TX service
* Use Workshop terminal at 9600 baud to see result
* Example of Buffered TX service vs Non buffered
* Also explains the use of COMMS events
*
* NB Program must be written to flash so
* the Workshop Terminal can be used.
**************************************************/
var combuf[220]; // buffer for up to 440 bytes
// run a timer event while we are doing comms
func T7Service()
var private colour := 0xF800;
colour ^= 0xF800;
gfx_RectangleFilled(50,200,80,220,colour);
sys_SetTimer(TIMER7, 200);
endfunc
// event to capture the buffer empty ev ent
func bufEmpty()
com_TXbuffer(0, 0, IO1_PIN); // done with the buffer, release it
print("\n nHELLO WORLD, I'M EMPTY ",com_TXcount(),"\n");
endfunc
func main()
var n, r, D, fh;
sys_SetTimerEvent(TIMER7,T7Service); // run a timer event
sys_SetTimer(TIMER7, 150);
com_TXemptyEvent(bufEmpty); // set to capture buffer empty event
setbaud(BAUD_9600);
txt_Set(TEXT_OPACITY, OPAQUE);
repeat
gfx_Cls();
txt_MoveCursor(3,1); // reset cursor to line 3, column 2
print("Send 440 chars non buffered\n");
pokeW(SYSTEM_TIMER_LO, 0); // reset timer
// note that 440 chars at 9600 baud takes approx 453msec
for(n:=0; n<10; n++)
to(COM0); putstr("The quick brown fox jumps over the lazy dog\n");
// 44 chars
next
print("took ",peekW(SYSTEM_TIMER_LO),"Msec\n\n");
// time spent blocking is only approx 1msec
com_TXbuffer(combuf, 440,I O1_PIN); // set up the TX buffer
com_TXbufferHold(ON); // hold the TX buffer til ready
// note that here the time is only approx 1msec overhead due to
print("Send 440 chars buffered\n");
pokeW(SYSTEM_TIMER_LO, 0); // reset timer
for(n:=0; n<10; n++)
to(COM0); putstr("THE QUICK BROWN FOX JUMPS OVER THE LAZY DOG\n");
// 44 chars
next
print("took ",peekW(SYSTEM_TIMER_LO),"Msec\n\n");
// time spent blocking is only approx 1msec
// demonstrate how to modify a prepared comms buffer that is still being held
to(combuf); print("MY CONTENTS HAVE BEEN CHANGED");
to(combuf+50); print("*** AND CHANGED HERE TOO ***");
combuf[218] := 'CA'; // the last 'DOG' changed here
combuf[219] := 'T\n'; // the last 'DOG' changed here
// now we are ready to send to buffer
n := com_TXbufferHold(OFF); // release TX buffer
print("TXBuffer is holding ", n, " chars\n");
// show how many characters were in the buffer
// watch the buffer empty
repeat
print("TX count = ", [DEC5ZB] n := com_TXcount(),"\r"); // watch the count as the buffer empties
until(!n);
print("\n\nTX Empty");
com_TXbuffer(0, 0, IO1_PIN); // done with the buffer, release it
sys_SetTimer(TIMER0, 3000); // pause for 3 seconds, non blocking
while(peekW(TMR0));
forever // do it forever
//com_TXbuffer(0, 0, 0); // if done with the pin, must release it
endfunc
Note
n is from 1 to 3 representing COM1 to COM3.
com_Mode
Use this function to set the required serial port parameters to other than 8N1.
Syntax: com_Mode("databits", "parity", "Stopbits", "comport");
| Arguments | Description |
|---|---|
| databits | Specifies the number of databits, 8 is the only currently valid value. |
| parity | Specifies the parity bit. Valid values are N(one), E(ven) and O(dd). |
| Stopbits | Specifies the number of stop bits. Valid values are 1 and 2. |
| comport | Specifies the Com port COM0, COM1, COM2, COM3. |
Returns: True if the parameters were acceptable.
Example
com_RXblock
Bufsize bytes are received from the serial port to the string pointer "buf". If a receive buffer is active and bufsize characters are available this function will return almost immediately otherwise it will block until the required bytes are received. This function is useful for protocols that require the reading of a fixed amount of data in one hit. Once the data has been read into a buffer it also makes it easy to perform CRC calculations on the data.
Syntax: com_RXblock("buf", "bufsize"); or com1_RXblock("buf", "bufsize"); or com2_RXblock("buf", "bufsize"); or com3_RXblock("buf", "bufsize");
| Arguments | Description |
|---|---|
| buf | String Pointer address of buffer to receive the data. |
| bufsize | The number of characters to receive into the buffer. |
Returns: None
Example
#platform "uLCD 32WDT"
func main()
var st[20] ;
com_RXblock(str_Ptr(st), 8) ;
str_PutByte(str_Ptr(st)+8, 0) ; // terminate
print(">", [STR] st, "<") ;
repeat // maybe replace
forever // this as well
endfunc
com_TXblock
Bufsize bytes are transmitted to the serial port from the string pointer "buf". If a transmit buffer is active and space is available this function will return almost immediately otherwise it will block until the required bytes are sent. This function is useful for protocols that require the reading of a fixed amount of data in one hit. Once the data has been read into a buffer it also makes it easy to perform CRC calculations on the data.
Syntax: com_TXblock("buf", "bufsize"); or com1_TXblock("buf", "bufsize"); or com2_TXblock("buf", "bufsize"); or com3_TXblock("buf", "bufsize");
| Arguments | Description |
|---|---|
| buf | String Pointer address of buffer to send the data from. |
| bufsize | The number of characters to send. |
Returns: None
Example
#platform "uLCD 32WDT"
func main()
var st[20] ;
to(st) ;
print("Hello there!") ;
com_TXblock(str_Ptr(st), 12) ;
com_TXblock("\nThis is a Test", 15) ;
repeat // maybe replace
forever // this as well
endfunc
com_InitBrk
This is the initialisation function for the serial communications buffered service with the ability to receive the BREAK signal as though it is a character. The parameters are identical to com_Init() except that each buffer entry can now only hold one byte. The BREAK ‘character’ is is a predefined constant call BREAK.
Syntax: com_InitBrk(buffer, bufsize, qualifier); or com1_InitBrk(buffer, bufsize, qualifier); or com2_InitBrk(buffer, bufsize, qualifier); or com3_InitBrk(buffer, bufsize, qualifier);
| Arguments | Description |
|---|---|
| buffer | Specifies the address of a buffer used for the background buffering service. |
| bufsize | Specifies the byte size of the user array provided for the buffer (each array element holds 1 byte). If the buffer size is zero, a buffer of 128 words (256 bytes) should be provided for automatic packet length mode (see below). |
| qualifier | Specifies the qualifying character that must be received to initiate serial data reception and buffer write. A zero (0x00) indicates no qualifier to be used. |
Returns: None
Example
com_TXbufferBrk
This is the initialisation function for the serial communications transmit buffered service with the ability to send the BREAK signal as though it is a character. The parameters are identical to com_TXbuffer() except that each buffer entry can now only hold one byte. The BREAK ‘character’ is a predefined constant call BREAK.
Syntax: com_TXbufferBrk(buf, bufsize, pin); or com1_TXbufferBrk(buf, bufsize, pin); or com2_TXbufferBrk(buf, bufsize, pin); or com3_TXbufferBrk(buf, bufsize, pin);
| Arguments | Description |
|---|---|
| buf | Specifies the address of a buffer used for the buffering service. |
| bufsize | Specifies the byte size of the user array provided for the buffer (each array element holds 1 byte). |
| pin | Specifies the turnaround pin. If not required, just set "pin" to zero. |
Returns: None
Example
com_TXbufferBrk(mybuf, 1024, PA1 ); // set the TX buffer of COM0
com_TXbufferBrk(0, 0, 0); // revert COM0 to non buffered service
Sound Control Functions
snd_Volume
Set the sound playback volume. Var must be in the range from 8 (min volume) to 127 (max volume). If var is less than 8, volume is set to 8, and if var > 127 it is set to 127.
Syntax: snd_Volume(var);
| Arguments | Description |
|---|---|
| var | sound playback volume. |
Returns: None
Example
snd_Pitch
Sets the samples playback rate to a different frequency. Setting pitch to zero restores the original sample rate.
Syntax: snd_Pitch(pitch)
| Arguments | Description |
|---|---|
| pitch | Sample's playback rate. Minimum is 4KHz. Range is, 4000 – 65535. |
Returns: Sample's original sample rate.
Example
snd_BufSize
Specify the memory chunk size for the wavefile buffer, default size 1024 bytes. Depending on the sample size, memory constraints, and the sample quality, it may be beneficial to change the buffer size from the default size of 1024 bytes.
This function is for control of a wav buffer, see the file_PlayWAV(..) function.
Syntax: snd_BufSize(var);
| Arguments | Description |
|---|---|
| var | Specifies the buffer size. 0 = 1024 bytes (default) 1 = 2048 bytes 2 = 4096 bytes 3 = 8192 bytes |
Returns: None
Example
snd_Stop
Stop any sound that is currently playing, releasing buffers and closing any open wav file. This function is for control of a wav buffer, see the file_PlayWAV(..) function.
Syntax: snd_Stop();
Returns: None
Example
snd_Pause
Pause any sound that is currently playing, does nothing until sound is resumed with snd_Continue().
The sample can be terminated with snd_Stop.
Buffers and closes any open wav file.
This function is for control of a wav buffer, see the file_PlayWAV(..) function.
Syntax: snd_Pause();
Returns: None
Example
snd_Continue
Resume any sound that is currently paused by snd_Pause.
This function is for control of a wav buffer, see the file_PlayWAV(..) function.
Syntax: snd_Continue();
Returns: None
Example
snd_Playing
Returns 0 if sound has finished playing, else return number of 512 byte blocks to go.
This function is for control of a wav buffer, see the file_PlayWAV(..) function.
Syntax: snd_Playing();
Returns: Number of 512 byte blocks to go.
Example
snd_Freq
Produces a pure square wave waveform on the audio output pin. This command is designed to drive Piezo transducers which require this sort of input. Whilst it also works on displays with a builtin amplifier the sound produced is extremely annoying.
Syntax: snd_Freq(frequency, duration);
| Arguments | Description |
|---|---|
| frequency | The frequency of the sound to produce, 10Hz is the minimum. |
| duration | The duration of the sound in milli seconds. |
Returns: TRUE if freq >= 10 and a wav file is not currently playing.
Example
SPI Control Functions
The SPI functions in this section apply to any general purpose SPI device.
Note
SPI0 is connected internally to the uSD card. spi_Init(), spi_Read(), spi_Write() and spi_Disable() all refer to the SPI0 to communicate with the uSD card through direct SPI commands. Only adept users should attempt this as it might damage the uSD card.
spi_Init
Sets up the DIABLO-16 SPI port to communicate with the uSD card through direct SPI commands. It should not be used if uSD card is active. See the example in section spi_Read().
Syntax: spi_Init(speed, address_mode);
| Arguments | Description |
|---|---|
| speed | Sets the speed of the SPI port. SPI_FAST – 16Mhz SPI_MED – 4Mhz SPI_SLOW – 650Khz |
| address_mode | Sets the address mode of the SPI port. 0 – Set address_mode to 0 when dealing with 16MB or less SPI_ADDRESS_MODE4 – Set to this if dealing with Flash larger than 16MB. |
Returns: None
Example
spi_Init(SPI_FAST,0); // init SPI at maximum speed for 16MB Flash
spi_Init(SPI_SLOW,SPI_ADDRESS_MODE4); // init SPI at Slow speed for 32MB
Note
Address_mode needs to be SPI_ADDRESS_MODE4 for flash devices with more than 16MB of capacity (to enable 4 byte addressing), else 0 for standard 3 byte addressing.
This is only for the uSD Card, it is not for SPI1, SPI2 or SPI3.
Warning
This should not be tampered with for normal operation, as the DIABLO-16 handles the uSD card itself. Only use if you are an adept user and know what you are doing.
spi_Read
This function allows a raw unadorned byte read from the uSD card via SPI.
Syntax: spi_Read();
Returns: A single data byte from the uSD card via SPI.
Example
var result;
spi_Init(2, 0, 0); // 650 kHZ, RXMODE_0, CKMODE_0
print("Hello World\n") ; // replace with your code
//....
spi_Write(0x40);
result := spi_Read();
print("result: ", result);
Note
This is only for the uSD Card, it is not for SPI1, SPI2 or SPI3.
The Chip Select line (SDCS) is lowered automatically.
Warning
This should not be tampered with for normal operation, as the DIABLO-16 handles the uSD card itself. Only use if you are an adept user and know what you are doing.
spi_Write
This function allows a raw unadorned byte write to the uSD card via SPI.
Syntax: spi_Write(byte);
| Arguments | Description |
|---|---|
| byte | Specifies the data byte to be sent to the uSD card via SPI. |
Returns: None
Example: See the example in section spi_Read().
Note
This is only for the uSD Card, it is not for SPI1, SPI2 or SPI3.
The Chip Select line (SDCS) is lowered automatically.
Warning
This should not be tampered with for normal operation, as the DIABLO-16 handles the uSD card itself. Only use if you are an adept user and know what you are doing.
spi_Disable
This function raises the Chip Select (SDCS) line of the uSD card, disabling it from further activity. The CS line will be automatically lowered next time the SPI functions spi_Read() or spi_Write(...) are used, and also by the action of any media_functions.
Syntax: spi_Disable();
Returns: None
Example TODO
Note
This is only for the uSD Card, it is not for SPI1, SPI2 or SPI3.
SPI1_Init
Initialize the SPI port to communicate with the SPI device. There are three peripheral interface SPI ports that can be used to communicate with three different SPI devices with different speeds and modes at the same time. SPI1, SPI2 and SPI3 need to be initialized separately using PI1_Init(..), SPI2_Init(..) or SPI3_Init(..) functions.
| Pre-defined Constant | Value | Comments |
|---|---|---|
| SPI_SPEED0 | 0 | 78.125 khz |
| SPI_SPEED1 | 1 | 109.375 khz |
| SPI_SPEED2 | 2 | 273.4375 khz |
| SPI_SPEED3 | 3 | 312.5 khz |
| SPI_SPEED4 | 4 | 437.5 khz |
| SPI_SPEER5 | 5 | 729.166 khz |
| SPI_SPEED6 | 6 | 1.09375 mhz |
| SPI_SPEED7 | 7 | 1.25 mhz |
| SPI_SPEED8 | 8 | 1.75 mhz |
| SPI_SPEED9 | 9 | 2.1875 mhz |
| SPI_SPEED10 | 10 | 4.375 mhz |
| SPI_SPEED11 | 11 | 5.00 mhz |
| SPI_SPEED12 | 12 | 7.00 mhz |
| SPI_SPEED13 | 13 | 8.75 mhz |
| SPI_SPEED14 | 14 | 11.666 mhz |
| SPI_SPEED15 | 15 | 17.5 mhz |
| Pre-defined Constant | Value | Comments |
|---|---|---|
| SPI8_MODE_0 | 0 | SCK idles low, SDO stable for first falling edge, SDI sampled on first falling edge. |
| SPI8_MODE_1 | 1 | SCK idles low, SDO stable for first rising edge, SDI sampled on first rising edge. |
| SPI8_MODE_2 | 2 | SCK idles high, SDO stable for first falling edge, SDI sampled on first falling edge. |
| SPI8_MODE_3 | 3 | SCK idles high, SDO stable for first rising edge, SDI sampled on first falling edge. |
| SPI8_MODE_4 | 4 | SCK idles low, SDO stable for first falling edge, SDI sampled on next rising edge. |
| SPI8_MODE_5 | 5 | SCK idles low, SDO stable for first rising edge, SDI sampled on next falling edge. |
| SPI8_MODE_6 | 6 | SCK idles high, SDO stable for first falling edge, SDI sampled on next rising edge. |
| SPI8_MODE_7 | 7 | SDO stable for first rising edge, SDI sampled on next rising edge. |
| Pre-defined Constant | Value | Comments |
|---|---|---|
| SPI16_MODE_0 | 8 | SCK idles low, SDO stable for first falling edge, SDI sampled on first falling edge. |
| SPI16_MODE_1 | 9 | SCK idles low, SDO stable for first rising edge, SDI sampled on first rising edge. |
| SPI16_MODE_2 | 10 | SCK idles high, SDO stable for first falling edge, SDI sampled on first falling edge. |
| SPI16_MODE_3 | 11 | SCK idles high, SDO stable for first rising edge, SDI sampled on first falling edge. |
| SPI16_MODE_4 | 12 | SCK idles low, SDO stable for first falling edge, SDI sampled on next rising edge. |
| SPI16_MODE_5 | 13 | SCK idles low, SDO stable for first rising edge, SDI sampled on next falling edge. |
| SPI16_MODE_6 | 14 | SCK idles high, SDO stable for first falling edge, SDI sampled on next rising edge. |
| SPI16_MODE_7 | 15 | SCK idles high, SDO stable for first rising edge, SDI sampled on next rising edge. |
Mode can also be “OR’ed” with SPI_ADDRESS_MODE4 when SPI Flash memory is used which requires 4 byte addressing.
This is only required for Flash chips having a capacity of greater than 16MB, thus requiring more than he standard 3 byte addressing. Refer to the Datasheet of the Flash Memory in question.
The syntax would be for example SPI8_MODE_0 | SPI_ADDRESS_MODE4, in place of the ‘mode’ argument.
Syntax: SPI1_Init(speed, mode, enablepin); or SPI2_Init(speed, mode, enablepin); or SPI3_Init(speed, mode, enablepin);
| Arguments | Description |
|---|---|
| speed | Specifies the speed of the SPI port. |
| mode | Specifies the mode of SPI operation. |
| enablepin | The DIABLO-16 pin connected to CS on the relevant chip. |
Returns: True if the function succeeded.
Example
if (! SPI1_Init(SPI_SPEED15, SPI8_MODE_5 , PA0))
print("INIT parameter Invalid n") ;
endif
if (! SPI3_Init(SPI_SPEED12 , SPI16_MODE_3 | SPI_ADDRESS_MODE4 , PA2))
print("INIT parameter Invalid n") ;
endif
Note
This is only for SPI1, SPI2 or SPI3, it is separate from the spi_Init() function used for the uSD Card.
SPI1_Read
This function allows a raw unadorned byte read from the SPI device connected to SPI1, SPI2 or SPI3 port. A dummy write using all bits set is automatically written to the SPI port to being the read.
Syntax: SPI1_Read(); or SPI2_Read(); or SPI3_Read();
Returns: A single data byte from the SPI device.
Example
#CONST
EnablePin PA0
ClockPin PA1
SDIPin PA2
SDOPin PA3
#END
func main()
var result, power, err;
pin_HI(EnablePin) ;
pin_Set(PIN_OUT,EnablePin);
if (! SPI1_SDI_pin(SDIPin))
print("SDI Pin Invalid\n") ;
err := 1 ;
endif
if (! SPI1_SCK_pin(ClockPin))
print("SCK Pin Invalid\n") ;
err := 1 ;
endif
if (! SPI1_SDO_pin(SDOPin))
print("SDO Pin Invalid\n") ;
err := 1 ;
endif
if (! SPI1_Init(SPI_SPEED0, SPI16_MODE_1))
print("INIT parameter Invalid\n") ;
err := 1 ;
endif
if(err)
repeat forever
endif
pin_LO(EnablePin); //Chip Select
SPI1_Write(0x0200); // Power supply data read Request
pin_HI(EnablePin);
pin_LO(EnablePin);
result:=SPI1_Read();
power:=result<<8;
result:=SPI1_Read();
power:=power+result;
pin_HI(EnablePin);
print("power: ", power);
repeat // maybe replace
forever // this as well
endfunc
Note
The Chip Select line needs to be manually lowered and raised by the users’ code since this pin is determined by the user and is not a fixed pin.
This is only for SPI1, SPI2 or SPI3, it is separate from the spi_Read() function used for the uSD Card
SPI1_Write
This function allows a raw unadorned byte write to the SPI device connected to SPI1, SPI2 or SPI3 port.
Syntax: SPI1_Write(byte); or SPI2_Write(byte); or SPI3_Write(byte);
| Arguments | Description |
|---|---|
| byte | Specifies the data byte to be sent to the SPI device. |
Returns: The data read from the SPI port whilst the write is in progress.
Example: See example in section “SPI1_Read()”
Note
The Chip Select line needs to be manually lowered and raised by the users’ code since this pin is determined by the user and is not a fixed pin.
This is only for SPI1, SPI2 or SPI3, it is separate from the spi_Write() function used for the uSD Card.
SPI1_SCK_pin
Selects the hardware pin for spi Clock line. SPI1, SPI2 or SPI3’s SCK pin could be assigned to the available pins.
| 4D Pin Name Predefined |
DIABLO-16 Pin Number |
H1 Pin Number | Availability |
|---|---|---|---|
| PA0 | 61 | 1 | No |
| PA1 | 62 | 3 | Yes |
| PA2 | 63 | 5 | No |
| PA3 | 64 | 7 | Yes |
| PA4 | 46 | 29 | Yes |
| PA5 | 49 | 27 | Yes |
| PA6 | 50 | 25 | Yes |
| PA7 | 51 | 23 | Yes |
| PA8 | 52 | 21 | Yes |
| PA9 | 53 | 19 | Yes |
| PA10 | 43 | 8 | No |
| PA11 | 44 | 6 | No |
| PA12 | 31 | 28 | Yes (See Note (1)) |
| PA13 | 32 | 30 | Yes (See Note (1)) |
| PA14 | 37 | 24 | No |
| PA15 | 36 | 26 | No |
Syntax: SPI1_SCK_pin(pin); or SPI2_SCK_pin(pin); or SPI3_SCK_pin(pin);
| Arguments | Description |
|---|---|
| pin | Specifies the pin to be set for SCK for SPI1, SPI2 or SPI3 ports. |
Returns: TRUE if function succeeded (usually ignored).
Example: See example in section “SPI1_Read()”
Note
Only a single pin should be mapped to spi SCK. If the pin argument is 0 the previously selected spi SCK pin is disconnected. The pin is automatically set to an output.
Some 4D Systems display modules utilise this pin for additional peripherals such as Resistive or Capacitive Touch. To ensure that the pin is available for use, refer to the appropriate product’s datasheet.
SPI1_SDI_pin
Selects the hardware pin for SPI Receive line. SPI1, SPI2 or SPI3’s SDI pin could be assigned to the available pins. Note that only a single pin should be mapped to spi SDI. If the pin argument is 0 the function has no effect. The pin is automatically set to an output.
| 4D Pin Name Predefined |
DIABLO-16 Pin Number |
H1 Pin Number | Availability |
|---|---|---|---|
| PA0 | 61 | 1 | Yes |
| PA1 | 62 | 3 | Yes |
| PA2 | 63 | 5 | Yes |
| PA3 | 64 | 7 | Yes |
| PA4 | 46 | 29 | Yes |
| PA5 | 49 | 27 | Yes |
| PA6 | 50 | 25 | Yes |
| PA7 | 51 | 23 | Yes |
| PA8 | 52 | 21 | Yes |
| PA9 | 53 | 19 | Yes |
| PA10 | 43 | 8 | Yes |
| PA11 | 44 | 6 | Yes |
| PA12 | 31 | 28 | Yes (See Note (1)) |
| PA13 | 32 | 30 | Yes (See Note (1)) |
| PA14 | 37 | 24 | No |
| PA15 | 36 | 26 | No |
Syntax: SPI1_SDI_pin(pin); or SPI2_SDI_pin(pin); or SPI3_SDI_pin(pin);
| Arguments | Description |
|---|---|
| pin | Specifies the pin to be set for SDI for SPI1, SPI2 or SPI3 ports. |
Returns: TRUE if finction succeeded (usually ignored).
Example
See example in section “SPI1_Read()”
Note
If the spi SDI pin is set to same pin as spi SDO pin (e.g. for a loopback check) it is necessary to configure the SDI pin first,
SPI2_SDI_pin(PA3); // configure SPI2 SDI to PA3 (this disconnects anything else)
SPI2_SDO_pin(PA3); // configure SPI2 SDO to PA3
Some 4D Systems display modules utilise this pin for additional peripherals such as Resistive or Capacitive Touch. To ensure that the pin is available for use, refer to the appropriate product’s datasheet.
SPI1_SDO_pin
Selects the hardware pin for SPI Transmit line. SPI1, SPI2 or SPI3’s SDO pin could be assigned to the available pins. Note that only a single pin should be mapped to spi SDO. If the pin argument is 0 the previously selected spi SDO pin is disconnected. The pin is automatically set to an output.
| 4D Pin Name Predefined |
DIABLO-16 Pin Number |
H1 Pin Number | Availability |
|---|---|---|---|
| PA0 | 61 | 1 | No |
| PA1 | 62 | 3 | Yes |
| PA2 | 63 | 5 | No |
| PA3 | 64 | 7 | Yes |
| PA4 | 46 | 29 | Yes |
| PA5 | 49 | 27 | Yes |
| PA6 | 50 | 25 | Yes |
| PA7 | 51 | 23 | Yes |
| PA8 | 52 | 21 | Yes |
| PA9 | 53 | 19 | Yes |
| PA10 | 43 | 8 | No |
| PA11 | 44 | 6 | No |
| PA12 | 31 | 28 | Yes (See Note (1)) |
| PA13 | 32 | 30 | Yes (See Note (1)) |
| PA14 | 37 | 24 | No |
| PA15 | 36 | 26 | No |
Syntax: SPI1_SDO_pin(pin); or SPI2_SDO_pin(pin); or SPI3_SDO_pin(pin);
| Arguments | Description |
|---|---|
| pin | Specifies the pin to be set for SDO for SPI1, SPI2 or SPI3 ports. |
Returns: TRUE if function succeeded (usually ignored).
Example
See example in section “SPI1_Read()”
Note
Some 4D Systems display modules utilise this pin for additional peripherals such as Resistive or Capacitive Touch. To ensure that the pin is available for use, refer to the appropriate product’s datasheet.
spi_ReadBlock
Bufsize bytes are read from the SPI port to the string pointer "buf". This function gives much better performance than reading individual bytes at a time. Once the data has been read into a buffer it also makes it easy to perform CRC calculations on the data. The SPI port must be initialised in 8-bit mode.
Syntax: spi_ReadBlock("buf", "bufsize"); or spi1_ReadBlock("buf", "bufsize"); or spi2_ReadBlock("buf", "bufsize"); or spi3_ReadBlock("buf", "bufsize");
| Arguments | Description |
|---|---|
| buf | String Pointer address of buffer to receive the data. |
| bufsize | The number of characters to receive into the buffer. |
Returns: None
Example
#platform "uLCD 32WDT"
func main()
var st[20] ;
// setup of spi3 pins and spi3 init goes
spi3_ReadBlock(str_Ptr(st), 8) ; // read 8 bytes from spi
print(">", [STR] st, "<") ; // assumes bytes read are terminated
repeat // maybe replace
forever // this as well
endfunc
spi_WriteBlock
Bufsize bytes are written to the SPI port from the string pointer "buf". This function gives much better performance than writing individual bytes at a time. Once the data has been read into a buffer it also makes it easy to perform CRC calculations on the data. The SPI port must be initialised in 8-bit mode.
Syntax: spi_WriteBlock("buf", "bufsize"); or spi1_WriteBlock("buf", "bufsize"); or spi2_WriteBlock("buf", "bufsize"); or spi3_WriteBlock("buf", "bufsize");
| Arguments | Description |
|---|---|
| buf | String Pointer address of buffer to send the data from. |
| bufsize | The number of characters to send. |
Returns: None
Example
#platform "uLCD 32WDT"
func main()
var st[20] ;
to(st) ;
print("Hello there!") ;
// setup of spi3 pins and spi3 init goes
spi3_WriteBlock(str_Ptr(st), 12) ;
repeat // maybe replace
forever // this as well
endfunc
SPI Flash Functions
These functions can be used to access an SPI FLASH storage device connected to the selected SPI port, and correctly initialised with the spi_Init(...) function, each FLASH device also needs a dedicated enable pin pulled high and set as output from within the driving program. Devices like the M25Pxx and A25Lxx which has 512Kbit to 128Mbit of Serial Flash Memory are supported. Other similar devices should work. Additionally, support for more than 16MB of serial flash is available by using SPI_ADDRESS_MODE4 in the relevant SPI Init function.
Sample initialization code:
#CONST
EnablePin PA0
ClockPin PA6
SDIPin PA2
SDOPin PA5
#END
pin_HI(EnablePin) ;
pin_Set(PIN_OUT,EnablePin) ;
SPI1_SDI_pin(SDIPin) ;
SPI1_SCK_pin(ClockPin) ;
SPI1_SDO_pin(SDOPin) ;
SPI1_Init(SPI_SPEED15, SPI8_MODE_5, EnablePin) ;
Note
When accessing certain file types via spiflash it may be necessary to append an identifiable EOF character (e.g. ^Z) to enable your program to properly detect EOF.
The Init must be done in 8-bit mode, but the internal functions will automatically flip between 8 and 16-bit mode to gain optimal performance.
spiflash_BlockErase
Erases the required block in a FLASH media device. The function returns no value, and the operation can take up to 3 milliseconds.
Syntax: spiflash_BlockErase(spi#, Enablepin, block);
| Arguments | Description |
|---|---|
| spi# | The SPI port to use, e.g. SPI0, SPI1, SPI2 or SPI3. |
| Enablepin | The enable pin assigned to this spiflash device, e.g. PA0. |
| block | The block to be erased. |
Returns: None
Example
spiflash_BulkErase
Erases the entire flash media device. The function returns no value, and the operation can take up to 80 seconds depending on the size of the flash device. Note that not all devices support this command.
Syntax: spiflash_BulkErase(spi#, Enablepin);
| Arguments | Description |
|---|---|
| spi# | The SPI port to use, e.g. SPI0, SPI1, SPI2 or SPI3. |
| Enablepin | The enable pin assigned to this spiflash device, e.g. PA0. |
Returns: None
Example
spiflash_Exec
This function is similar to spiflash_Run, however, the main program in FLASH retains all memory allocations (e.g. file buffers, memory allocated with mem_Alloc etc.)
Returns like a function, current program calling program is kept active and control returns to it.
If arglistptr is 0, no arguments are passed, else arglist points to an array, the first element being the number of elements in the array.
func 'main' in the called program accepts the arguments.
This function is similar to spiflash_LoadFunction(...), however, the function argument list is passed by pointer, and the memory consumed by the function is released as soon as the function completes.
spiflash_SetAdd should have previously been called to identify the address of the program to be called.
Syntax: spiflash_Exec(spi#, Enablepin, arglistptr);
| Arguments | Description |
|---|---|
| spi# | The SPI port to use, e.g. SPI0, SPI1, SPI2 or SPI3. |
| Enablepin | The enable pin assigned to this spiflash device, e.g. PA0. |
| arglistptr | Pointer to the list of arguments to pass to the new program or 0 if no arguments. |
Returns: The value from main in the called program.
Example
spiflash_GetC
Reads a character (or byte) from the SPI FLASH memory device on the specified SPI port and enable pin. The source is the address set by spiflash_SetAdd(), or incremented by subsequent reads or writes.
Syntax: spiflash_GetC(spi#, Enablepin);
| Arguments | Description |
|---|---|
| spi# | The SPI port to use, e.g. SPI0, SPI1, SPI2 or SPI3. |
| Enablepin | The enable pin assigned to this spiflash device, e.g. PA0. |
Returns: The next char from the file.
Example
spiflash_GetS
This function Reads a line of text to a buffer (specified by "*string") from the FLASH memory device on the specified SPI port and enable pin into the specified destination. The source is the address set by spiflash_SetAdd(), or incremented by subsequent reads or writes.
file_GetS(...) will stop reading when any of the following conditions are true:
a. It has read n-1 bytes (one character is reserved for the null-terminator). b. It encounters a newline character (a line-feed in the compilers tested here). c. It reaches the end of file d. A read error occurs.
The file must be previously opened with 'r' (read) mode.
Syntax: spiflash_GetS(*String, size, spi#, Enablepin);
| Arguments | Description |
|---|---|
| string | Destination buffer. |
| size | The maximum number of bytes to be read from the file. (Up to max of 80). |
| spi# | The SPI port to use, e.g. SPI0, SPI1, SPI2 or SPI3. |
| Enablepin | The enable pin assigned to this spiflash device, e.g. PA0. |
Returns: The number of characters read from file (excluding the null terminator).
Example
Note
Only reads up to "size-1" characters into "string".
spiflash_GetW
This function reads a word (2 bytes) from the FLASH memory device on the specified SPI port and enable pin, at the spiflash_SetAdd(), or incremented by subsequent reads or writes and advances the pointer appropriately (incremented by 2).
Syntax: spiflash_GetW(spi#, Enablepin);
| Arguments | Description |
|---|---|
| spi# | The SPI port to use, e.g. SPI0, SPI1, SPI2 or SPI3. |
| Enablepin | The enable pin assigned to this spiflash device, e.g. PA0. |
Returns: The next word in the file.
Example
spiflash_ID
Reads the memory type and capacity from the serial FLASH device. Hi byte contains type, and low byte contains capacity. Refer to the device data sheet for further information.
Syntax: spiflash_ID(spi#, Enablepin);
| Arguments | Description |
|---|---|
| spi# | The SPI port to use, e.g. SPI0, SPI1, SPI2 or SPI3. |
| Enablepin | The enable pin assigned to this spiflash device, e.g. PA0. |
Returns: None
Example
spiflash_Image
Display an image from the SPI FLASH at screen location specified by x, y(top left corner). The image is displayed from a file at the current FLASH position set by spiflash_SetAdd().
Syntax: spiflash_Image(x, y, spi#, Enablepin);
| Arguments | Description |
|---|---|
| X | X-position of the image to be displayed. |
| y | Y-position of the image to be displayed. |
| spi# | The SPI port to use, e.g. SPI0, SPI1, SPI2 or SPI3. |
| Enablepin | The enable pin assigned to this spiflash device, e.g. PA0. |
Returns: A copy of the file_Error() error code.
Example
spiflash_LoadFunction
Load a function or program from the FLASH memory device on the specified SPI port and enable pin at the address set by spiflash_SetAdd(), or incremented by subsequent reads or writes and return a function pointer to the allocation.
The function can then be invoked just like any other function would be called via a function pointer. Parameters may be passed to it in a conventional way. The function may be discarded at any time when no longer required, thus freeing its memory resources.
The loaded function can be discarded with mem_Free(..).
The callers stack is shared by the loaded function, however any global variables in the loaded function are private to that function.
Syntax: spiflash_LoadFunction(spi#, Enablepin);
| Arguments | Description |
|---|---|
| spi# | The SPI port to use, e.g. SPI0, SPI1, SPI2 or SPI3. |
| Enablepin | The enable pin assigned to this spiflash device, e.g. PA0. |
Returns: A pointer to the memory allocation where the function has been loaded from file which can be then used as a function call.
Example
var titlestring[20];
var textstring[20];
to(titlestring); putstr(“My Window Title”);
to (textstring); putstr(“My Special Message”);
popupWindow := spiflash_LoadFunction(SPI1, PA0);
if(!popupWindow)goto LoadFunctionFailed; //could not load the function
//then elsewhere in your program
res := popupWindow(MYMODE,titlestring,textstring);
if(res == QUIT_APPLICATION) goto exitApp;
//Later in your program, when popupWindow is no longer required
//for the application
res := mem_Free(popupWindow);
if(!res) goto FreeFunctionFailed; //should never happen if memory not
//corrupted
var fncHandle; //a var for a handle to sliders2.4dg
var slidervals; //reference var to access global vars in sliders.4dg
fncHandle :=spiflash_LoadFunction(SPI1, PA0); // load the function
slidervals := fncHandle&0x7FFF; // note that memory allocations
//for transient programs are biased with 8000h which must be removed.
slidervals++; // note that all globals start at '1'
slidervals[0] := 25; // set sliders to initial positions
slidervals[1] := 20;
slidervals[2] := 30;
slidervals[3] := 15;
slidervals[4] := 35;
slidervals[5] := 20;
slidervals[6] := 40;
slidervals[7] := 25;
slidervals[8] := 45;
slidervals[9] := 5;
r := fncHandle(); // activate the function
print("Return value = 0x", [HEX] r,"\n");
// print the values, they may have changed
print("Slider 1 ", slidervals[0]," Slider 2 ", slidervals[1],"\n");
print("Slider 3 ", slidervals[2]," Slider 4 ", slidervals[3],"\n");
print("Slider 5 ", slidervals[4]," Slider 6 ", slidervals[5],"\n");
print("Slider 7 ", slidervals[6]," Slider 8 ", slidervals[7],"\n");
print("Slider 9 ", slidervals[8]," Slider 10 ", slidervals[9],"\n");
mem_Free(fncHandle); // done with sliders, release its memory
Note
Any pointer references passed to the child function may not include references to the parents DATA statements or any static string references. Any string or array information must be in the parents global or local memory space. The reason for this is that DATA statements and static strings are contained in the parents CODE segment, and cannot be accessed by the child process.
spiflash_LoadImageControl
Reads a control file to create an image list from the FLASH memory device on the specified SPI port and enable pin. The source is the address set by spiflash_SetAdd(), or incremented by subsequent reads or writes. The ".dat" file is first and is immediately followed by a ^Z and then the ".gci' file.
When an image control is loaded, an array is built in ram. It consists of a 6 word header with the following entries as defined by the constants:
| Predefined Constant | value |
|---|---|
| IMG_COUNT | 0 |
| IMG_ENTRYLEN | 1 |
| IMG_MODE | 2 |
| IMG_GCI_FILENAME | 3 |
| IMG_DAT_FILENAME | 4 |
| IMG_GCIFILE_HANDLE | 5 |
No images are stored in FLASH or RAM, the image control holds the index values for the absolute storage positions on the uSD card for RAW mode, or the cluster/sector position for formatted FAT16 mode.
When an image control is no longer required, the memory can be released with: mem_Free(MyImageControlHandle);
Syntax: spiflash_LoadImageControl(spi#, Enablepin) ;
| Arguments | Description |
|---|---|
| spi# | The SPI port to use, e.g. SPI0, SPI1, SPI2 or SPI3. |
| Enablepin | The enable pin assigned to this spiflash device, e.g. PA0. |
Returns: A handle (pointer to the memory allocation) to the image control list that has been created. NULL if function fail.
Example
#inherit "4DGL_16bitColours.fnc"
#constant OK 1
#constant FAIL 0
var p; // buffer pointer
var img; // handle for the image list
var n, exit, r;
//------------------------------------------------------------------------------------------
// return true if screen touched, also sets ok flag
func CheckTouchExit()
return (exit := (touch_Get(TOUCH_STATUS) == TOUCH_PRESSED)); // if there's a press, exit
endfunc
//------------------------------------------------------------------------------------------
func main()
gfx_Cls();
txt_Set(FONT_ID, FONT 2);
txt_Set(TEXT_OPACITY, OPAQUE);
touch_Set(TOUCH_ENABLE); // enable the touch screen
print("heap=", mem_Heap(), " bytes\n"); // show the heap size
r := OK; // return value
exit := 0;
if (!file_Mount())
print("File error ", file_Error());
while(!CheckTouchExit());
// just hang if we didnt get the image list
r := FAIL;
goto quit;
endif
print ("WAIT...building image list\n");
// slow build, fast execution, higher memory requirement
img := spiflash_LoadImageControl(SPI1, PA0);
// build image control, returning a pointer to structure allocation
if (img)
print("image control=",[HEX] img,"\n");
// show the address of the image control allocation
else
putstr("Failed to build image control....\n");
while(CheckTouchExit() == 0);
// just hang if we didnt get the image list
r := FAIL;
goto quit;
endif
print ("Loaded ", img[IMG_COUNT], " images\n");
print ("\nTouch and hold to exit...\n");
pause(2000);
pause(3000);
gfx_Cls();
repeat
n := 0;
while(n < img[IMG_COUNT] && !exit) // go through all images
CheckTouchExit(); // if there's a press, exit
img_SetPosition(img, n, (ABS(RAND() % 240)), (A BS(RAND() %320))); // spread out the images
n++;
wend
img_Show(img, ALL); // update the entire control in 1 hit
until(exit);
quit:
mem_Free(img); // release the image control
file_Unmount(); // (program must release all resources)
return r;
endfunc
//===================================================================================================================
spiflash_PlayWAV
Play a wave file from the FLASH memory device on the specified SPI port and enable pin. The source is the address set by spiflash_SetAdd(), or incremented by subsequent reads or writes. Opens the wav file, decode the header to set the appropriate wave player parameters and set off the playing of the file as a background process.
This function automatically grabs a chunk of memory for a wave buffer. The minimum memory requirement is the wave buffer size of 1024. The size of the wave buffer allocation can be increased by the snd_BufSize function.
The default size 1024 bytes.
See “Sound Control Functions” for additional play control functions.
Syntax: spiflash_PlayWAV(spi#, Enablepin);
| Arguments | Description |
|---|---|
| spi# | The SPI port to use, e.g. SPI0, SPI1, SPI2 or SPI3. |
| Enablepin | The enable pin assigned to this spiflash device, e.g. PA0. |
Returns:
- If there are no errors, returns number of blocks to play (1 to 32767).
- If errors occurred, the following is returned
- -7 : Insufficient memory available for WAV buffer and file.
- -6 : cant play this rate.
- -5 : no data chunk found in first rsector.
- -4 : no format data.
- -3 : no wave chunk signature.
- -2 : bad wave file format.
- -1 : file not found.
Example
print("\nding.wav\n");
for(n:=0; n<45; n++)
pitch := NOTES[n];
print([UDEC] pitch,"\r");
snd_Pitch(pitch);
spiflash_PlayWAV(SPI1, PA0);
while(snd_Playing());
//pause(500);
next
Note
The memory is only required during the duration of play, and is automatically released while not in use.
spiflash_PutC
This function writes the byte specified by "char" to the FLASH memory device on the specified SPI port and enable pin, at the position spiflash_SetAdd(), or incremented by subsequent reads or writes and advances the pointer appropriately (incremented by 1).
Syntax: spiflash_PutC(char, spi#, Enablepin);
| Arguments | Description |
|---|---|
| char | Data byte about to be written. |
| spi# | The SPI port to use, e.g. SPI0, SPI1, SPI2 or SPI3. |
| Enablepin | The enable pin assigned to this spiflash device, e.g. PA0. |
Returns: None
Example
spiflash_PutS
This function writes an ASCIIZ (null terminated) string from a buffer specified by "*source" to the FLASH memory device on the specified SPI port and enable pin, at the position set by spiflash_SetAdd(), or incremented by subsequent reads or writes and advances the pointer appropriately.
Syntax: spiflash_PutS(source, spi#, Enablepin);
| Arguments | Description |
|---|---|
| source | A pointer to the string to be written. |
| spi# | The SPI port to use, e.g. SPI0, SPI1, SPI2 or SPI3. |
| Enablepin | The enable pin assigned to this spiflash device, e.g. PA0. |
Returns: The number of characters written (excluding the null terminator).
Example
spiflash_PutW
This function writes word sized (2 bytes) data specified by "word" to the FLASH memory device on the specified SPI port and enable pin, at the position indicated by set by spiflash_SetAdd(), or incremented by subsequent reads or writes and advances the pointer appropriately (incremented by 2).
Syntax: spiflash_PutW(word, spi#, Enablepin);
| Arguments | Description |
|---|---|
| word | Data about to be written. |
| spi# | The SPI port to use, e.g. SPI0, SPI1, SPI2 or SPI3. |
| Enablepin | The enable pin assigned to this spiflash device, e.g. PA0. |
Returns: None
Example
spiflash_Read
Reads the number of bytes specified by "size" from the FLASH memory device on the specified SPI port and enable pin into a destination memory buffer. The source is the address set by spiflash_SetAdd(), or incremented by subsequent reads or writes.
Syntax: spiflash_Read(destination, size, spi#, Enablepin);
| Arguments | Description |
|---|---|
| destination | Destination memory buffer. |
| size | Number of bytes to be read. |
| spi# | The SPI port to use, e.g. SPI0, SPI1, SPI2 or SPI3. |
| Enablepin | The enable pin assigned to this spiflash device, e.g. PA0. |
Returns: The number of characters read.
Example
spiflash_Run
Any memory allocations in the main FLASH program are released, however, the stack and globals are maintained.
If arglistptr is 0, no arguments are passed, else arglistptr points to an array, the first element being the number of additional elements in the array which contain the arguments.
func 'main' in the called program accepts the arguments, if any.
The arguments can only be passed by value, no pointers or references can be used as all memory is cleared before the file is loaded. Refer to spiflash_Exec and spiflash_LoadFunction for functions that can pass by reference.
spiflash_SetAdd should have previously been called to identify the address of the program to be called.
Syntax: spiflash_Run(spi#, Enablepin, arglistptr);
| Arguments | Description |
|---|---|
| spi | The SPI port to use, e.g. SPI0, SPI1, SPI2 or SPI3. |
| Enablepin | The enable pin assigned to this spiflash device, e.g. PA0. |
| arglistptr | Pointer to the list of arguments to pass to the new program. |
Returns: The value from main in the called program.
Example: Refer to the file_Run example.
spiflash_SetAdd
Set media memory internal Address pointer for to SPI FLASH memory.
Syntax: spiflash_SetAdd(spi#, HiWord, LoWord);
| Arguments | Description |
|---|---|
| spi# | The SPI port to use, e.g. SPI0, SPI1, SPI2 or SPI3. |
| HiWord | Specifies the high word (upper 2 bytes) of a 4 byte SPI FLASH memory byte address location. |
| LoWord | Specifies the low word (lower 2 bytes) of a 4 byte SPI FLASH memory byte address location. |
Returns: None
Example
spiflash_SIG
Returns the Electronic Signature of the SPI FLASH device. Only the low order byte is valid, the upper byte is ignored
Syntax: spiflash_SIG(spi#, Enablepin);
| Arguments | Description |
|---|---|
| spi# | The SPI port to use, e.g. SPI0, SPI1, SPI2 or SPI3. |
| Enablepin | The enable pin assigned to this spiflash device, e.g. PA0. |
Returns: The Electronic Signature of the SPI FLASH device.
Example
spiflash_Write
Writes the number of bytes specified by "size" from the source buffer into the FLASH memory device on the specified SPI port and enable pin.
Syntax: spiflash_Write(Source, size, spi#, Enablepin);
| Arguments | Description |
|---|---|
| source | Source memory buffer. |
| size | Number of bytes to be written. |
| spi# | The SPI port to use, e.g. SPI0, SPI1, SPI2 or SPI3. |
| Enablepin | The enable pin assigned to this spiflash device, e.g. PA0. |
Returns: TRUE if the Source address is valid.
Example
spiflash_Block32Erase
Erase the 32KB flash block including the currently set address.
Syntax: spiflash_Block32Erase(spi#, Enablepin);
| Arguments | Description |
|---|---|
| spi# | The SPI interface to which the Flash memory chip is located SPI0 for the uSD port, or SPI1, SPI2 or SPI3. |
| Enablepin | The enable, or CS pin for the Flash memory chip PA0-PA15, or USD_ENABLE for the uSD's enable pin. |
Returns: None
Example
spiflash_Sector4Erase
Erase the 4KB flash sector including the currently set address.
Syntax: spiflash_Sector4Erase (spi#, Enablepink);
| Arguments | Description |
|---|---|
| spi# | The SPI interface to which the Flash memory chip is located SPI0 for the uSD port, or SPI1, SPI2 or SPI3. |
| Enablepin | The enable, or CS pin for the Flash memory chip PA0-PA15, or USD_ENABLE for the uSD's enable pin. |
Returns: None
Example
spiflash_ReadByte
Reads a byte from the FLASH memory device on the specified SPI port and enable pin and returns it. The enable pin is lowered at the start of the operation and raised at the end unless the flag is set to SPIFLASH_HOLDCS is set, in which case the pin is left low.
Syntax: spiflash_ReadByte(flag, spi#, Enablepin);
| Arguments | Description |
|---|---|
| flag | |
| spi# | The SPI interface to which the Flash memory chip is located SPI0 for the uSD port, or SPI1, SPI2 or SPI3. |
| Enablepin | The enable, or CS pin for the Flash memory chip PA0-PA15, or USD_ENABLE for the uSD's enable pin. |
Returns: The character read.
Example
spiflash_WriteByte
Writes the specified byte to the FLASH memory device on the specified SPI port and enable pin. The enable pin is lowered at the start of the operation and raised at the end unless the reg/value has SPIFLASH_HOLDCS orred onto it, in which case the pin is left low.
Syntax: spiflash_WriteByte(reg/value, spi#, Enablepin);
| Arguments | Description |
|---|---|
| reg/value | The value may be a command or value depending upon where it is written to relative to the lowering of CS. |
| spi# | The SPI interface to which the Flash memory chip is located SPI0 for the uSD port, or SPI1, SPI2 or SPI3. |
| Enablepin | The enable, or CS pin for the Flash memory chip PA0-PA15, or USD_ENABLE for the uSD's enable pin. |
Returns: TRUE if valid.
Example
spiflash_SetMode
Sets the address size to be used to access the FLASH memory device on the specified SPI port and enable pin. The size should be set using the correct command for the SPI FLASH memory device you are using.Then this function should be called to enable that addressing mode to be used.
Valid options are:
- SPIFLASH_ADDRESS3 Address operand is 3 bytes long
- SPIFLASH_ADDRESS4 Address operand is 4 bytes long
Syntax: spiflash_SetMode(spi#, mode);
| Arguments | Description |
|---|---|
| spi# | The SPI interface to which the Flash memory chip is located SPI0 for the uSD port, or SPI1, SPI2 or SPI3. |
| mode |
Returns: None
Example
spiflash_LoadGCFImageControl
spiflash_SetAdd() should have previously been called to set the GCIF start location.
Syntax: spiflash_LoadGCFImageControl(spi#, Enablepin);
| Arguments | Description |
|---|---|
| spi# | The SPI interface to which the Flash memory chip is located SPI0 for the uSD port, or SPI1, SPI2 or SPI3. |
| Enablepin | The enable, or CS pin for the Flash memory chip PA0-PA15, or USD_ENABLE for the uSD's enable pin. |
Returns: A handle (pointer to the memory allocation) to the image control list that has been created. Returns NULL if function fails.
Example
String Class Functions
str_Ptr
Return a byte pointer to a word region.
Syntax: str_Ptr(&var);
| Arguments | Description |
|---|---|
| var | Pointer to string buffer. |
Returns: Value is the byte pointer to string buffer.
Example
var buffer[100]; // 200 character buffer for a source string
var p; // string pointer
var n;
var vars[3]; // for our results
func main()
to(buffer); print("0x1234 0b10011001 12345 abacus");
p := str_Ptr(buffer); //raise string pointer for the string functions
while(str_GetW(&p, &vars[n++]) != 0); // read all the numbers till we
//get a non number
print(vars[0],"\n", vars[1],"\n", vars[2],"\n"); // print them out
endfunc
str_GetD
Convert number in a string to DWORD (myvar[2]).
Syntax: str_GetD(&ptr, &var);
| Arguments | Description |
|---|---|
| ptr | Byte pointer to string. |
| var | Destination for our result. |
Returns: TRUE if function succeeds, advancing ptr.
Example
var buffer[100]; // 200 character buffer for a source string
var p; // string pointer
var n;
var vars[6]; // for our results
func main()
to(buffer); print("100000 200000 98765432 abacus");
p := str_Ptr(buffer); // raise a string pointer so we can use the
// string functions
while(str_GetD(&p, &vars[n]) != 0) n:=n+2; //read all the numbers
//till we get a non number
print( [HEX4] vars[1], ":" , [HEX4] vars[0], "\n" );
// show the longs as hex numbers
print( [HEX4] vars[3], ":" , [HEX4] vars[2], "\n" );
print( [HEX4] vars[5], ":" , [HEX4] vars[4], "\n" );
endfunc
Note
The address of the pointer must be passed so the function can advance it if required.
str_GetW
Convert number in a string to WORD (myvar).
Syntax: str_GetW(&ptr, &var);
| Arguments | Description |
|---|---|
| ptr | Byte pointer to string. |
| var | Destination for our result. |
Returns: TRUE if function succeeds, advancing ptr.
Example
var buffer[100]; // 200 character buffer for a source string
var p; // string pointer
var n;
var vars[3]; // for our results
func main()
to(buffer); print("0x1234 0b10011001 12345 abacus");
p := str_Ptr(buffer); // raise a string pointer so we can use the
// string functions
while(str_GetW(&p, &vars[n++]) != 0); // read all the numbers till
// we get a non number
print(vars[0],"\n", vars[1],"\n", vars[2],"\n"); // print them out
str_Printf (&p, "%s\n" ); // numbers extracted, now just print
// remainder of string
endfunc
Note
The address of the pointer must be passed so the function can advance it if required.
str_GetHexW
Convert hex number in a string to WORD (myvar).
This function is for extracting 'raw' hex words with no "0x" prefix.
Syntax: str_GetHexW(&ptr, &var);
| Arguments | Description |
|---|---|
| ptr | Byte pointer to string. |
| var | Destination for our result. |
Returns: TRUE if function succeeds, advancing ptr.
Example
var buffer[100]; // 200 character buffer for a source string
var p; // string pointer
var n;
var vars[4]; // for our results
func main()
to(buffer); print("1234 5678 9 ABCD");
p := str_Ptr(buffer); // raise a string pointer so we can use the
// string functions
while(str_GetHexW(&p, &vars[n++]) != 0); // read all the hex numbers
// till w e get a non number
print(vars[0],"\n", vars[1],"\n" , vars[2],"\n", vars[3],"\n");
endfunc
Note
The address of the pointer must be passed so the function can advance it if required.
str_GetC
Get next valid ascii char in a string to myvar.
The function returns 0 if end of string reached. Used for extracting single characters from a string.
Syntax: str_GetC(&ptr, &var);
| Arguments | Description |
|---|---|
| ptr | Byte pointer to string. |
| var | Destination for our result. |
Returns: TRUE if function succeeds, advancing ptr.
Example
var p; // string pointer
var n;
var char;
var buffer[100]; // 200 character buffer for a source string
func main()
to(buffer); print("Quick Brown Fox");
p := str_Ptr(buffer); // raise a string pointer so we can use the
//string functions
while(str_GetC(&p, &char))
print("p=",p," char is", [CHR] char); // print characters
wend
print("End of string");
endfunc
Note
The address of the pointer must be passed so the function can advance it if required.
str_GetByte
Get a byte to myvar. Similar to "PEEKB" in basic. It is not necessary for byte pointer ptr to be word aligned
Syntax: str_GetByte(ptr);
| Arguments | Description |
|---|---|
| ptr | Address of byte array or string. |
Returns: The byte value at pointer location.
Example
var buffer[100]; // 200 character buffer for a source string
var n, p;
func main()
to(buffer); print("Testing 1 2 3");
p := str_Ptr(buffer); // get a byte pointer from a word region
n := 0;
while (n <= str_Length(buffer))
print( [HEX2] str_GetByte(p + n++)," "); // print all the chars hex
// values
wend
endfunc
str_GetWord
Get a word to myvar. Similar to PEEKW in basic. It is not necessary for byte pointer ptr to be word aligned
Syntax: str_GetWord(ptr);
| Arguments | Description |
|---|---|
| ptr | Byte pointer. |
Returns: The word at pointer location.
Example
var p; // string pointer
var buffer[10]; // array for 20 bytes
func main()
p := str_Ptr (buffer); // raise a string pointer
str_PutWord (p+3, 100); // 'poke' the array
str_PutWord (p+9, 200);
str_PutWord (p+12, 400);
print(str_GetWord( p + 3), "\n" ); // 'peek' the array
print( str_GetWord( p + 9),"\n" );
print( str_GetWord( p + 12), "\n" );
endfunc
str_PutByte
Put a byte value into a string buffer at ptr. Similar to "POKEB" in basic.
It is not necessary for byte pointer ptr to be word aligned
Syntax: str_PutByte(ptr, val);
| Arguments | Description |
|---|---|
| ptr | Byte pointer to string. |
| val | Byte value to insert. |
Returns: None
Example
var buffer[100]; // 200 character buffer for a source string
var p; // string pointer
func main()
p := str_Ptr(buffer); // raise a string pointer so we can use the
// string functions
str_PutByte(p + 3, 'A'); // store some values
str_PutByte(p + 4, 'B'); // store some values
str_PutByte(p + 5, 'C'); // store some values
str_PutByte(p + 6, 'D'); // store some values
str_PutByte(p + 7, 0); // string terminator
print(vars[0],"\n", vars[1],"\n", vars[2],"\n"); // print them out
p := p + 3; // offset to where we placed the chars
str_Printf(&p, "%s\n"); // print the result
// nb, also, understand that the core print service
// assumes a word aligned address so it starts at pos 4
// print( [STR] &buffer[2]);
endfunc
str_PutWord
Put a word value into a byte buffer at ptr, similar to "POKEW" in basic.
It is not necessary for byte pointer ptr to be word aligned.
Syntax: str_PutWord(ptr, val);
| Arguments | Description |
|---|---|
| ptr | Byte pointer. |
| val | Value to store. |
Returns: None
Example
var p; // string pointer
var numbers[10]; // array for 20 bytes
func main()
p := str_Ptr (numbers); // raise a string pointer
str_PutWord (p+3, 100); // 'poke' the array with some numbers
str_PutWord (p+9, 200);
str_PutWord (p+12, 400);
print( str_GetWord( p + 3), "\n" ); // 'peek' the array
print( str_GetWord( p + 9), "\n" );
print( str_GetWord( p + 12), "\n" );
endfunc
str_Match
Case Sensitive match. Compares the string at position ptr in a string buffer to the string str, skipping over any leading spaces prior to the test. If a match occurs, ptr is advanced to the first position past the match, else ptr is not altered
Syntax: str_Match(&ptr, *str);
| Arguments | Description |
|---|---|
| ptr | Address of byte pointer to string buffer. |
| str | Pointer string to match. |
Returns: 0 if no match, else advance ptr to the next position after the match and returns a pointer to the match position.
Example
var buffer[100]; // 200 character buffer for a source string
var p, q; // string pointers
var n;
func main()
to(buffer); print( " volts 240 " ); // string to parse
p := str_Ptr(buffer); // string pointer to be used
// with string functions
q := p;
// match the start of the string with "
if ( n := str_Match( &p, "volts" ) )
str_Printf( &p, "%s\n" ); // print remainder of string
else
print ( "not found\n" );
endif
print ( "startpos=" , q , "\nfindpos=" , n , "\nendpos=" , p );
repeat
forever
endfunc
Note
The address of the pointer must be passed so the function can advance it if required.
str_MatchI
Case Insensitive match. Compares the string at position ptr in a string buffer to the string str, skipping over any leading spaces prior to the test. If a match occurs, ptr is advanced to the first position past the match, else ptr is not altered.
Syntax: str_MatchI(&ptr, *str);
| Arguments | Description |
|---|---|
| ptr | Address of the byte pointer to string buffer. |
| str | Pointer string to match. |
Returns: 0 if no match, else advance ptr to the next position after the match and returns a pointer to the match position.
Example
var buffer[100]; // 200 character buffer for a source string
var p, q; // string pointers
var n;
func main()
// string to parse
to(buffer); print( "The sun rises in the East" );
p := str_Ptr(buffer); // string pointer to be used
// with string functions
q := p;
// Will match if the string starts with "The", or "the"
if ( n := str_MatchI( &p, "the" ) )
str_Printf ( &p, "%s\n" ); // print remainder of string
else
print ( "not found\n" );
endif
print ( "startpos=" , q , "\nfindpos=" , n , "\nendpos=" , p );
repeat
forever
endfunc
Note
The address of the pointer must be passed so the function can advance it if required.
str_Find
Case Sensitive. Given the address of a pointer to a source string as the first argument, and a pointer to a test string as the second argument, attempts to find the position of the matching string in the source string. The test is performed with case sensitivity.
Syntax: str_Find(&ptr, *str);
| Arguments | Description |
|---|---|
| ptr | Byte pointer to string buffer. |
| str | String to find. |
Returns: 0 if not found. Returns the address of the first character of the match if successful.
Example
var buffer[100]; // 200 character buffer for a source string
var p; // string pointer
var n;
var strings[4]; // for our test strings
func main()
txt_Set ( FONT_ID, FONT2 );
strings[0] := "useful" ;
strings[1] := "string" ;
strings[2] := "way" ;
strings[3] := "class" ;
to(buffer); print( "and by the way, the string class is rather useful " );
// raise a string pointer so we can use the string functions
p := str_Ptr(buffer);
// offset into the buffer a little so we don't see word "
p := p + 13;
print( "p=" , p , "\n\n" ); // show the start point of our search
n := 0;
while ( n < 4 )
print( "\\"" , [STR] strings[n] , "\" is at pos " , str_Find( &p, strings[n++] ) , "\n" );
wend
//note that p is unchanged
print ( "\nNOTE: p is unchanged, p=" , p );
repeat
forever
endfunc
Note
The source pointer is not altered.
str_FindI
Case Insensitive. Given the address of a pointer to a source string as the first argument, and a pointer to a test string as the second argument, attempts to find the position of the matching string in the source string. The test is performed with case insensitivity, e.g. upper and lower case chars are accepted.
Syntax: str_FindI(&ptr, *str);
| Arguments | Description |
|---|---|
| ptr | Byte pointer to string buffer. |
| str | String to find. |
Returns: 0 if not found. Returns the address of the first character of the match if successful.
Example
var buffer[100]; // 200 character buffer for a source string
var p; // string pointer
var n;
var strings[4]; // for our test strings
func main()
txt_Set ( FONT_ID, FONT2 );
strings[0] := "USEFUL" ;
strings[1] := "string" ;
strings[2] := "way" ;
strings[3] := "class" ;
to(buffer); print ( "and by the way, the String Class is rather useful " );
// raise a string pointer so we can use the string functions
p := str_Ptr(buffer);
// offset into the buffer a little so we don't see word "
p := p + 13;
// show the start point of our search
print( "p=" , p , "\n\n" );
n := 0;
while ( n < 4 )
print( "\"" , [STR] strings[n] , "\" is at pos " , str_FindI(&p , strings[n++] ) ,"\n" );
wend
//note that p is unchanged
print ( "\nNOTE: p is unchanged, p=" , p );
repeat
forever
endfunc
Note
The source pointer is not altered.
str_Length
Returns the length of a byte aligned string excluding terminator.
Syntax: str_Length(ptr);
| Arguments | Description |
|---|---|
| ptr | Pointer to string buffer. |
Returns: String length.
Example
// Dynamic String Example
func main()
var a;
var pa ; //This be a String pointer to a
a := mem_Alloc( 200 ); // allocate a dynamic with undefined data
mem_Set (a, 'X', 200 ); // fill it full of 'X's
pa := str_Ptr(a); // raise a string pointer
str_PutByte(pa+20,0); // Stick a string terminator in the array
print ("a length:", str_Length(pa), "\n"); // show length of the
// dynamic buffer
// using the required string pointer
mem_Free (a); // test is over, free up the memory
repeat
forever
endfunc
func main()
var c[40]; // 80 character buffer for a source string
var pc; // This will be a String pointer to c[]
to(c); print ( "An 'ASCIIZ' string is terminated with a zero" );
pc := str_Ptr(c); // raise a string pointer so we ca n use the
// string functions
print ("c length:", str_Length(pc), "\n"); // show length of the
// 're directed' string
// using the required str ing pointer
repeat
forever
endfunc
str_Printf
This function prints a formatted string from elements derived from a structured byte region. There is only one input argument, the byte region pointer ptr which is automatically advanced as the format specifier string is processed. The format string is similar to the C language, however, there are a few differences, including the addition of the indirection token * (asterix).
Format Specifiers:
| format | Description |
|---|---|
| %c | character |
| %s | string of characters |
| %d | signed decimal |
| %ld | long decimal |
| %u | unsigned decimal |
| %lu | long unsigned decimal |
| %x | hex byte |
| %X | hex word |
| %lX | hex long |
| %b | binary word |
| %lb | long binary word |
(*) indirection prefix (placed after '%' to specify indirect addressing)
(number) width description (use between '%' and format specifier to set the field width).
Syntax: str_Printf(&ptr, *format);
| Arguments | Description |
|---|---|
| ptr | Byte pointer to the input data (structure). |
| format | Format string. |
Returns: The position of last extraction point. This is useful for processing by other string functions.
Example
var buffer[100]; // 200 character buffer for a source string
var p, q; // string pointers
var n;
var m[20]; // for our structure example
var format; // a pointer to a format string
func main()
var k;
// string print example
to (buffer); print ( "\nHELLO WORLD" );
q := str_Ptr (buffer); // raise a string pointer so we can use the
// string functions
p := q;
str_Printf ( &p , "%8s" ); // only prints first 8 characters of
// string
putch ('\n'); // new line
p := q;
k := str_Printf ( &p , "%04s" ); // prints 4 leading spaces before
// string
putch ('\n'); // new line
print ( k ); // if required, the return value points to the last
// source position and is returned for processing by
// other string function
// print structure elements example, make a demo structure
n := 0;
m[n++] := "Mrs Smith" ;
m[n++] := 200 ;
m[n++] := 300 ;
m[n++] := 0xAA55 ;
m[n++] := 500 ;
// make a demo format control string
format := "%*s\n%d\n%d\n%016b\n%04X" ; // format string for printing
// structure m
// print the structure in the required format
p := str_Ptr (m); // point to structure m
str_Printf (&p, format); // use the format string to print the
// structure
endfunc
Note
The address of the pointer must be passed so the function can advance it as required. The format specifier string can be a string pointer, allowing dynamic construction of the printing format. If (number) is preceded by 0, the result is Left-pads with zeroes (0) instead of spaces.
str_Cat
Appends a copy of the source string to the destination string. The terminating null character in destination is overwritten by the first character of source, and a new null-character is appended at the end of the new string formed by the concatenation of both in destination.
Syntax: str_Cat(&destination, &source);
| Arguments | Description |
|---|---|
| destination | Destination string address. |
| source | Source string address. |
Returns: Pointer to the destination.
Example
var buf[100]; // 200 character buffer for a source string
func main()
var p ;
to(buf) ;
print("Hello ") ;
p := str_Ptr(buf) ;
str_Cat(p,"There"); // Will append "There" to the end of buf
print([STR] buf) ;
repeat
forever
endfunc
str_CatN
The number of characters copied is limited by "count". The terminating null character in destination is overwritten by the first character of source, and a new null-character is appended at the end of the new string formed by the concatenation of both in destination.
Syntax: str_CatN(&ptr, str, count);
| Arguments | Description |
|---|---|
| ptr | Destination string address. |
| str | Source string address. |
| count | Number of characters to be concatenated. |
Returns: Pointer to the destination.
Example
var buf[100]; // 200 character buffer for a source string
func main()
var p ;
to(buf) ;
print("Sun ") ;
p := str_Ptr(buf) ;
str_CatN(p,"Monday",3); // Concatenate "Mon" to the end of buf
print([STR] buf) ;
repeat
forever
endfunc
str_ByteMove
Copy bytes from "src" to "dest", stopping only when "count" is exhausted. No terminator is appended, it is purely a byte copy, and any zeroes encountered will also be copied.
Syntax: str_ByteMove(src, dest, count);
| Arguments | Description |
|---|---|
| src | Points to byte aligned source. |
| dest | Points to byte aligned destination. |
| count | Number of bytes to transfer. |
Returns: A pointer to the end of the destination (which is "dest" + "count").
Example
var src, dest, mybuf1[10], mybuf2[10]; // string pointers and two 20 byte buffers
to(mybuf1); putstr("TESTING 123");
src := strPtr(mybuf1);
dest := str_Ptr(mybuf2);
src += 6; // move src pointer to "G 123"
str_ByteMove(src, dest, 6); // move to second buffer (including the zero terminator)
putstr(mybuf2); // print result
nextpos := str_ByteMove(s, d, 100);
str_Copy
Copy a string from "src" to "dest", stopping only when the end of source string "src" is encountered (0x00 terminator). The terminator is always appended, even if "src" is an empty string.
Syntax: str_Copy(dest, src);
| Arguments | Description |
|---|---|
| dest | Points to byte aligned destination. |
| src | Points to byte aligned source. |
Returns: A pointer to the 0x00 string terminator at the end of "dest" (which is "dest" + str_Length(src); ).
Example
str_CopyN
Copy a string from "src" to "dest", stopping only when "count" is exhausted, or end of source string "str" is encountered (0x00 string terminator). The terminator is always appended, even if "count" is zero, or "src" is a null string.
Syntax: str_CopyN(dest, src, count);
| Arguments | Description |
|---|---|
| dest | Points to byte aligned destination. |
| src | Points to byte aligned source. |
| count | Maximum number of bytes to copy. |
Returns: A pointer to the 0x00 string terminator at the end of "dest" (which is "dest" + str_Length(src); ).
Example
System Memory Functions
peekW
Read a word from system memory.
Syntax: peekW(address);
| Arguments | Description |
|---|---|
| address | The address of a memory word. The address is usually a pre-defined system register address constant, (see the address constants for all the system word sized registers in System Register Memory). |
Returns: The 16-bit value stored at address.
Example
var myvar;
myvar := peekW(SYSTEM_TIMER_LO);
// This example places the low word of the 32-bit system timer in myvar.
Note
The txt_Set variables (0-15) and gfx_set variables (16-31) can also be accessed with peekW and pokeW.
pokeW
This function writes a 16-bit value to a location specified by address.
Syntax: pokeW(address, word_value);
| Arguments | Description |
|---|---|
| Address | The address of a memory word. The address is usually a pre-defined system register address constant, (see the address constants for all the system word sized registers in System Register Memory). |
| word_value | The 16-bit word_value will be stored at address. |
Returns: None
Example
Note
the txt_Set variables (0-15) and gfx_set variables (16-31) can also be accessed with peekW and pokeW.
Text and String Functions
txt_MoveCursor
Moves the text cursor to a screen position set by line and column parameters. The line and column position is calculated, based on the size and scaling factor for the currently selected font. When text is outputted to screen it will be displayed from this position. The text position could also be set with gfx_MoveTo(...); if required to set the text position to an exact pixel location. Note that lines and columns start from 0. So, line 0, column 0 is the top left corner of the display.
Syntax: txt_MoveCursor(line, column);
| Arguments | Description |
|---|---|
| line | Holds a positive value for the required line position. |
| column | Holds a positive value for the required column position. |
Returns: None
Example
Note
This function sets the TEXT_MARGIN the x value, this is so you can easily left align text using \n. If you don’t want this, simply set TEXT_MARGIN to 0 using pokeW(TEXT_MARGIN,0).
putch
putch prints single characters to the current output stream, usually the display.
Syntax: putch(char);
| Arguments | Description |
|---|---|
| char | Holds a positive value for the required character. |
Returns: None
Example
var v;
v := 0x39;
putch(v); // print the number 9 to the current display location
putch('\n'); // newline
putchXY
putchXY prints a single character at position x, y.
Syntax: putchXY(xpos, ypos, char);
| Arguments | Description |
|---|---|
| xpos | Specifies the horizontal position of the character. |
| ypos | Specifies the vertical position of the character. |
| char | Holds a positive value for the required character. |
Returns: None
Example
Note
This function will also update the origin.
putstr
putstr and, similarly print([STR]x); operate on constant strings in Flash, or word aligned strings in RAM.
putstr prints a string to the current output stream, usually the display.
A string constant is automatically terminated with a zero.
A string in a data statement is not automatically terminated with a zero.
All variables in 4DGL are 16bit, if an array is used for holding 8-bit characters; each array element packs 1 or 2 characters.
Syntax: putstr(string);
| Arguments | Description |
|---|---|
| string | A string constant, a word pointer to a string, a pointer to an array, or a pointer to a data statement. Note that for a byte aligned RAM string you need to use str_Printf. |
Returns: The pointer to the item that was printed.
Example
// Example #3 printing strings from data table
#DATA
byte message "Week",0
word days sun,mon,tue,wed,thu,fr i,sat // pointers to data items
byte sun "Sunday\n 0"
byte mon "Monday\n 0"
byte tue "Tuesday\n 0"
byte wed "Wednesday\n 0"
byte thu "Thursday\n 0"
byte fri "Friday\n 0"
byte sat "Saturday\n 0"
#END
var n;
n:=0;
while(n < 7)
putstr(days[n++]); // print the days
wend
putstrXY
putstrXY prints a string at position x, y on the display.
A string constant is automatically terminated with a zero.
A string in a data statement is not automatically terminated with a zero.
All variables in 4DGL are 16bit, if an array is used for holding 8-bit characters; each array element packs 1 or 2 characters.
Syntax: putstrXY(xpos, ypos, string);
| Arguments | Description |
|---|---|
| xpos | Specifies the horizontal position of the string. |
| ypos | Specifies the vertical position of the string. |
| string | A string constant, a word pointer to a string, a pointer to an array, or a pointer to a data statement. Note that for a byte aligned RAM string you need to use str_Printf in conjunction with gfx_MoveTo(x,y) command. |
Returns: None
Example
// Example #3 printing strings from data table
#DATA
byte message " Week",0
word days sun,mon,tue,wed,thu,fri,sat // pointers to data items
byte sun "Sunday\0"
byte mon "Monday\0"
byte tue "Tuesday\0"
byte wed "Wednesday\0"
byte thu "Thursday\0"
byte fri "Friday\0"
byte sat "Saturday\0"
#END
var n; n:=0;
while(n < 7)
putstrXY(0, n+10, days[n++]); // print the days
wend
putstrCentred
putstrCentred prints a string centered at position x, y on the display.
A string constant is automatically terminated with a zero.
A string in a data statement is not automatically terminated with a zero.
All variables in 4DGL are 16bit, if an array is used for holding 8-bit characters; each array element packs 1 or 2 characters.
Syntax: putstrCentred(xc, yc, string);
| Arguments | Description |
|---|---|
| xc | Specifies the horizontal position of the string. |
| yc | Specifies the vertical position of the string. |
| string | A string constant, a pointer to a string, a pointer to an array, or a pointer to a data statement. |
Returns: None
Example
putstrCentred(120, 0, "4D Lab's\n"); // Print 4D Labs centered at 120, 0
// Assuming X-resolution = 240, this command will print ‘4D Labs’ in the top-middle of the screen.
Note
The string constants and data statement pointers are byte aligned.
putnum
putnum prints a 16bit number in various formats to the current output stream, usually the display.
Number formatting bits supplied by format
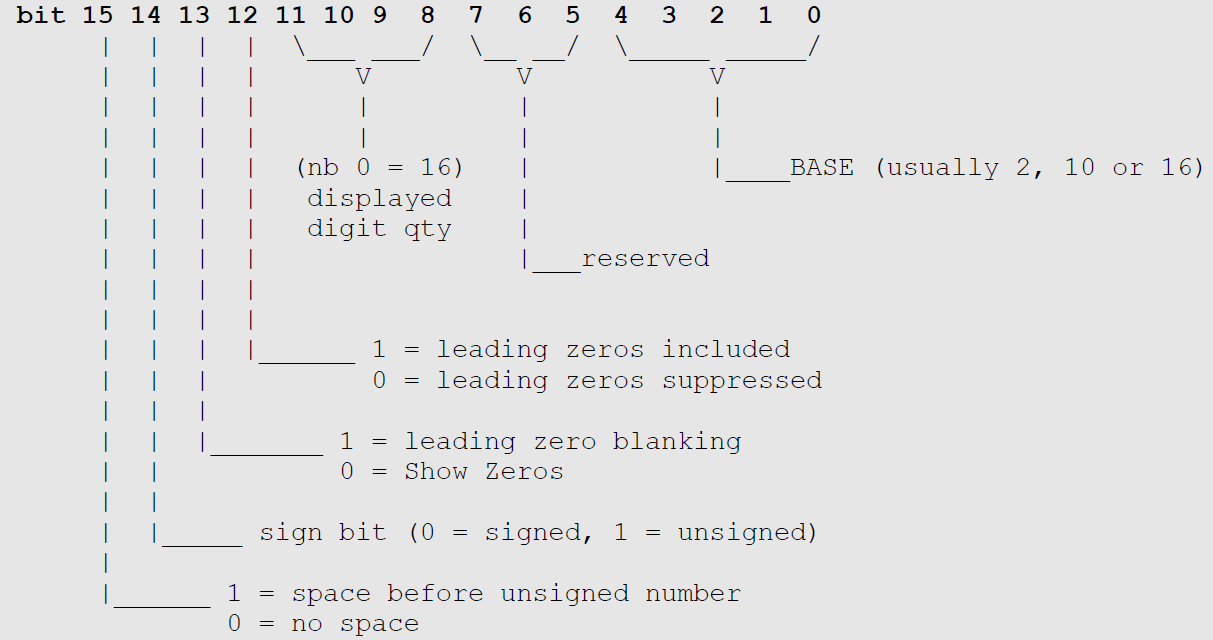
Pre-Defined format constant quick reference
| DEC | DECZ | DECZB |
| DEC1 | DEC1Z | DEC1ZB |
| DEC2 | DEC2Z | DEC2ZB |
| DEC3 | DEC3Z | DEC3ZB |
| DEC4 | DEC4Z | DEC4ZB |
| DEC5 | DEC5Z | DEC5ZB |
| UDEC | UDECZ | UDECZB |
| UDEC1 | UDEC1Z | UDEC1ZB |
| UDEC2 | UDEC2Z | UDEC2ZB |
| UDEC3 | UDEC3Z | UDEC3ZB |
| UDEC4 | UDEC4Z | UDEC4ZB |
| UDEC5 | UDEC5Z | UDEC5ZB |
| HEX | HEXZ | HEXZB |
| HEX1 | HEX1Z | HEX1ZB |
| HEX2 | HEX2Z | HEX2ZB |
| HEX3 | HEX3Z | HEX3ZB |
| HEX4 | HEX4Z | HEX4ZB |
| BIN | BINZ | BINZB |
| BIN1 | BIN1Z | BIN1ZB |
| BIN2 | BIN2Z | BIN2ZB |
| BIN3 | BIN3Z | BIN3ZB |
| BIN4 | BIN4Z | BIN4ZB |
| BIN5 | BIN5Z | BIN5ZB |
| BIN6 | BIN6Z | BIN6ZB |
| BIN7 | BIN7Z | BIN7ZB |
| BIN8 | BIN8Z | BIN8ZB |
| BIN9 | BIN9Z | BIN9ZB |
| BIN10 | BIN10Z | BIN10ZB |
| BIN11 | BIN11Z | BIN11ZB |
| BIN12 | BIN12Z | BIN12ZB |
| BIN13 | BIN13Z | BIN13ZB |
| BIN14 | BIN14Z | BIN14ZB |
| BIN15 | BIN15Z | BIN15ZB |
| BIN16 | BIN16Z | BIN16ZB |
Syntax: putnum(format, value);
| Arguments | Description |
|---|---|
| format | A constant that specifies the number format. |
| value | The number to be printed. |
Returns: The default width of the numeric field (digit count), usually ignored.
Example
var v;
v := 05678;
putnum(HEX, v); // print the number as hex 4 digits
putnum(BIN, v); //print the number as binary 16 digits
4DGL has a versatile print(...) statement for formatting numbers and strings. In its simplest form, print will simply print a number as can be seen below:
myvar := 100;
print(myvar);
// This will print **100** to the current output device (usually the display in TEXT mode).
Note
If you wish to add a string anywhere within a print(...) statement, just place a quoted string expression and you will be able to mix strings and numbers in a variety of formats. See the following example.
(*) Refer the table in putnum(..) for all the numeric representations available.
The print(...) statement will accept directives passed in square brackets to make it print in various ways, for instance, if you wish to print a number in 4 digit hex, use the [HEX4] directive placed in front of the variable to be displayed within the print statement. See the following example.
Note
There are 2 print directives that are not part of the numeric set and will be explained separately. these are the [STR] and [CHR] directives.
The [STR] directive expects a string pointer to follow:
s := "Hello World"; // assign a string constant to s
print("Var 's' points to a string constant at address", s ," which is", [STR] s);
The [CHR] directive prints the character value of a variable.
also
Note
You can freely mix string pointers, strings, variables and expressions within a print statement. print(...) can also use the to(...) function to redirect it's output to a different output device other than the screen using the function (refer to the to(...) statement for further examples).
Syntax: print(...);
Returns: None
Example
#platform "uLCD-70DT"
// DATA STATEMENT
#DATA
word myData
myString1, Bert, Fred, main, myString2, baud, barney, 0x1111, 0x2222, 0x3333, 0x4444
byte myString1 "Data String OK\n\n",0
byte myString2 "\"(and forward\n\n",0
word baud 150, 300, 600, 1200, 2400, 9600
#END
// this constant is a forward reference
#constant barney 9876
func Fred(var str)
print("string = ", [STR] str);
endfunc
func Bert(var p1, var p2, var p3)
print("hello from Bert\np1=",p1,"\np2=",p2, "\np3=",p3,"\n");
return "Bert was here\n";
endfunc
func main()
var fn; // a variable for a handle for the function
txt_Set(FONT_ID, FONT 1);
fn := myData[1]; //Get function pointer from data statement index
print( [STR] fn(100,200,300) );
// use it in a statement to prove engine ok
fn := myData[2]; //Get function pointer from data statement index
fn("ABC\n"); // execute the function
// just shows where main lives
print("\naddress of main = code[", myData[3],"]\n\n");
// remember a var can be a handle, variable, pointer or vector
print( [STR] myData[0]); // pointer table data reference
print( [STR] myData[4]);
repeat forever
endfunc
to
to() sends the printed output to destinations other than the screen. Normally, print just sends its output to the display in TEXT mode which is the default, however, the output from print can be sent to 'streams', e.g. – COM0, COM1, COM2, or COM3, an open FAT16 file with DSK, to raw media with MDA (media), or to the I2C ports with I2C1, I2C2 or I2C3.
The to(...) function can also stream to a memory array . Note that once the to(...) function has taken effect, the stream reverts back to the default stream which is TEXT as soon as putch, putstr, putnum, print, or str_Printf has completed its action.
The APPEND argument is used to append the printed output to the same place as the previous redirection. This is most useful for building string arrays, or adding sequential data to a media stream.
| Predefined Name | Constant | putch, putstr, putnum, print, str_Printf redirection |
|---|---|---|
| DSK | 0xF802 | Output is directed to the most recently open file that has been opened in write mode. |
| COM0 | 0xF804 | Output is redirected to the COM0 (default serial) port. |
| COM1 | 0xFF05 | Output is redirected to the COM1 port. |
| COM2 | 0xFF06 | Output is redirected to the COM2 port. |
| COM3 | 0xFF07 | Output is redirected to the COM3 port. |
| I2C1 | 0xF820 | Output is directed to the I2C1 port. |
| I2C2 | 0xF821 | Output is directed to the I2C2 port. |
| I2C3 | 0xF822 | Output is directed to the I2C3 port. |
| MDA | 0xF840 | Output is directed to the SD/SDHC or FLASH media. |
| APPEND | 0x0000 | Output is appended to user array if previous redirection was to an array. |
| (memory pointer) | Array Address | Output is redirect to the memory pointer argument. |
Warning
Becareful writing to a FAT16 formatted card without checking legal partitioned are, else the disk formatting will be destroyed.
Syntax: to(iostream);
| Arguments | Description |
|---|---|
| iostream | A variable or constant specifying the destination for the putch, putstr, putnum, print and str_Printf functions. |
Returns: None
Example
// Example #1 putstr redirection
var buf[10]; // a buffer that will hold up to 20 bytes/chars
var s; // a var for use as a pointer
to(buf); putstr("ONE "); // redirect putstr to the buffer
to(APPEND); putstr("TWO "); // and add a couple more items
to(APPEND); putstr("THREE\n");
putstr(buf); // print the result to the display
while (media_Init()==0); // wait if no SD/SDHC card detected
media_SetSector(0, 2); // at sector 2
//media_SetAdd(0, 1024); // (alternatively, use media_SetAdd(),
// lower 9 bits ignored).
to(MDA); putstr("Hello World"); // now write a ascii test string
media_WriteByte('A'); // write a further 3 bytes
media_WriteByte('B');
media_WriteByte('C');
to(MDA); putstr(buf); // write the buffer we prepared earlier
media_WriteByte(0); // terminate with ASCII zero
media_Flush();
media_SetAdd(0, 1024); // reset the media address
while(char:=media_ReadByte())
to(COM0); putch(char); // print the stored string to the COM port
wend
repeat forever
charwidth
charwidth is used to calculate the width in pixel units for a character, based on the currently selected font.
Syntax: charwidth('char');
| Arguments | Description |
|---|---|
| char | The ascii character for the width calculation. |
Returns: The width of a single character in pixel units.
Example
// Example
str := "HELLO\nTHERE"; // note that this string spans 2 lines due
// to the \n.
width := strwidth(str); // get the width of the string, this will
// a lso capture the height.
height := strheight(); // note, invoking strwidth also calcs height
// which we can now read.
// The string above spans 2 lines, strheight(.) will calculate height correctly for multiple lines.
len := strlen(str); // the strlen() function returns the number of characters in a string.
print("\nLength=",len); // NB: the \n in "HELLO \nTHERE" is counted as a character.
txt_FontID(MS_SanSerif8x12); // select this font
w := charwidth('W'); // get a characters width
h := charheight('W'); // and height
txt_FontID(0); // back to default font
print ("\n'W' is " ,w, " pixels wide"); // show width of a character 'W' in pixel units.
print ("\n'W' is " ,h, " pixels high"); // show height of a character 'W' in pixel units.
charheight
charheight is used to calculate the height in pixel units for a character, based on the currently selected font.
Syntax: charheight('char');
| Arguments | Description |
|---|---|
| char | The ascii character for the height calculation. |
Returns: The height of a single character in pixel units.
Example: See example in charwidth.
strwidth
strwidth returns the width of a zero terminated string in pixel units. Note that any string constants declared in your program are automatically terminated with a zero as an end marker by the compiler. Any string that you create in the DATA section or MEM section must have a zero added as a terminator for this function to work correctly.
Syntax: strwidth(pointer);
| Arguments | Description |
|---|---|
| pointer | The pointer to a zero (0x00) terminated string. 'pointer' may be a constant or pointer to word aligned variable. |
Returns: The width of a string in pixel units, can be multi line.
Example: See example in charwidth.
strheight
strheight returns the height of a zero terminated string in pixel units. The strwidth function must be called first which makes available width and height. Note that any string constants declared in your program are automatically terminated with a zero as an end marker by the compiler. Any string that you create in the DATA section or MEM section must have a zero added as a terminator for this function to work correctly.
Syntax: strheight();
Returns: The height of a string in pixel units, can be multi line.
Example: See example in charwidth.
strlen
strlen returns the length of a zero terminated string in character units. Note that any string constants declared in your program are automatically terminated with a zero as an end marker by the compiler. Any string that you create in the DATA section or MEM section must have a zero added as a terminator for this function to work correctly.
Syntax: strlen(pointer);
| Arguments | Description |
|---|---|
| pointer | The pointer to a zero (0x00) terminated string. |
Returns: The length of a string in character units.
Example: See example in charwidth.
unicode_page
After selecting a Unicode image control with txt_FontID, this function is called to set the required font within the Unicode set. The file "Unicode.inc" contains wrappers for this function, and it is not normally called directly.
Refer to Unicode documentation ‘4DGL-Unicode-REVx.pdf’ and ‘Unicode.inc’ for further information.
Syntax: unicode_page(charbeg, charend, charoffset);
| Arguments | Description |
|---|---|
| charbeg | Offset of first character in Unicode set. |
| charend | Offset of ending character in Unicode Set. |
| charoffset | Offset of first ASCII character in Unicode Set. |
Returns: Count of characters in the set.
Example: See Unicode.inc
txt_Set
Given a function number and a value, set the required text control parameter, such as size, colour, and other formatting controls. This function is extremely useful in a loop to select multiple parameters from a data statement or a control array. Note also that each function available for txt_Set has a single parameter 'shortcut' function that has the same effect.
| # | Predefined Name | Description | Value |
|---|---|---|---|
| 0 | TEXT_COLOUR | Set the text foreground colour. | Colour 0-65535 Default = LIME |
| 1 | TEXT_HIGHLIGHT | Set the text background colour. | Colour 0-65535 Default = BLACK |
| 2 | FONT_ID | Set the required font. See font table Note: The value could be the name of a custom font included in a users program in a data statement. |
1 to 11 or (FONT_1 to FONT_11) Default = FONT_3 |
| 3 | TEXT_WIDTH | Set the text width multiplier. Text will be printed magnified horizontally by this factor. | 1 to 16 Default = 1 |
| 4 | TEXT_HEIGHT | Set the text height multiplier. Text will be printed magnified vertically by this factor. | 1 to 16 Default = 1 |
| 5 | TEXT_XGAP | Set the pixel gap between characters. The gap is in pixel units. | 0 to 32 Default = 0 |
| 6 | TEXT_YGAP | Set the pixel gap between lines. The gap is in pixel units. | 0 to 32 Default = 0 |
| 7 | TEXT_PRINTDELAY | Set the delay between character printing to give a 'teletype' like effect. | 0 to 255 Default = 0 msec |
| 8 | TEXT_OPACITY | Selects whether or not the 'background' pixels are drawn. | 0 or TRANSPARENT 1 or OPAQUE Default = 1 (OPAQUE) |
| 9 | TEXT_BOLD | Sets Bold Text mode for the next string or char. The feature automatically resets after printing using putstr or print has completed. | 0 or 1 (OFF or ON ) |
| 10 | TEXT_ITALIC | Sets Italic Text mode for the next string or char. The feature automatically resets after printing using putstr or print has completed. | 0 or 1 (OFF or ON ) |
| 11 | TEXT_INVERSE | Sets Inverse Text mode for the next string or char. The feature automatically resets after printing using putstr or print has completed. | 0 or 1 (OFF or ON ) |
| 12 | TEXT_UNDERLINED | Sets Underlined Text mode for the next string or char. The feature automatically resets after printing using putstr or print has completed. | 0 or 1 (OFF or ON ) |
| 13 | TEXT_ATTRIBUTES | Allows a combination of text attributes to be defined together by 'or'ing the bits together. The feature automatically resets after printing using putstr or print has completed. Example: txt_Set(TEXT_ATTRIBUTES, BOLD | INVERSE); // bold + inverse Note: bits 0-3 and 8-15 are reserved. |
16 or BOLD 32 or ITALIC 64 or INVERSE 128 or UNDERLINED |
| 14 | TEXT_WRAP | Sets the pixel position where text wrap will occur at RHS The feature automatically resets when screen mode is changed. If the value is set to 0, text wrap is turned off of the current screen. Note: The value is in pixel. |
0 to n (OFF or Value) Default = 0 |
| 15 | TEXT_ANGLE | Sets the text angle, only for plotted fonts. The feature automatically resets when screen mode is changed. | 0 to 359 degrees |
Single parameter short-cuts for txt_Set() functions.
| Function Syntax | Function Action | Value |
|---|---|---|
| txt_FGcolour(colour) | Set the text foreground colour. | Colour 0 - 65535 Default = LIME |
| txt_BGcolour(colour) | Set the text background colour. | Colour 0 - 65535 Default = BLACK |
txt_FontID |
Set the required font. See Font table. Note: The value could also be the name of a custom font included in a users program in a data statement, or the handle returned from file_LoadImageControl() for a uSD based font. |
1 to 11 or (FONT_1 to FONT_11) Default = FONT_3 |
| txt_Width(multiplier) | Set the text width multiplier. Text will be printed magnified horizontally by this factor. | 1 to 16 Default = 1 |
| txt_Height(multiplier) | Set the text height multiplier. Text will be printed magnified vertically by this factor. | 1 to 16 Default = 1 |
| txt_Xgap(pixelcount) | Set the pixel gap between characters. The gap is in pixel units. | 0 to 32 Default = 0 |
| txt_Ygap(pixelcount) | Set the pixel gap between lines. The gap is in pixel units. | 0 to 32 Default = 0 |
| txt_Delay(millisecs) | Set the delay between character printing to give a 'teletype' like effect. | 0 to 255 Default = 0 msec |
| txt_Opacity(mode) | Selects whether or not the 'background' pixels are drawn (default mode is OPAQUE) |
0 or TRANSPARENT 1 or OPAQUE Default = 0 |
| txt_Bold(mode) | Sets Bold Text mode for the next string or char. The feature automatically resets after printing using putstr or print has completed. | 0 or 1 (OFF or ON) |
| txt_Italic(mode) | Sets Italic Text mode for the next string or char. The feature automatically resets after printing using putstr or print has completed. | 0 or 1 (OFF or ON) |
| txt_Inverse(mode) | Sets Inverse Text mode for the next string or char. The feature automatically resets after printing using putstr or print has completed. | 0 or 1 (OFF or ON) |
| txt_Underlined | Sets Underline Text mode for the next string or char. The feature automatically resets after printing using putstr or print has completed. | 0 or 1 (OFF or ON) |
| txt_Attributes(value) | Allows a combination of text attributes to be defined together by 'or'ing the bits together. The feature automatically resets after printing using putstr or print has completed. Example: txt_Set(TEXT_ATTRIBUTES, BOLD | INVERSE); // bold + inverse Note: bits 0-3 and 8-15 are reserved. |
|
| txt_Wrap(value) | Sets the pixel position where text wrap will occur at RHS. The feature automatically resets when screen mode is changed. If the value is set to 0, text wrap is turned off of the current screen. Note:bits 0-3 and 8-15 are reserved. |
16 or BOLD 32 or ITALIC 64 or INVERSE 128 or UNDERLINED |
| txt_Angle(value) | Sets the text angle, only for plotted fonts. The feature automatically resets when screen mode is changed. | 0 to 359 degrees |
Font Table
| Font ID | Value |
|---|---|
| System_5x7 | 1 or FONT_1 |
| System_8x8 | 2 or FONT_2 |
| System_8x12 | 3 or FONT_3 |
| System_12x16 | 4 or FONT_4 |
| MS_SanSerif8x12 | 5 or FONT_5 |
| dejaVuSans9pt | 6 or FONT_6 |
| dejaVuSansBold9pt | 7 or FONT_7 |
| dejaVuSansCondensed9pt | 8 or FONT_8 |
| System_3x6 | 9 or FONT_9 |
| plotted | 10 or FONT_10 |
| EGA 8x12 font | 11 or FONT_11 |
Note
The value could be the name of a custom font included in a users program in a data statement.
Syntax: txt_Set(function, value);
| Arguments | Description |
|---|---|
| functions | The function number determines the required action for various text control functions. Usually a constant, but can be a variable, array element, or expression. There are pre-defined constants for each of the functions. |
| value | A variable, array element, expression or constant holding a value for the selected function. |
Returns: None
Example: TODO
txt_FontBank
Enables the usage of fonts stored in banks. See the FontInBankTest and BookAntiqua2032FontsInBank1 samples. If a single font is the only thing in a bank its address will be 7, otherwise look in the .lst file from the compile to find the address of the font. Assuming there is space available multiple fonts can be stored in the same bank.
Syntax: txt_FontBank(bank, address);
| Arguments | Description |
|---|---|
| bank | The bank that the font is stored in. |
| address | The address of the font within the bank. |
Returns: The current font before the change.
Example
putnumXY
putnumXY prints a 16bit number in various formats to the current output stream, usually the display at the specified position. The Formats are the same as for the putnum command.
Syntax: putnumXY(x, y, format, value);
| Arguments | Description |
|---|---|
| x | The x position to start printing the number in. |
| y | The y position to start printing the number in. |
| format | A constant that specifies the number format. |
| value | The number to be printed. |
Returns: The default width of the numeric field (digit count), usually ignored.
Example
var v;
v := 05678;
putnumXY(0, 0, HEX, v); // print the number as hex 4 digits
putnumXY(0, 20, BIN, v); // print the number as binary 16 digits
Timer Functions
sys_T
Returns the current value of the rolling 32bit system timer (1mse) LO word.
Syntax: sys_T();
Returns: The value of system timer. (LO Word)
Example
sys_T_HI
Returns the current value of the rolling 32bit system timer (1mse) HI word.
Syntax: sys_T_HI();
Returns: The value of system timer. (HI Word)
Example
sys_SetTimer
Set a countdown on the selected timer or 'top-up' if required. There are 8 timers TIMER0 to TIMER7 which stop at the count of 0. Maximum timeout period is 65, 535 milliseconds or 65.535 seconds. A timer can be read with the sys_GetTimer("timernum") function.
Syntax: sys_SetTimer(timernum, value);
| Arguments | Description |
|---|---|
| timernum | value |
| timernum | One of eight timers TIMER0 to TIMER7. |
| value | Countdown period in milliseconds. |
Returns: None
Example
sys_GetTimer
Returns 0 if timer has expired, or the current countdown value. There are 8 timers TIMER0 to TIMER7 which stop at the count of 0. Maximum timeout period is 65, 535 milliseconds or 65.535 seconds.
A timer can be set with the sys_SetTimer("timernum", "value") function.
Syntax: sys_GetTimer(timernum);
| Arguments | Description |
|---|---|
| timernum | One of eight timers TIMER0 to TIMER7. |
Returns: 0 if timer has expired, or the current countdown value.
Example
sys_SetTimerEvent
Set a function to be called for selected timer. When the timer reaches zero, the function is called. The called function must not have any parameters, and should not have a return value. This is necessary because the timer event is invoked asynchronously to the mainline program (i.e, it is not called in the normal way, so parameters and return values don’t apply).
sys_SetTimerEvent(timernum, 0) disables the timer event.
Note
When a child process is run using the file_run or file_exec function, or if a file was loaded with file_Loadfunction and is executed, the loaded process gets its own code and memory space, therefore, any timer that reaches zero that has a timer event attached in the parent code space, will fail and cause a crash as an attempt is made to force the program counter to some wild place in the child process - There are 2 ways to overcome this problem.
- If a child process will not be requiring the use of any timers or timer events, the parent program can simply use the eventsPostpone() function before calling or entering the child process. Once the parent program regains control, the eventsResume() function will allow any events in the queue to then be processed. The side effect of this method is that several events may bank up, and will execute immediately once the eventsResume() takes place. This however disallows a child process to use any timer events in the sub program so method 2 is preferable in this case.
- The parent program can 'disconnect' the event(s) by setting it/them to zero prior to child process execution, or setting the associated timer to zero so the event wont fire. In either case, it is necessary to do the following:
while(sys_EventQueue());
to ensure the event queue is empty prior to calling the child process. Note also that if just the timer is set to zero, the child process cannot use this timer. If the timer was now set to a value and the old event still existed, when the timer reaches zero the 'bad' parent address event will fire causing a crash.
The reverse situation also applies of course, the same level of respect is required if a child program needs to use any timer events. Method [1] (above) will not work as the events have been postponed, stopping the child process from using any timer events. If the child process did an eventsResume() in this case, everything would crash miserably. So the same applies, a child that uses any timer events must respect any timers that may be used by the parent, and a child must zero the sys_SetTimerEvent before returning to the parent.
Syntax: sys_SetTimerEvent(timernum, function);
| Arguments | Description |
|---|---|
| timernum | One of eight timers TIMER0 to TIMER7. |
| function | Event Function to be queued. |
Returns: Any previous event function address, or zero if there was no previous function.
Example
sys_EventQueue
Returns the max number of events that were pending in the event queue since the last call to this function. This can be used to assess event overhead burden, especially after or during a sys_EventsPostpone action.
Syntax: sys_EventQueue();
Returns: Number of events.
Example
sys_EventsPostpone
Postpone any events until the sys_EventResume function is executed. The event queue will continue to queue events, but no action will take place until a sys_EventResume function is encountered. The queue will continue to receive up to 32 events before discarding any further events. This function is required to allow a sequence of instructions or functions to occur that would otherwise be corrupted by an event occurring during the sequence of instructions or functions. A good example of this is when you set a position to print, if there was no way of locking the current sequence, an event may occur which does a similar thing, and a contention would occur - printing to the wrong position. This function should be used wisely, if any action that is required would take considerable time, it is better to disable any conflicting event functions with a bypass flag, then restart the conflicting event by re-issuing a timer value.
Syntax: sys_EventsPostpone();
Returns: None
Example
sys_EventsResume
Resume any postponed events. The queue will try to execute any events that were incurred during the postponed period. Note that queued events are only checked for and executed at the end of each 4DGL instruction.
Syntax: sys_EventsResume();
Returns: None
Example
sys_DeepSleep
Deep Sleep is a sleep state that is ‘deeper’ than the regular Sleep (for most display modules) and therefore consumes less power. Some displays do not support being powered to a lower state, so sleep and deepsleep power consumption can sometimes be roughly the same.
Puts the display and processor into the lowest power mode for a period of time. If "units" is zero, the display goes into sleep mode forever and needs power cycling to re-initialize. If "units" is 1 to 65535, the display will sleep for that period of time, or will be woken when touch screen is touched. The function returns the count of "units" that are remaining when the screen was touched. When returning from deep sleep mode, some displays might lose their screen and/or need to be reinitialised with disp_Init().
New in v0.7 PmmC.
Syntax: sys_DeepSleep(units);
| Arguments | Description |
|---|---|
| units | Sleep timer units are approx 1 second. When in sleep mode, timing is controlled by an RC oscillator, therefore, timing is not totally accurate and should not be relied on for timing purposes. |
Returns: Remaining time units when touch screen is touched, else returns zero.
Example
sys_Sleep
Regular sleep, which puts the display and processor into low power mode for a period of time. If "units" is zero, the display goes into sleep mode forever and needs power cycling to re-initialize. If "units" is 1 to 65535, the display will sleep for that period of time, or will be woken when touch screen is touched. The function returns the count of "units" that are remaining when the screen was touched. When returning from sleep mode, the display and processor are restored from low power mode.
Note
sys_Sleep() was found to have an issue in PmmC’s prior to R33, the units value was not always near 1 second. This has been corrected in PmmC R33.
Syntax: sys_Sleep(units);
| Arguments | Description |
|---|---|
| units | Sleep timer units are approx 1 second. When in sleep mode, timing is controlled by an RC oscillator, therefore, timing is not totally accurate and should not be relied on for timing purposes. |
Returns: Remaining time units when touch screen is touched, else returns zero.
Example
iterator
Sets the iterator size for the next postinc, postdec, preinc or predec by a specified value. The offset will return to 1 after the next operation.
Syntax: iterator_(offset);
| Arguments | Description |
|---|---|
| offset | Offset size for the next ++ or - - command. |
Returns: None
Example
sys_GetDate
Print the system date in the format "DD-MM-YYYY"
Can be captured to a buffer using the to() function.
Syntax: sys_Getdate();
Returns: None
Example
sys_GetTime
Print the system time in the format "HH:MM:SS"
Can be captured to a buffer using the to() function.
Syntax: sys_GetTime(); |
Returns: None
Example
sys_SetDate
Used to set clock to correct date after power up or suspension.
If an I2C real time clock is present, this function can be used to synchronize the internal date to the I2C RTC date.
Returns true if valid date.
Syntax: sys_SetDate(year, month, day);
| Arguments | Description |
|---|---|
| year | Year argument can be a variable, array element, expression or constant. |
| month | Month argument can be a variable, array element, expression or constant. |
| day | Day argument can be a variable, array element, expression or constant. |
Returns: TRUE if valid date.
Example
sys_SetTime
Used to set clock to correct time after power up or suspension.
If an I2C real time clock is present, this function can be used to synchronize the internal time to the I2C RTC time.
Returns true if valid time.
Syntax: sys_SetTime(hour, minute, second);
| Arguments | Description |
|---|---|
| hour | Hour argument can be a variable, array element, expression or constant. |
| minute | Minute argument can be a variable, array element, expression or constant. |
| second | Second argument can be a variable, array element, expression or constant. |
Returns: TRUE if valid time.
Example
sys_GetDateVar
Returns the current year, month and day into variables.
Syntax: sys_GetDateVar(&year, &month, &day);
| Arguments | Description |
|---|---|
| year | Specifies the address for the storage location of the returned year value. |
| month | Specifies the address for the storage location of the returned month value. |
| day | Specifies the address for the storage location of the returned day value. |
Returns: None
Example
sys_GetTimeVar
Returns the current hour, minute, second and millisecond into variables.
Syntax: ``
| Arguments | Description |
|---|---|
| hour | Specifies the address for the storage location of the returned hour value. |
| minute | Specifies the address for the storage location of the returned minute value. |
| second | Specifies the address for the storage location of the returned second value. |
| msecs | Specifies the address for the storage location of the returned milli-second value. |
Returns: None
Example
Touch Screen Functions
touch_DetectRegion
Specifies a new touch detect region on the screen. This setting will filter out any touch activity outside the region and only touch activity within that region will be reported by the status poll touch_Get(TOUCH_STATUS) function.
Syntax: touch_DetectRegion(x1, y1, x2, y2);
| Arguments | Description |
|---|---|
| x1 | specifies the horizontal position of the top left corner of the region. |
| y1 | specifies the vertical position of the top left corner of the region. |
| x2 | specifies the horizontal position of the bottom right corner of the region. |
| y2 | specifies the vertical position of the bottom right corner of the region. |
Returns: None
Example
gfx_Rectangle(100, 100, 201, 201, YELLOW); // draw a rectangle with a yellow border
touch_DetectRegion(101, 101, 200, 200); // limit touch detect region towithin the rectangle
touch_Set
Sets various Touch Screen related parameters.
mode = TOUCH_ENABLE (Mode 0) Enable Touch Screen.
touch_Set(TOUCH_ENABLE); - Enables and initialises Touch Screen hardware
mode = TOUCH_DISABLE (Mode 1) Disable Touch Screen.
touch_Set(TOUCH_DISABLE); - Disables the Touch Screen.
mode = TOUCH_REGIONDEFAULT (Mode 2) Default Touch Region.
touch_Set(TOUCH_REGIONDEFAULT); - This will reset the current active region to default which is the full screen area
Note
Touch Screen task runs in the background and disabling it when not in use will free up extra resources for 4DGL CPU cycles.
Syntax: touch_Set(mode);
| Arguments | Description |
|---|---|
| mode | mode = TOUCH_ENABLE mode = TOUCH_DISABLE mode = TOUCH_REGIONDEFAULT |
Returns: None
Example
touch_Get
Returns various Touch Screen parameters to caller. Sometimes NOTOUCH can be returned when the touchscreen is touched and held (in between pressed and released). This occurs if the touch points are identical on two successive calls, because it does not qualify as MOVING, but it has not yet been RELEASED (but has already been PRESSED)
mode = TOUCH_STATUS (Mode 0) - Returns the various states of the touch screen
- 0 = NOTOUCH
- 1 = TOUCH_PRESSED
- 2 = TOUCH_RELEASED
- 3 = TOUCH_MOVING
mode = TOUCH_GETX (Mode 1) - Returns the X coordinates of the touch reported by mode 0
mode = TOUCH_GETY (Mode 2) - Returns the Y coordinates of the touch reported by mode 0
Syntax: touch_Get(mode);
| Arguments | Description |
|---|---|
| mode | mode = TOUCH_STATUS (Mode 0): Get Status mode = TOUCH_GETX (Mode 1) : Get X coordinates mode = TOUCH_GETY (Mode 2) : Get Y coordinates |
Returns: The various states of the touch screen
0 = NOTOUCH
1 = TOUCH_PRESSED
2 = TOUCH_RELEASED
3 = TOUCH_MOVING
Example
state := touch_Get(TOUCH_STATUS); // get touchscreen status
x := touch_Get(TOUCH_GETX);
y := touch_Get(TOUCH_GETY);
if (state == TOUCH_PRESSED) // see if Exit hit
if ( x > 170 && y > 280 ) // EXIT button
gfx_Cls();
exit := 1;
endif
if (vertical)
if ( x > 170 && (y > 240 && y < 270 ))// Horiz button
vertical := 0;
exit := 1;
endif
else if ( x > 170 && (y > 200 && y < 230 ))// Vert button
vertical := 1;
exit := 2;
endif
endif
endif
touch_TestArea
The touch_TestArea function creates a test area based on the parameters in rect, and returns true if the last touch resided within the test area.
rect is an array of 4 vars, x1, y1, x2, y2 (using absolute co-ordinates).
Syntax: touch_TestArea(&rect);
| Arguments | Description |
|---|---|
| rect | An array of 4 vars, x1, y1, x2, y2 (using absolute co-ordinates). |
Returns: TRUE if last touch co-ordinates are within the absolute co-ordinate test area.
Example
var x, y, state;
var r[5] := [30, 30, 130, 130];
var curStatus := 0, prevStatus := 0;
gfx_ScreenMode(LANDSCAPE) ; // change manually if orientation change
gfx_Rectangle(r[0], r[1], r[2], r[3], YELLOW); // draw a yellow rectangle
touch_Set(TOUCH_ENABLE); // enable the touch screen
repeat
state := touch_Get(TOUCH_STATUS);// look for any touch activity
x := touch_Get(TOUCH_GETX);
y := touch_Get( TOUCH_GETY);
gfx_MoveTo(150, 0);
print("x: ",x," ");
gfx_MoveTo(150, 15);
print("y: ",y," ");
curStatus := touch_TestArea(r)
if(curStatus != prevStatus)
gfx_MoveTo(0,0);
if(curStatus)
print("touched! ");
else
print("no touch!");
endif
prevStatus := curStatus;
endif
forever
touch_TestBox
The touch_TestArea function creates a test box based on the parameters in rect, and returns true if the last touch resided within the boxed test area.
rect is an array of 4 vars, x1, y1, width, height (using boxed co-ordinates).
Syntax: touch_TestBox(&rect);
| Arguments | Description |
|---|---|
| rect | An array of 4 vars, x1, y1, width, height. |
Returns: TRUE if last touch co-ordinates are within the boxed test area.
Example
var x, y, state;
var r[5] := [30, 30, 100, 50];
var curStatus := 0, prevStatus := 0;
gfx_ScreenMode(LANDSCAPE) ; // change manually if orientation change
gfx_Rectangle(r[0], r[1], r[0]+r[2], r[1]+r[3], YELLOW); // draw a yellow rectangle
touch_Set(TOUCH_ENABLE); // enable the tou ch screen
repeat
state := touch_Get(TOUCH_STATUS); // look for any touch activity
x := touch_Get(TOUCH_GETX);
y := touch_Get(TOUCH_GETY);
gfx_MoveTo(150, 0);
print("x: ",x," ");
gfx_MoveTo(150, 15);
print("y: ",y," ");
curStatus := touch_TestBox(r)
if(curStatus != prevStatus)
gfx_MoveTo(0,0);
if(curStatus)
print("touched! ");
else
print("no touch!");
endif
prevStatus := curStatus;
endif
forever
Widget Functions
widget_Create
Creates a widget control capable of holding count elements and returns a handle for the control.
Syntax: widget_Create(count);
| Arguments | Description |
|---|---|
| count | The number of elements in the widget control. |
Returns: Widget control handle.
Example
widget_Add
Add a widget ram entry "widget" into index "index" of the widget control referenced by "hndl".
Syntax: widget_Add(hndl, index, widget);
| Arguments | Description |
|---|---|
| hndl | Handle of the widget control. |
| index | Index of element in the widget control. |
| widget | Pointer to RAM allocation of the entry widget. |
Returns: None
Example
widget_Delete
Delete widget ram entry "index" from the widget control referenced by "hndl".
Syntax: widget_Delete(hndl, index);
| Arguments | Description |
|---|---|
| hndl | Handle of the widget control. |
| index | Index of element in the widget control. |
Returns:
Example
var hndl;
hndl := widget_Create(1);
widget_Add(hndl, 0, ILed1RAM); // Add entry index 0 for Led1
widget_Delete(hndl, 0); // Remove entry index 0
widget_Realloc
Resizes a widget control "handle" to contain n entries, allowing it to be expanded or condensed. Doing this unnecessarily can lead to RAM fragmentation. It is much better to allocate widget controls once with the desired number of entries.
Syntax: widget_Realloc(handle, n);
| Arguments | Description |
|---|---|
| handle | Handle of the widget control. |
| n | New number of entries. |
Returns: New handle to widget control.
Example
var hndl;
hndl := widget_Create(10);
widget_Add(hndl, 0,ILed1RAM);
widget_Add(hndl, 1, ILed2RAM);
widget_Add(hndl,2 , ILed3RAM);
hndl := widget_Realloc(hndl, 3); // Reallocate widget control
widget_GetWord
Returns specified word (0-14) from a widget entry. Refer to widget control entry offsets. This function requires that a widget control has been created with the widget_Create() function.
Widget Control entry offset
| Predefined Name | Value | Description |
|---|---|---|
| WIDGET_XPOS | 0 | RAM xpos |
| WIDGET_yPOS | 1 | RAM ypos |
| WIDGET_WIDTH | 2 | RAM width, needed for touch. |
| WIDGET_HEIGHT | 3 | RAM height, needed for touch. |
| WIDGET_XOTHER | 4 | RAM xpos 'other' (Non Flash widgets only). |
| WIDGET_LO_WORD | 4 | Flash offset low word (External Flash widgets only). |
| WIDGET_YOTHER | 5 | RAM ypos 'other' (Non Flash widgets only). |
| WIDGET_HI_WORD | 5 | Flash offset high word (Flash widgets only). |
| WIDGET_FLAGS | 6 | RAM Flags. |
| WIDGET_TAG | 7 | RAM tag (user or FORM#). |
| WIDGET_TAG2 | 8 | RAM tag2 (user or object << 8 |
| WIDGET_VAL1 | 9 | RAM current value. |
| WIDGET_DELAY | 10 | Inter frame delay (Flash widgets only). |
| WIDGET_FRAMES | 11 | Number of frames (Flash widgets only). |
Syntax: widget_GetWord(hndl, index, offset);
| Arguments | Description |
|---|---|
| hndl | Handle of the widget control. |
| index | Index of element in the widget control. |
| offset | Offset of the required word in the widget entry. |
Returns: The specified word (0-14) from a widget entry.
Example
#DATA
word Led1Info 5, 30, 103, 56, 0x2965, BLACK, 0xDEFB, 0xF800, 0x5800, 20,30, 10, 20, 1
#END
var Led1 Ram [WIDGET_RAM_SPACE];
func main()
var hndl;
var width;
hndl := widget_Create(1);
widget_Add(hndl, 0, Led1Ram);
gfx_Led(0, Led1Ram, Led1Info);
width := widget_GetWord(hndl, 0, WIDGET_ WIDTH);
print(width); // Print widget width from RAM
repeat
forever
endfunc
widget_Setposition
Set the position of an entry in the widget control. This function requires that a widget control has been created with the widget_Create() function.
Syntax: widget_Setposition(hndl, index, xpos, ypos);
| Arguments | Description |
|---|---|
| hndl | Handle of the widget control. |
| index | Index of element in the widget control. |
| xpos | x-coordinate of position. |
| ypos | y-coordinate of position. |
Returns: True if index was ok and function was successful.
Example
#DATA
word Led1Info 5, 5 , 103, 56, 0x2965, BLACK, 0xDEFB, 0xF800, 0x5800, 20, 30, 10, 20, 1
#END
var Led1Ram [WIDGET_RAM_SPACE];
func main()
var hndl;
hndl := widget_Create(1);
widget_Add(hndl, 0, Led1Ram);
gfx_Led(0, Led1Ram, Led1Info);
pause(2000);
gfx_Cls();
widget_Setposition(hndl, 0, 50, 50); // Set new widget position
gfx_Led(0, Led1Ram, Led1Info);
repeat
forever
endfunc
widget_Enable
Enable an item in a widget control. This function requires that a widget control has been created with the widget_Create() function.
Syntax: widget_Enable(hndl, index);
| Arguments | Description |
|---|---|
| hndl | Handle of the widget control. |
| index | Index of element in the widget control. |
Returns: True if index was ok and function was successful.
Example
#DATA
word IILed1 5, 30, 103, 56, 0x2965, BLACK, 0xDEFB, 0xF800, 0x5800, 20,30, 10, 20, 1
word IILed2 5, 90, 103, 56, 0x2965, BLACK, 0xDEFB, BLUE, 0x000B, 20, 30, 10, 20, 1
#END
var ILed1RAM[WIDGET_RAM_SPACE] ;
var ILed2RAM[WIDGET_RAM_SPACE] ;
func main()
var hndl, i;
hndl := widget_Create(2);
widget_Add(hndl, 0, ILed1RAM);
widget_Add(hndl, 1, ILed2RAM);
repeat
if (i == 0)
widget_Disable(hndl, 0); // Disable LED 0
widget_Enable(hndl, 1); // Enable LED 1
else
widget_Disable(hndl, 1); // Disable LED 1
widget_Enable(hndl, 0); // Enable LED 0
endif
// Draw LED widgets
widget_ClearAttributes(hndl, ALL, WIDGET_F_INITIALISED);
gfx_Led(0, ILed1RAM, IILed1);
gfx_Led(0, ILed2RAM, IILed2);
pause(2000);
gfx_Cls();
i := !(i);
forever
endfunc
widget_Disable
Disable an item in a widget control. This function requires that a widget control has been created with the widget_Create() function.
Syntax: widget_Disable(hndl, index);
| Arguments | Description |
|---|---|
| hndl | Handle of the widget control. |
| index | Index of element in the widget control. |
Returns: True if index was ok and function was successful.
Example: See example in widget_Enable().
widget_SetWord
Set specified word in an image entry. This function requires that a widget control has been created with the widget_Create() function.
| Predefined Name | Value | Description |
|---|---|---|
| WIDGET_XPOS | 0 | RAM xpos |
| WIDGET_yPOS | 1 | RAM ypos |
| WIDGET_WIDTH | 2 | RAM width, needed for touch. |
| WIDGET_HEIGHT | 3 | RAM height, needed for touch. |
| WIDGET_XOTHER | 4 | RAM xpos 'other' (Non Flash widgets only). |
| WIDGET_LO_WORD | 4 | Flash offset low word (External Flash widgets only). |
| WIDGET_YOTHER | 5 | RAM ypos 'other' (Non Flash widgets only). |
| WIDGET_HI_WORD | 5 | Flash offset high word (Flash widgets only). |
| WIDGET_FLAGS | 6 | RAM Flags. |
| WIDGET_TAG | 7 | RAM tag (user or FORM#). |
| WIDGET_TAG2 | 8 | RAM tag2 (user or object << 8 |
| WIDGET_VAL1 | 9 | RAM current value. |
| WIDGET_DELAY | 10 | Inter frame delay (Flash widgets only). |
| WIDGET_FRAMES | 11 | Number of frames (Flash widgets only). |
Syntax: widget_SetWord(hndl, index, offset, value)
| Arguments | Description |
|---|---|
| hndl | Handle of the widget control. |
| index | Index of element in the widget control. |
| offset | Offset of the required word in the widget entry. |
| value | The word to be written to the entry. |
Returns: TRUE if successful, return value usually ignored.
Example
#DATA
word IGauge1 10, 10, 30, 160, 80, 0, 100, 0, 0, 0x18E3, 0x0280, LIME, 0x5280, YELLOW, 0x5000, RED, 51, 36, 0x0
#END
var IGauge1RAM WIDGET_RAM_SPACE
func main()
var hndl;
hndl := widget_Create(1);
widget_Add(hndl, 0, IGauge1RAM);
gfx_Gauge(50, IGauge1RAM , IGauge1);
widget_SetWord(hndl, 0, WIDGET_XPOS, 45);
gfx_Gauge(50, IGauge1RAM , IGauge1);
repeat
forever
endfunc
widget_SetAttributes
This function SETS one or more bits in the widget flags field of a widget control entry. "value" refers to various bits in the widget control entry (see widget attribute flags). A '1' bit in the "value" field SETS the respective bit in the widget flags field of the widget control entry.
Widget attribute flags to be used and maintained by widgets and touch processing:
| WIDGET_F_TOUCH_ENABLE | 0x8000 | Set to disable touch for this image, (default=1 for movie, 0 for image). |
| WIDGET_F_INTERNAL | 0x4000 | Internal use only (force redraw on next write). |
| WIDGET_F_INITIALISED | 0x2000 | Flag when ‘base gauge needle, etc.’ is done |
| WIDGET_F_UNDRAW_ONLY | 0x1000 | Set to prevent draw of new needle. |
| WIDGET_F_INPUT | 0x0800 | Set if this is an input (Used only with the IDE). |
| WIDGET_F_FLASH | 0x0400 | set if this is a flash based widget. |
| WIDGET_F_RESERVED | 0x03c0 | bits 9-6 reserved. |
Syntax: widget_SetAttributes(hndl, index, value);
| Arguments | Description |
|---|---|
| hndl | Handle of the widget control. |
| index | Index of element in the widget control. |
| value | The word to be written to the entry. |
Returns: TRUE if successful, return value usually ignored.
Example
#DATA
word Slider1Info 10, 10, 250, 40, 0, 0, 100, 0x1082, 0x0, 0x7E0, 30, 30, 2, 2, 10, 0x7E0, 5, 0x7E0, FONT3, 0xFFE0, 0x1082, 0x9CD3, GRAD_DOWN, 0x1082, 0x9CD3, GRAD_UP
#END
var Slider1Ram[10];
func main()
var hndl;
hndl := widget_Create(1);
widget_Add(hndl, 0, Slider1Ram);
widget_SetAttributes(hndl, 0, WIDGET_F_TOUCH_ENABLE);
gfx_Slider5(frame, Slider1Ram, Slider1 Info);
repeat
// do something here
forever
endfunc
widget_ClearAttributes
This function CLEARS one or more bits in the widget flags field of an image control entry. "value" refers to various bits in the widget control entry (see widget attribute flags). A '1' bit in the "value" field CLEARS the respective bit in the widget flags field of the image control entry.
Widget attribute flags to be used and maintained by widgets and touch processing:
| WIDGET_F_TOUCH_ENABLE | 0x8000 | Set to disable touch for this image, (default=1 for movie, 0 for image). |
| WIDGET_F_INTERNAL | 0x4000 | Internal use only (force redraw on next write). |
| WIDGET_F_INITIALISED | 0x2000 | Flag when ‘base gauge needle, etc.’ is done |
| WIDGET_F_UNDRAW_ONLY | 0x1000 | Set to prevent draw of new needle. |
| WIDGET_F_INPUT | 0x0800 | Set if this is an input (Used only with the IDE). |
| WIDGET_F_FLASH | 0x0400 | set if this is a flash based widget. |
| WIDGET_F_RESERVED | 0x03c0 | bits 9-6 reserved. |
Syntax: widget_ClearAttributes(hndl, index, value);
| Arguments | Description |
|---|---|
| hndl | Handle of the widget control. |
| index | Index of element in the widget control. |
| value | The word to be written to the entry. |
Returns: TRUE if successful, return value usually ignored.
Example
#DATA
word fLed1Info 5, 5 , 103, 56, 0x2965, BLACK, 0xDEFB, 0xF800, 0x5800, 20, 30, 10, 20, 1
#END
var Led1[WIDGET_RAM_SPACE];
func main()
var hndl;
hndl := widget_Create(10);
widget_Add(hndl, 0, Led1);
gfx_Led(0, Led1, fLed1Info);
pause(2000);
gfx_Cls();
widget_ClearAttributes(hndl, 0, WIDGET_F_INITIALISED);
gfx_Led(0, Led1, fLed1Info);
repeat
// do something here
forever
endfunc
widget_Touched
This function requires that a widget control has been created with the widget_Create() function.
Returns index of the widget touched or returns -1 if no widget was touched.
If index is passed as -1 or ALL the function tests all widgets.
Syntax: widget_Touched(hndl, index);
| Arguments | Description |
|---|---|
| hndl | Handle of the widget control. |
| index | Index of element in the widget control. |
Returns: -1 if image not touched, or returns index.
Example
if(state == TOUCH_PRESSED)
n := widget_Touched(hndl, ALL); //scan widget list, looking for a touch
if(n != 1)
print( n); // print index of widget touched
endif
endif
System Registers Memory
The following tables outline in detail the DIABLO-16 system registers and flags.
| Label | Address DEC |
Address HEX |
Usage |
|---|---|---|---|
| RANDOM_LO | 32 | 0x20 | random number generator LO word |
| RANDOM_HI | 33 | 0x21 | random number generator HI word |
| SYSTEM_TIMER_LO | 34 | 0x22 | 1msec 32-bit free running timer LO word |
| SYSTEM_TIMER_HI | 35 | 0x23 | 1msec 32-bit free running timer HI word |
| TIMER0 | 36 | 0x24 | 1msec user timer 0 |
| TIMER1 | 37 | 0x25 | 1msec user timer 1 |
| TIMER2 | 38 | 0x26 | 1msec user timer 2 |
| TIMER3 | 39 | 0x27 | 1msec user timer 3 |
| TIMER4 | 40 | 0x28 | 1msec user timer 4 |
| TIMER5 | 41 | 0x29 | 1msec user timer 5 |
| TIMER6 | 42 | 0x2A | 1msec user timer 6 |
| TIMER7 | 43 | 0x2B | 1msec user timer 7 |
| SYS_X_MAX | 44 | 0x2C | display hardware X res-1 |
| SYS_Y_MAX | 45 | 0x2D | display hardware Y res-1 |
| GFX_XMAX | 46 | 0x2E | current display width-1 determined by portrait / landscape swapping |
| GFX_YMAX | 47 | 0x2F | current display height-1 determined by portrait / landscape swapping |
| GFX_LEFT | 48 | 0x30 | virtual left point for most recent object |
| GFX_TOP | 49 | 0x31 | virtual top point for most recent object |
| GFX_RIGHT | 50 | 0x32 | virtual right point for most recent object |
| GFX_BOTTOM | 51 | 0x33 | virtual bottom point for most recent object |
| GFX_X1 | 52 | 0x34 | clipped left point for current object |
| GFX_Y1 | 53 | 0x35 | clipped top point for current object |
| GFX_X2 | 54 | 0x36 | clipped right point for current object |
| GFX_Y2 | 55 | 0x37 | clipped bottom point for current object |
| GFX_X_ORG | 56 | 0x38 | current X origin |
| GFX_Y_ORG | 57 | 0x39 | current Y origin |
| GFX_THUMB_PERCENT | 75 | 0x4B | size of slider thumb as percentage |
| GFX_THUMB_BORDER_DARK | 76 | 0x4C | darker shadow of thumb |
| GFX_THUMB_BORDER_LIGHT | 77 | 0x4D | lighter shadow of thumb |
| TOUCH_XMINCAL | 78 | 0x4E | touch calibration value |
| TOUCH_YMINCAL | 79 | 0x4F | touch calibration value |
| TOUCH_XMAXCAL | 80 | 0x50 | touch calibration value |
| TOUCH_YMAXCAL | 81 | 0x51 | touch calibration value |
| IMG_WIDTH | 82 | 0x52 | width of currently loaded image |
| IMG_HEIGHT | 83 | 0x53 | height of currently loaded image |
| IMG_FRAME_DELAY | 84 | 0x54 | if image else inter frame delay for movie |
| IMG_FLAGS | 85 | 0x55 | bit 4 determines colour mode other bits reserved |
| IMG_FRAME_COUNT | 86 | 0x56 | count of frames in a movie |
| IMG_PIXEL_COUNT_LO | 87 | 0x57 | count of pixels in the current frame |
| IMG_PIXEL_COUNT_HI | 88 | 0x58 | count of pixels in the current frame |
| IMG_CURRENT_FRAME | 89 | 0x59 | last frame shown |
| MEDIA_ADDRESS_LO | 90 | 0x5A | micro-SD byte address LO |
| MEDIA_ADDRESS_HI | 91 | 0x5B | micro-SD byte address HI |
| MEDIA_SECTOR_LO | 92 | 0x5C | micro-SD sector address LO |
| MEDIA_SECTOR_HI | 93 | 0x5D | micro-SD sector address HI |
| MEDIA_SECTOR_COUNT | 94 | 0x5E | micro-SD number of bytes remaining in sector |
| TEXT_XPOS | 95 | 0x5F | text current x pixel position |
| TEXT_YPOS | 96 | 0x60 | text current y pixel position |
| TEXT_MARGIN | 97 | 0x61 | text left pixel pos for carriage return |
| TXT_FONT_ID | 98 | 0x62 | font type, 0 = system font, else pointer to user font" |
| TXT_FONT_MAX | 99 | 0x63 | max number of chars in font |
| TXT_FONT_OFFSET | 100 | 0x64 | starting offset (normally 0x20) |
| TXT_FONT_WIDTH | 101 | 0x65 | current font width |
| TXT_FONT_HEIGHT | 102 | 0x66 | Current font height |
| GFX_TOUCH_REGION_X1 | 103 | 0x67 | touch capture region |
| GFX_TOUCH_REGION_Y | 104 | 0x68 | touch capture region |
| GFX_TOUCH_REGION_X2 | 105 | 0x69 | touch capture region |
| GFX_TOUCH_REGION_Y2 | 106 | 0x6A | touch capture region |
| GFX_CLIP_LEFT_VAL | 107 | 0x6B | left clipping point (set with gfx_ClipWindow(...) |
| GFX_CLIP_TOP_VAL | 108 | 0x6C | top clipping point (set with gfx_ClipWindow(...) |
| GFX_CLIP_RIGHT_VAL | 109 | 0x6D | right clipping point (set with gfx_ClipWindow(...) |
| GFX_CLIP_BOTTOM_VAL | 110 | 0x6E | bottom clipping point (set with gfx_ClipWindow(...) |
| GFX_CLIP_LEFT | 111 | 0x6F | current clip value (reads full size if clipping turned off) |
| GFX_CLIP_TOP | 112 | 0x70 | current clip value (reads full size if clipping turned off) |
| GFX_CLIP_RIGHT | 113 | 0x71 | current clip value (reads full size if clipping turned off) |
| GFX_CLIP_BOTTOM | 114 | 0x72 | current clip value (reads full size if clipping turned off) |
| GRAM_PIXEL_COUNT_LO | 115 | 0x73 | LO word of count of pixels in the set GRAM area |
| GRAM_PIXEL_COUNT_HI | 116 | 0x74 | HI word of count of pixels in the set GRAM area |
| TOUCH_RAW_X | 117 | 0x75 | 12 bit raw A2D X value from touch screen |
| TOUCH_RAW_Y | 118 | 0x76 | 12 bit raw A2D Y value from touch screen |
| GFX_LAST_CHAR_WIDTH | 119 | 0x77 | calculated char width from last call to charWidth function |
| GFX_LAST_CHAR_HEIGHT | 120 | 0x78 | calculated height from last call to charHeight function |
| GFX_LAST_STR_WIDTH | 121 | 0x79 | calculated width from last call to strWidth function |
| GFX_LAST_STR_HEIGHT | 122 | 0x7A | calculated height from last call to strHeight function |
| PIN_COUNTER_PA4 | 123 | 0x7B | pin counter for PA4 |
| PIN_COUNTER_PA5 | 124 | 0x7C | pin counter for PA5 |
| PIN_COUNTER_PA6 | 125 | 0x7D | pin counter for PA6 |
| PIN_COUNTER_PA7 | 126 | 0x7E | pin counter for PA7 |
| PIN_COUNTER_PA8 | 127 | 0x7F | pin counter for PA8 |
| PIN_COUNTER_PA9 | 128 | 0x80 | pin counter for PA9 |
| PIN_EVENT_PA4 | 129 | 0x81 | pin counter rollover event for PA4 |
| PIN_EVENT_PA5 | 130 | 0x82 | pin counter rollover event for PA5 |
| PIN_EVENT_PA6 | 131 | 0x83 | pin counter rollover event for PA6 |
| PIN_EVENT_PA7 | 132 | 0x84 | pin counter rollover event for PA7 |
| PIN_EVENT_PA8 | 133 | 0x85 | pin counter rollover event for PA8 |
| PIN_EVENT_PA9 | 134 | 0x86 | pin counter rollover event for PA9 |
| QEN1_COUNTER_LO | 135 | 0x87 | quadrature encoder #1 counter LO |
| QEN1_COUNTER_HI | 136 | 0x88 | quadrature encoder #1 counter HI |
| QEN1_DELTA | 137 | 0x89 | quadrature encoder #1 delta count |
| QEN2_COUNTER_LO | 138 | 0x8A | quadrature encoder #2 counter LO |
| QEN2_COUNTER_HI | 139 | 0x8B | quadrature encoder #2 counter HI |
| QEN2_DELTA | 140 | 0x8C | quadrature encoder #2 delta count |
| FALSE_REASON | 141 | 0x8D | explanation 'false' results, currently only for flash_ functions" |
Runtime Errors
| Error No. | Error Meaning | Notes |
|---|---|---|
| 1 | Failed to receive 'L' during loading process from Workshop | Not in DIABLO-16 |
| 2 | Did not receive valid header info from Workshop | Unexpected error during Program load |
| 3 | Header size does not match loader info | Not in DIABLO-16 |
| 4 | Could not allocate enough memory for program | Unexpected error during Program load |
| 5 | Loader checksum error | Unexpected error during Program load |
| 6 | Did not receive header prior to 'L' command | Not in DIABLO-16 |
| 7 | Header size entry does not match loader value | Unexpected error during Program load |
| 8 | Failed to load program from FLASH | Internal |
| 9 | Could not allocate code segment | Not in DIABLO-16 |
| 10 | Could not load function file from disk | File on disk possibly corrupted |
| 11 | Bad header in program file | File on disk possibly corrupted |
| 12 | Header in program file differs from file size | File on disk possibly corrupted |
| 13 | Could not allocate global memory for program file | Program probably too large |
| 14 | Program File checksum error | File on disk possibly corrupted |
| 15 | EVE Stack Overflow | Infinitely recursive program or insufficient Stack Size |
| 16 | Unsupported PmmC function | Program error or .fnc file mismatch |
| 17 | Illegal COM0 Event Function address | Program error |
| 18 | Illegal COM1, COM2 or COM3 Event Function address | Program error |
| 19 | Bad txt_Set(...) command number | Program error |
| 20 | Bad gfx_Get(...) command number | Program error |
| 21 | Bad gfx_Set(...) command number | Program error |
| 22 | Bad address for peekW or pokeW | Program error |
| 23 | Bad timer number for Timer function | Program error |
| 24 | Bad Event for sys_SetTimerEvent(...) | Program error |
| 25 | Flash Write Verify Failed | Internal |
| 26 | Bad or missing uSD Card | Program specifies #MODE of 'save to disk' but no valid disk can be found |
| 27 | Illegal Event Function Address | Program error |
| 28 | Not a pre-defined baud rate | Program error in setbaud() |
| 29 | Target of flash_Exec cannot have globals or privates | Program error |
| 30 | Inherent widgets are used in this program and have not been loaded into Flash Bank 5. Use the utility in Workshop to load them. | User error |
Revision History
Document Revision
| Revision | Date | Description |
|---|---|---|
| 1.0 | 22/07/2013 | First Release |
| 1.1 | 22/10/2013 | Added new Functions disp_Disconnect(), disp_Init() and sys_DeepSleep(). Fix spelling mistake in file_LoadImageControl |
| 1.2 | 07/11/2013 | Fixed gfx_Contrast description as it contained PICASO information, other minor non-fucntional related fixes |
| 1.3 | 23/12/2013 | Added com_TXblock, com1_TXblock, com2_TXblock, com3_TXblock, com_RXblock, com1_RXblock, com2_RXblock and com3_RXblock, com_Mode, crc_CSUM_8, crc_16, crc_MODBUS and crc_CCITT for support of CRCs, non 8N1 mode and block transmit and receive. Added spiflash_SIG, spiflash_ID, spiflash_BulkErase, spiflash_BlockErase, spiflash_SetAdd, spiflash_Read, spiflash_Write, spiflash_Image, spiflash_PutC, spiflash_GetC, spiflash_PutW, spiflash_GetW, spiflash_PutS, spiflash_GetS spiflash_LoadFunction, spiflash_Run, spiflash_Exec, spiflash_LoadImageControl, spiflash_PlayWAV for support if SPI Flash memory. Fixed error return codes in file_PlayWAV and added missing code. |
| 1.4 | 06/01/2014 | Added bus_Read8 and bus_Write8 |
| 1.5 | 25/02/2014 | Added Mode PWM_BINARY and usage notes. Added notes to spiflash initialization. Added disp_BlitPixelsFromCOMx. Added special baud rates to com_SetBaud(). Added spix_ReadBlock and spix_Writeblock. All these additions apply to PmmC 1.1 and later. |
| 1.6 | 21/03/2014 | Documented v1.1 PmmC’s changes to files opened in append mode. Added new I2C options. |
| 1.7 | 07/07/2014 | Documented V1.3 PmmC’s new snd_Freq(), sys_GetDateVar(), sys_GetTimeVar() and pin_PulseoutCount() functions. |
| 1.8 | 04/08/2014 | Added keywords Backlight and Brightness to assist searchers finding the contrast setting. Fixed format of date in sys_GetDate function. |
| 1.9 | 16/09/2014 | Documented V1.5 PmmC’s new txt_FontBank, putnumXY, flt_PRINTxy, file_Rename, file_Setdate, NP_Write and OW_* functions. Fixed error in memory size used for file_Mount. Added detail to set_Clipping(). |
| 1.10 | 22/12/2014 | Updated information for file_LoadImageControl mode 2. Updated control block size in file_Mount. Added information about source of uSD based font in txt_FontID. Added information about the use of TRANSPARENCY. Fixed spelling of snd_Freq() in example. Added information about the SPIx_Write and SPIx_Read operations. Clarified information about events. |
| 1.11 | 11/02/2015 | Added more information about interrupts and NP_Write. Added notes to comx_TXbufferHold. Fixed case of pwm_Init() |
| 1.12 | 06/03/2015 | Modification to Analog Input read rates |
| 1.13 | 07/05/2015 | Fixed I2Cx_Write return code information. Clarified str_Length and bus_SetChangeInterrupt examples. Fixed syntax example for usub_3232. Added ‘page’ options to gfx_Set for uLCD-43D* displays. |
| 1.14 | 14/07/2015 | Fixed FontIDs for deja fonts. Updated udiv_3232 sample. Improved return description for str_Match and str_MatchI. Added str_Printf to ‘to’ function. Added runtime Error 29. Improved examples for str_Cat, str_CatN, str_Find, str_FindI, str_Match, str_MatchI and file_Exec. |
| 1.15 | 06/10/2015 | Corrected flt_POW syntax typo. Corrected incurred information relating to PA14 and PA15. Improvements to a few pin_ and bus_ function examples. |
| 1.16 | 08/02/2016 | Add information about TXT_MARGIN to txt_MoveCursor() and gfx_MoveTo() functions Add I_TOUCH_DISABLE detail to img_SetAttributes() and img_ClearAttributes() functions Fix gfx_PieSlice() documentation Add comx_TXbufferBrk() and comx_InitBrk() functions in support of sending and receiving BREAK characters Updated serin() and serout() as appropriate Added PA14, PA15 to pins that can be used with various functions Added new options to PWM_Init() function. |
| 2.0 | 06/05/2017 | Updated formatting and contents |
| 2.1 | 21/03/2019 | Updated formatting. Improved touch_Get(). Fixed inverted states relating to BOLD, ITALIC, TEXT INVERSE, TEXT ITALIC in txt_Set() Improved explanation of pointers in file_Write and file_Read Putnum alignment improved putstr explanation improved. sys_Sleep() and sys_DeepSleep() minor description improvements. |
| 2.2 | 19/08/2019 | Added Note1 information regarding PA12/PA13 GPIO, for clarity. No change in original functionality. Fixed a few historical minor example spelling mistakes/typo’s. |
| 2.3 | 16/07/2020 | Lots of additions for gfx_, widget_, file_, img_, flash_ and spiflash_ functions, relating to new features such as new widgets and flash memory. Additional information for spi_Init and SPIx_Init functions added |
| 2.4 | 07/08/2020 | Typo fix on gfx_PointWithinRectangle &recta argument for last 2 components of the array |
| 2.5 | 08/10/2020 | Updated DISPLAY_PAGE, READ_PAGE and WRITE_PAGE information, to reflect differences between SSD1961 and SSD1963 Driver IC’s on 4.3” products. |
| 2.6 | 13/10/2020 | Removal of incorrect Note from crc_CCITT function |
| 2.7 | 08/12/2020 | Added note to img_File functions regarding GCF and Flash only. Fixed incorrect information on mem_Realloc function return, and ptr syntax. |
| 2.8 | 21/12/2020 | Added baud rate formula for calculating actual baud rate and error %. See setbaud() and com_SetBaud() functions. |
| 2.9 | 11/01/2021 | Updated PWM_Init with the PWM_625HZ option being corrected for what it produces |
| 2.10 | 01/02/2021 | Added 200Hz, 500Hz and 1KHz PWM options into the pwm_Init() function. Changed wording for ucmp_3232() to read ‘variable’ instead of ‘constant’ |
| 2.11 | 31/05/2021 | Updated note for Word Pointer, for file_GetS string argument, and file_PutS souce argument. |
| 2.12 | 14/07/2021 | Updated the ‘value’ description for gfx_LedDigits |
| 2.13 | 19/01/2022 | Fixed mistake in example of flash_Copy |
| 2.14 | 31/01/2022 | Fixed typo in example for pin_Read having parameters around the wrong way for pin_Set function. |
| 2.15 | 05/07/2023 | Removed unreleased file_CheckUpdate function |
| 3.0 | 03/11/2023 | Modified for web-based documentation |
| 3.1 | 17/06/2024 | Fixed example for pin_PulseoutCount function |